How to Root MyPhone My33 and Install CWM recovery
How to Root MyPhone My33 and Install CWM recovery
Finally we made Rooting Procedure and Flashing CWM recovery for MYphone My33. In this tutorial I have 3 method for Rooting. It's up to you of what you prefer. Just try the first method if not work proceed the 2nd and 3rd method.
Warning! Rooting can void your warranty!. DO it at Your own risk!
FIRST METHOD
(HIGH RISK)Rooting via Recovery Mode only
Pros: No need PC. Can root via your mobile phone only!
Cons: This method is high risk and not fully tested
Requirements:
My33
Download:
Procedure:
1. Download Android.com-root.zip and put in sdcard.
2. Go to recovery mode: (Reboot your phone and hold Power Vol up +Vol down + Power)
Then Vol up once Recovery mode appear
3.Tap install via zip then locate Android.com-root.zip in sdcard then Install.
4. Reboot.
SECOND METHOD
(MED RISK)Rooting via Fastboot
Download all:
Pros: Medium Risk only.
Cons: Wrong command can't work unlocking.
Can delete all your files. you need to back up first.
Can delete all your files. you need to back up first.
Download all:
1. Adb drivers
(run exe file to load needed drivers)
2. Vcom drivers: .. (install sa pc)
(extract the file then copy to desktop)
4.CWM
4.CWM
5. SuperSu.zip
(copy this to your root directory of sdcard(sa labas lang ng sdcard wag sa mga folder ok)
PROCEDURE:
1) Unlock bootloader:
1.1) Boot for first time your device. I recommend to NOT register/login/add Wifi/add accounts/etc., because the unlock process DELETES all your data in the device. So to go more fast, skip all, and go directly to SETTINGS. In section ABOUT DEVICE, enable the developer options with eight time picks over “Build number”. Then in SETTINGS/DEVELOPER OPTIONS, enable the option “OEM unlocking”. Then power off.
1.2) Boot your device to Fastboot mode (hold power button and vol up) choose fastboot mode or boot into bootloader), then connect your phone to PC via USB cable. Open folder fastboot from minimal adb fastboot tool(run as administrator)
Click Run me.bat
Execute in your computer the command “fastboot oem unlock”, say YES with “vol+” and “power” buttons. Then select reboot. This ERASES completely your device (factory restore), but the bootloader will be UNLOCKED! Two reboots needed.
2) Install custom Recovery:
2.1) Download CWM recovery
2.2) Boot in the BOOTLOADER mode. Then execute command “fastboot flash recovery recovery.img”;
3) Rooting:
3.1) Copy last beta of SuperSU v2.52 to your SD Card (file BETA-SuperSU-v2.52.zip).
Click Here
Click Here
3.2) Boot in the CWM with “Vol+” and “Power” buttons.
Note: CWM not toucheable to navigate use Vol up and down button (down and up) and Power button (OK)3.3) Install ZIP from external-sd card.
3.4) Reboot and don’t select “fix root”, only “Yes”.
3.5) After boot, start SuperSU and configure it. Root done!
THIRD METHOD
(LOW RISK)
Rooting via PC and Flash via SPFT
Pros: This tested 100% by our member in My33 Group
Can't delete file. you don't need to backup.
Can't delete file. you don't need to backup.
Cons: USE PC
Wrong flashing can brick your phone!
CWM is still no touchable. Use vol and power button to navigate.
PC
USB Cable
Download Links:
Mediatek VCOM Drivers:
Mediatek VCOM Drivers:
SP Flash Tool:
My 33 CWM & Scatter File:
BETA-SuperSU-v2.52.zip:
Instructions
1. Download all necessary files and Enable USB Debugging mode in your phone..
2. Install Drivers USB_VCOM_Driver.rar

In Device Manager Right click on PC name(Right Side) and then click on Add legacy hardware as shown in image below.

Now in Add Hardware Wizard click on Next » Install the Hardware that i manually select from a list (Advanced) » Show All Devices » Next » Have a Disk, Now select the any inf file from where you extracted the downloaded VCOM driver package.
Now Click on Next and select Install this driver software anyway and wait for finishing the process.
After installation is finished then Restart your computer, That's it.
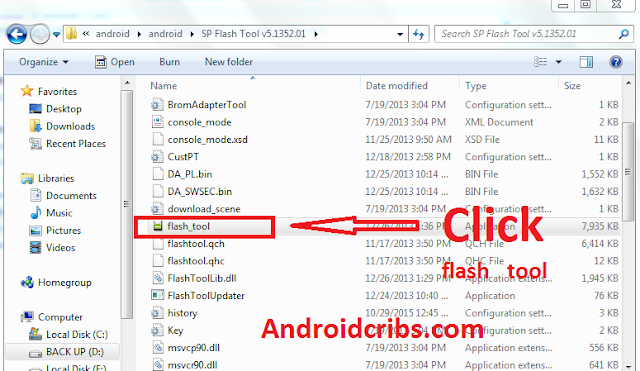
3. Extract SPFlash tool and my33-cwm-recovery+scatter.zip
4. Copy the BETA-SuperSU-v2.52.zip to your phone.
6. Click Scatter-loading and browse for the scatter file(included in the My33 CWM RECOVERY+Scatter file) (MT6592_Android_scatter)
8. Click Download.
9. Turn off your phone, connect your phone to the PC and wait for the flashing to commence.
11. Important: Disconnect your phone from the computer, press and hold Vol Up + Power.
12. Boot menu will show, select Recovery.
From the custom recovery (CWM), it is recommended to backup your phone first, before rooting.
To root:
1. Reboot your phone then press and hold Vol Up + Power On
4. Enjoy your rooted MY33.
Then download Root checker in Playstore to verified.
NOTE: After rooting.
Download and Install Root Explorer/ES File Explorer and install.
Go to root/system/ and rename recovery-from-boot.p to recovery-from-boot.p.bak.
Disclaimer:
Please give proper credits in my blog and Do not reupload, Instead share this link! Thank You!Credits:
Dess LAgnirac (tester 1)
Budz Navz (tester 2)
Rane Forteza (tester 3)
Sam toledanes for screeenshot in Cwm
Sam toledanes for screeenshot in Cwm
My 33 Group
Carliv
XDA
Chainfire
Labels: CWM Recovery, Myphone, Myphone My33, rooting


0 Comments:
Post a Comment
Subscribe to Post Comments [Atom]
<< Home