PC Synchronization : Be cautious
Last night, during a PC sync operation, my w810i handset lost all it's data - Contacts, Notes, Calendar et all. [ Read it in details here. ] And it was all my fault. I didn't check my sync manager options which caused all the nuisance.
Data loss is the biggest horror, worst nightmare that a techie or any person today can face. I faced it twice and and am very upset about it now. 'Coz both time, it was all my fault. Anyway, I'm writing this post so that others don't fall pray to similar mistakes. Learn from my mistakes.
This post gives a detail insight into the Sync Manager activity of the Sony Ericsson w810i handset. Guess all Sony Ericsson models have similar or same process. And though other brands' handset might not have similar interfaces, all must be having similar options. So, follow it closely to be on the safe side of data security.
To synchronize your cell data with your PC, U need to connect your cell to your PC with the USB cable provided with your handset. Once you've done that, U'll get an option on your cell screen asking whether you want it to switch to 'File Transfer' mode or remain in 'Phone Mode'. Select the 2nd option. It will prepare your cell for communication with the PC. A confirmation will be displayed on your cell screen.
[ Click the images below to open a fullsize clear image in a new window ]
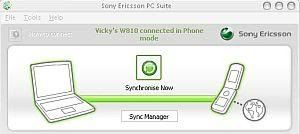 <- Pic 1
Launch the Sony Ericsson PC Suite application on your PC. [ I'm assuming U've already installed it on your PC from the installation CD provided with your handset. ] The application looks like Pic 1. DON'T click the 'Synchronise Now' button. That might just cost you all your data.
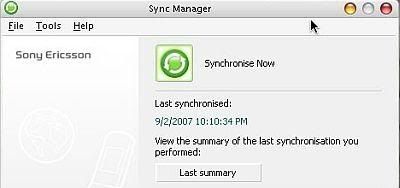
Pic 2 ->
Click the 'Sync Manager' button just below that. This will open the 'Sync Manager' in a popup window [pic 2]. Click 'Settings...' button on this.
Data loss is the biggest horror, worst nightmare that a techie or any person today can face. I faced it twice and and am very upset about it now. 'Coz both time, it was all my fault. Anyway, I'm writing this post so that others don't fall pray to similar mistakes. Learn from my mistakes.
This post gives a detail insight into the Sync Manager activity of the Sony Ericsson w810i handset. Guess all Sony Ericsson models have similar or same process. And though other brands' handset might not have similar interfaces, all must be having similar options. So, follow it closely to be on the safe side of data security.
To synchronize your cell data with your PC, U need to connect your cell to your PC with the USB cable provided with your handset. Once you've done that, U'll get an option on your cell screen asking whether you want it to switch to 'File Transfer' mode or remain in 'Phone Mode'. Select the 2nd option. It will prepare your cell for communication with the PC. A confirmation will be displayed on your cell screen.
 <- Pic 1
 Launch the Sony Ericsson PC Suite application on your PC. [ I'm assuming U've already installed it on your PC from the installation CD provided with your handset. ] The application looks like Pic 1. DON'T click the 'Synchronise Now' button. That might just cost you all your data.
Pic 2 ->
Click the 'Sync Manager' button just below that. This will open the 'Sync Manager' in a popup window [pic 2]. Click 'Settings...' button on this.

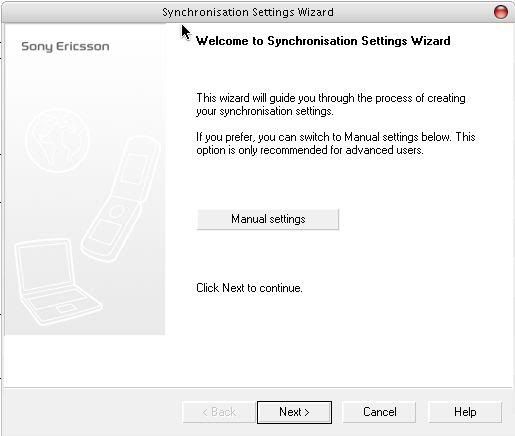
Pic 4 ->
Another window opens [pic 3] which have all the settings that will be used for the synchronization. If your window is different than that shown in pic3, chances are that it is in Wizard mode as shown in Pic4. You'll have lesser control over this one. So, click 'Manual Settings' button on this window to get the 'Settings...' window in Manual mode as in Pic3.
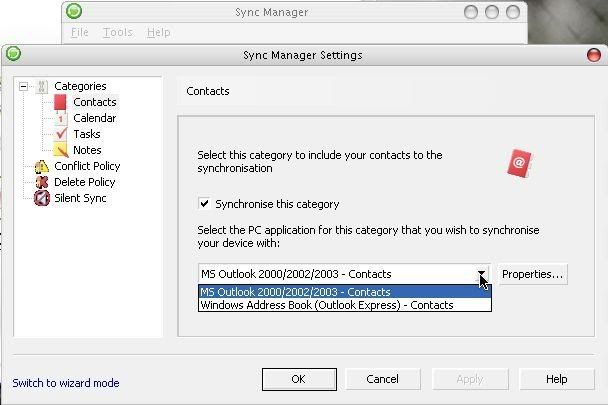 <- Pic 5
Here, 'categories' lists the 4 things that U can synchronise with your PC; namely - Contacts, Calendar, Tasks and Notes. Uncheck the 'Synchronise this category' box for anything that U don't want to sync. [Check Pic5]
Pic 6 -> below
Now click the 'Conflict Policy' on the left pane as shown in pic6. This is one of the main settings that will control the data on your cell and PC. Make a mistake here and U might overwrite your modified / updated data with an old outdated record. Selection on this page should be based on which device do U use for constantly updating your data.
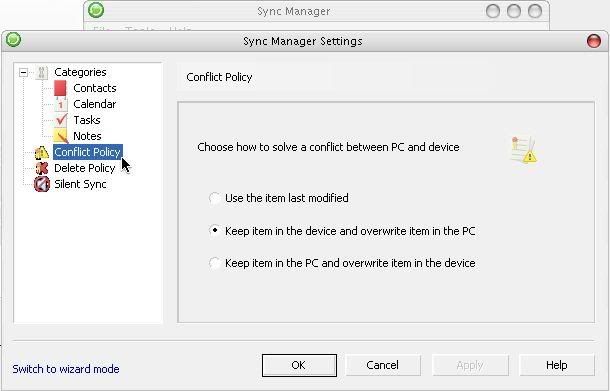 Case 1 : As and when any of your contacts change their number, U save the changes in your mobile handset. So, your mobile has latest data while data saved in PC outlook during last sync is outdated. In such a case, select the 'Keep item in the device and overwrite item in the PC' option. This will update the outdated data in your PC with the latest data on your handset.
Case 2 : You perform all your work online and make all the changes in your computer - like contact info updating, Notes and calendar addition etc. So, your computer has all the latest data. In such a case, select the 'Keep item in the PC and overwrite item in the device' option. This will update the outdated data in your handset with the latest data on your computer.
Case 3 : Or you might have mix of updated and outdated data on both your handheld cell and PC. For example, you have updated contact info on your cell while updated calendar info on your PC. In such a case, select the 'Use the item last modified' option. This will compare individual data records on your handset with its counterpart in PC, and whichever is modified last is used, the other record being overwritten with this one. Thus both the cell and PC will have latest updated data.
Make the selection wisely. If you're not sure, it's always a bit safe to 'Use the item last modified' option.
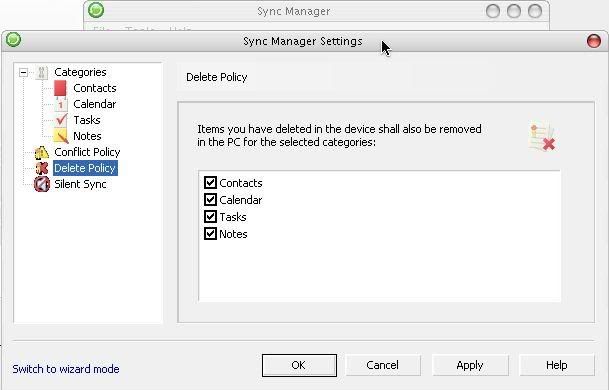 <- Pic 7
Now click the 'Delete Policy' on the left pane, as hown in pic7. This controls data from which category should be deleted from your PC, if they are deleted on your cell. By default, all four categories are selected. So, do check this page to save your data. Uncheck any category whose data you don't want to be deleted from your PC.
Click 'OK' to get back to the 'Sync Manager' window of pic2. Now you are ready to click the 'Synchronise Now' button. This will start the process in a new window.
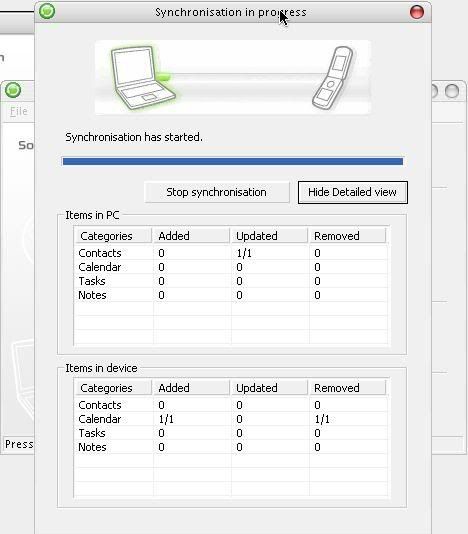
Pic 8 ->
Click the 'Detailed View' on this window to get the progress details as shown in Pic8. Once the sync is over, you'll get a report stating what are all the changes made, as in Pic9. Click on each icon on the left pane to see individual changes made in each category. If you have taken all the proper precautions and followed the directions stated above, both your cell and PC should have the latest data now.
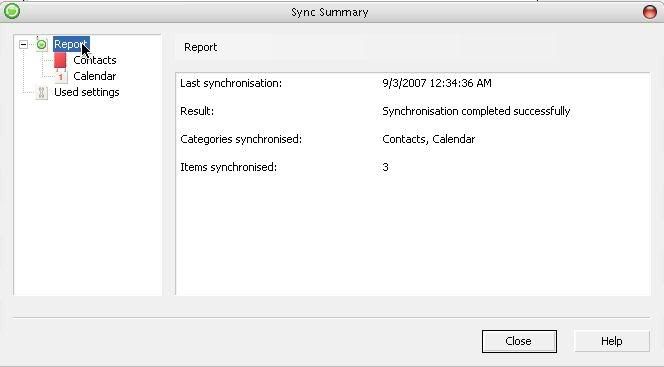
<- Pic 9
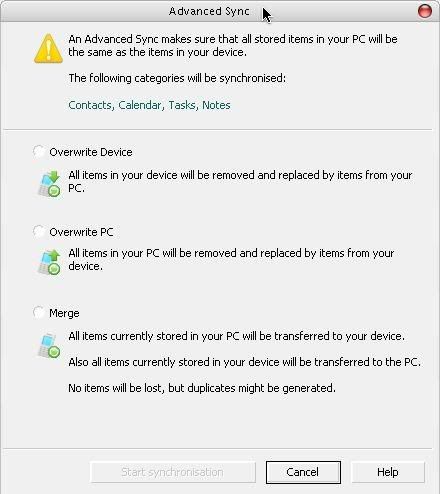
Pic 10 ->
For any reason, if you think that there's some error in the data, in cell or in PC, U can use the 'Advanced Sync' option. Check Pic2. This will open the window as in Pic10. There are 3 options here.
- Overwrite Device : will replace all items on your cell with items on your PC,
- Overwrite PC : will do just the opposite,
- Merge : will copy all data from cell to PC and vice versa.
This 'Advanced Sync' option is helpful in few lucky cases. Don't count on it too much. For, if your data is deleted during sync operation due to wrong settings, there's no way you can get it back.
That is all I had to share on Synchronisation. Best policy is to take regular backups. Once you've successfully synced your cell and data, take a backup of your outlook.pst file. And you can take a backup of your contact details in SIM card also, so that your memory card gets corrupted due to any reason, you have a backup.
Take Care.
Labels: Guide
posted by kjnb @ September 02, 2007
0 Comments
![]()

0 Comments:
Post a Comment
Subscribe to Post Comments [Atom]
<< Home