Friday, October 31, 2014

Actualizare de firmware pentru tableta Evolio X8


Descarca actualizarea de firmware stock de aici, aici sau aici.
Vezi mai jos instructiuni pentru a face update-ul.

Nume arhiva: update_X8_Fusion_pentru_conexiune_bluetooth
Dimensiune arhiva: 268 MB
Nume fisier update: update.img
Platforma: Rockchip 3188
Versiune boot: 1.24
Versiune firmware:  4.1.01
Driver: RK Driver Assistant v4.1
Mod de instalare: cu Rockchip Batch Tool v1.7


Labels: , , , ,

How to Root ASUS Fonepad 7 FE 170CG


This article will teach you to root your ASUS Fonepad 7 FE 170CG

Resources:
Instructions:
  1. Download Resources above and Install Intel USB Driver for Android Devices (filename: IntelAndroidDrvSetup1.1.5 .exe)
  2. Activate USB Debugging (Go to Settings > About >Software Information >tap 7x build number) back to Settings>Developer Options>Tick USB Debugging
  3. Connect Asus Fonepad 7 to PC/Laptop, and Click Always allow to this computer
  4.  Go to Root Resources Folder and Open as Administrator RootGenius.exe
  5.  Open Task Manager, and Find  shuame_helper.exe and press Right Click>find Location or you can open cmd andy type ECHO %Temp%
  6.  Find Superuser Folder and Delete it, and Copy Superuser folder from Resources above and Paste there.
  7.  Back to RootGenius and Press Root Button
  8.  Wait until Finish, Be patient
  9. After Completed install SuperUser.apk from resources folder.
DWYOR
 

Labels: , ,

EVOLIO X10 primește update la Android 4.4 KitKat


Posesorii tabletelor X10 își pot face singuri acest update, urmând instrucțiunile prezentate mai jos. Prin acest upgrade tableta va avea o interfață mai prietenoasă, cu icon-uri noi, sistem de widget-uri îmbunătățit și o tranziție mai fluentă între ecrane. Consumul de memorie și de baterie al tabletei va fi diminuat în comparație cu versiunea Android 4.2, iar sistemul va permite multitasking mai rapid, cloud printing și smart control.

Descarca actualizarea la Android KitKat de aici, aici sau aici.

Nume arhiva: Update_Android_4.4_KitKate_-_Evolio_X10
Dimensiune arhiva: 285 MB
Nume fisier update: update.img
Platforma: Rockchip 3188
Versiune boot: 2.10
Versiune firmware:  4.4.02
Driver: RK Driver Assistant v4.1
Mod de instalare: cu Rockchip Batch Tool v1.7


Labels: , , ,

Thursday, October 30, 2014

Lenovo S820 Update to the Latest ROW Firmware S820_S221 4Gb and 8Gb

Lenovo S820 Update to the Latest ROW Firmware S820_S221 4Gb and 8Gb - This guide can be use to update Lenovo S820 4Gb or 8Gb with ROW version firmware. This is the latest update can be found on the net also can be obtain with OTA on S820_S220 ROW version firmware. This guide will show you how to update your device using flash tool method, this method don't required internet connection but it lot safer if you use OTA update. Even this guide for Lenovo S820, it also has possibility to brick your device and make you lost your IMEI or data, so please do backup preparations first before following this guide.

Disclaimer :
This guide for educational purpose only, We not responsible if your device bricked after following this tutorial.  (DWYOR), Please prepare everything before start following this guide like backup your data, applications, etc this guide has possibility to brick your device. 
For device produce in 2014 you must download this preloader 2014 , extract it to ROM folder and remove the checksum.ini file
Lenovo S820 Update to the Latest ROW Firmware S820_S220 4GB and 8Gb

ROM Descriptions :
  • Build Number : S820_ROW_S221_140730
  • Date :  30-07-2014
  • OS : Android 4.4.2 KitKat
  • Language : Russian , Ukrainian, English, Arabic, Spanish, French, Chinese, Vietnamese, Indonesian, Malaysian, Thai
  • Google Applications : Include
  • ROOT : No
Downloads :
  • S820_ROW_S221_4GB_140730 715 Mb, contains all images file to upgrade your Lenovo S820 to the latest firmware, only for 4Gb
  • S820_ROW_S221_8GB_140730 ↦ 710 Mb, contains all images file to upgrade your Lenovo S820 to the latest firmware, only for 8Gb
  • USB VCOM Driver  Install this driver first on your computer, Turn off your device and remove the battery, using USB cable connect your device while look at My Computer  Manage  Device Manager there will be MTK65xx Preloader Devices show up for 5 second than disappeared, before disappeared right click on it and select Update Driver Software point it to USB VCOM Driver extracted folder. When it finish disconnect and connect again there will be Mediatek PreLoader USB VCOM Port on your device manager.
    Lenovo S820 Update to the Latest ROW Firmware S820_S221 4Gb and 8Gb

  • SP Flash Tool v5.1352 this is optional download, flash tool already include on ROM download.
Lenovo S820 Update to the Latest ROW Firmware S820_S221 4Gb and 8Gb
  1. Download all required files to upgrade your Lenovo S820, first please make sure that USB VCOM driver is completely installed on your computer, without it flash tool will not recognize any device connected.
  2. Extract downloaded ROM, you will got 2 folders target_bin and flash_tool folder. Go to falsh_tool  folder and run flash_tool.exe, if you are running windows 7 or later please run it with administrator privilege.
  3. On the flash tool, go to Options ↦ Option ↦ Download make sure DA DL All with Checksum options already checked, if not please check this option.
    Lenovo S820 Update to the Latest ROW Firmware S820_S221 4Gb and 8Gb

  4. Press [x] to close and back to flash tool, click Scatter-Loading button and point it to target_bin/MT6589_Android_scatter_emmc.txt this action will load all images file on the target_bin to flash tool, change Download Only on download option (2) become Firmware Upgrade.
    Lenovo S820 Update to the Latest ROW Firmware S820_S221 4Gb and 8Gb

  5. Finish configure flash tools, press Download button or hit CTRL+D. Flash tool will begin to initialize and become stand by mode, waiting to connect with your device.
  6. Turn off your device and remove the battery, connect your device when you are ready. If USB VCOM driver installed properly then flash tool will immediately recognize your device and begin to start flashing process. Flashing process will take 5-6 minutes to finish, When you see there is GREEN CIRCLE on the middle of flash tool that mean you flashing process already finish and you can disconnect your device.
    Lenovo S820 Update to the Latest ROW Firmware S820_S221 4Gb and 8Gb

  7. Done, you can disconnect your device and try to boot to your home screen. Confirm that you already success update your Lenovo S820 with the latest version, go to System Settings ↦ About Phone and make sure it has same version with the downloaded ROM.
That it, a guide how to update Lenovo S820 with the latest version ROW firmware, You can leave any comments if you found any problems regarding this guide and please be specific about your problem so i can help you to solve it.

Labels: , ,

Shred It! MOD (Unlimited Money) For Android

Shred It! MOD (Unlimited Money) For Android


ตัวเกม + ไฟล์เกม   Shred It! MOD (Unlimited Money) For Android

DATA  ลงใน SDCard/Android/Obb/ 

Labels:

Reckless Racing 3 MOD (Unlimited Money) For Android

Reckless Racing 3 MOD (Unlimited Money) For Android


ตัวเกม + ไฟล์เกม  


DATA ลงใน SDCard/Android/Obb/


Labels:

Grand Theft Auto San Andreas 1.06 For Android

Grand Theft Auto San Andreas 1.06 For Android


ตัวเกม + ไฟล์เกม   Grand Theft Auto San Andreas 1.06 For Android

DATA  ลงใน   SDCard/Android/Obb/

Labels:

Wednesday, October 29, 2014

HOW TO FIX INVALID IMEI 3 METHODS by sheershbansl

METHOD NO;-1 BY MOBILE UNCLE TOOLS

  1. Select Engineer Mode
  2. Select Engineer Mode MTK
  3. Select CDS Information from the Connectivity tab
  4. Select Radio Information
  5. Select the SIM you wish to change the IMEI on
  6. At the AT+ line for SIM 1, enter AT+EGMR=1,7,THE-FIRST-IMEI-NUMBER. For SIM 2, enter AT+EGMR=1,10,THE-SECOND-IMEI-NUMBER. Of course where the words are, you will enter a number.  

imei fix screenshot 1imei fix screenshot 2imei fix screenshot 2
imei fix screenshot 3imei fix screenshot 4imei fix screenshot 5


 WATCH THIS  VIDEO TUTORIAL--->CLICK TO WATCH VIDEO

METHOD NO;- 2 BY MTK MOBILE UNCLE -2
1.download Mobileuncle MTK IMEI Write Tool Mobileuncle MTK IMEI Write Tool.zip
input"Y",input IMEI code
finally,create IMEI .BAK,move it to ur phone or SD card Click image for larger versionName: F2@4@I]]9O}{)MNT%KD(PA4.jpgViews: 1461Size: 6.7 KBID: 2713694
2.download mobileuncle_MTK_toolv2.9.9.apk
3.need root, run mobileuncle MTK tool,choose IMEI backup and restore,restore IMEI.bak.


_____________________________________________________________________________________________
_____________________________________________________________________________________________
METHOD NO:-3 BY MTK DROID TOOLS
Needed Items
  1. Root access on the phone
  2. MTK Droid Tool: Download here
  3. Your IMEI Number, usually written at the back of the phone when batteries are removed or at the pack of the phone
  4. Android ADB drivers, depending on the phone you are using but there is a universal version: Download here
Procedures
1. Extract the MTK droid tools you downloaded. It would be extracted to the same folder the zipped file was except you change the location. On extraction, you would get a "MtkDroidTools" folder.

2. Open the folder and click on MTKdroidTools.exe to launch it.

mtkdroidtools screenshot 1
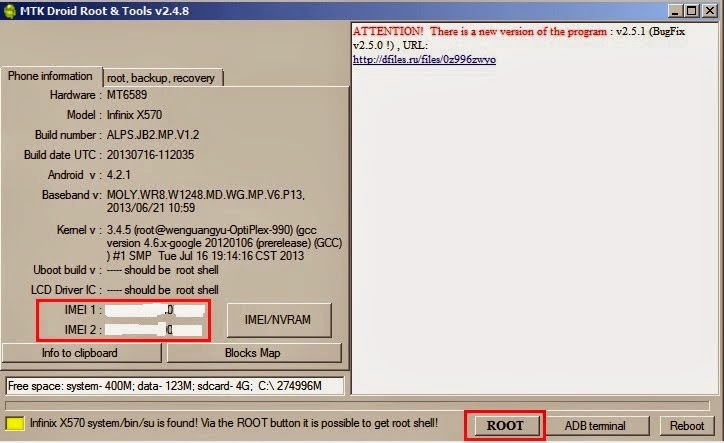
3. Install the ADB drivers if it has never been installed on the computer before. Connect the phone into the computer. On connecting, it would be identified with phone's information displayed. IMEI would be displayed too if its not having issues. But if an issue is present with the IMEI, it would be missing.
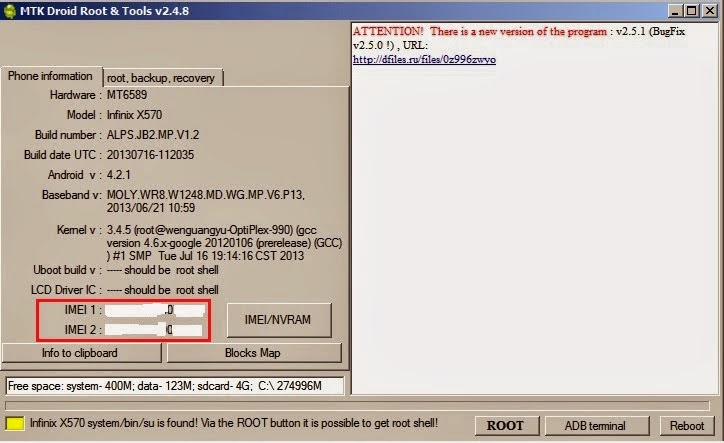
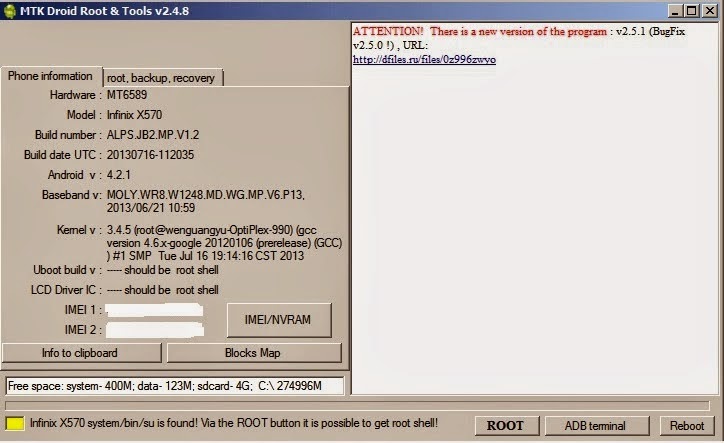
mtkdroidtools screenshot 2

mtkdroidtools screenshot 3

4. Now click on the ROOT button at the bottom right of the page. This button would be greyed out if the phone wasn't already rooted. So you really need to root your phone before you begin the process. Root access is needed for the tool to run scripts.
mtkdroidtools screenshot 4

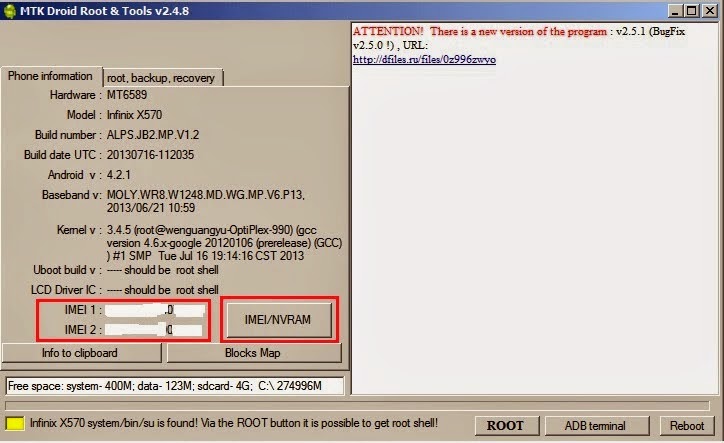
5. It will ask if you want to 'receive root shell through already established SU', just click 'Yes'.
Once that has been done, click on the 'IMEI/NVRAM' tab close to the IMEI part.

mtkdroidtools screenshot 5
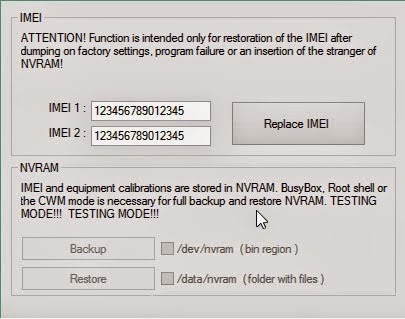
On clicking 'IMEI/NVRAM', the window below would appear. 

mtkdroidtools screenshot 6


You would need to type in your IMEI number as seen from your phone case or inside the phone and then click on Replace IMEI.


6. You would be asked if you want to replace your IMEI, click Yes and then another window will tell you that 'changes will come into force after reset'. Click OK and then reboot your phone.


Credit to: sheershbansl

Labels: ,

HOW TO BACK UP YOUR IMEI USING MTKDROID TOOLS

BACKUP YOUR IMEI (NVRAM) BY MTK DROID TOOLS
Guys this is the most important things you need to do before flashing
any custom rom you want. Some phone are not compatible with the imei
you flash,I'm using mtkdroid tools to prevent this invalid imei.
So before anything else back up your imei using this tools.

Requirements:
1. Rooted
2. MTK Droid Tools.
3. PC/DESKTOP

Procedure:
1. Switch on the phone and connect it to pc.

2. Go to settings->about phone.

3. Tap build number 7 times.

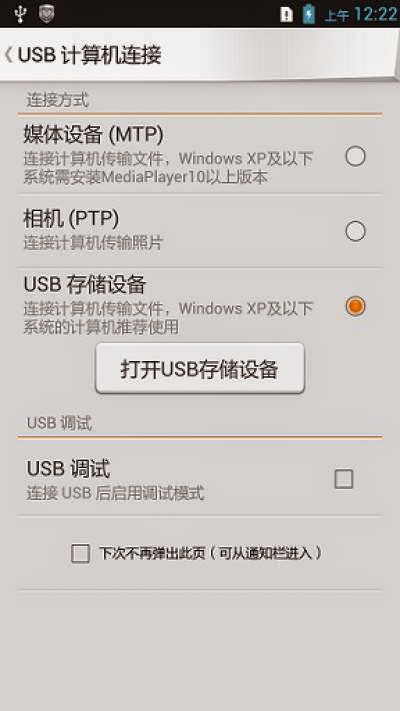
4. Go back and enter developers options, and check usb debugging on.

5. Start MTK Driod Tools and click root. grant root permission in phone.

6. Click IMEI/NVRAM and click backup or restore as required.

Done!


MTKDROIDTOOLS SCREENSHOT 1

MTKDROIDTOOLS SCREENSHOT 2


Labels: , ,

Lenovo S939 Update Vibe UI 2.0 with Root and Google Applciations

Lenovo S939 Update Vibe UI 2.0 with Root and Google Applciations - Many people still and want to use china ROM Vibe UI 2.0 but they hindered by the absence of google applications, so today i will try to give you a guide on how to installing Vibe UI 2.0 on Lenovo S939 with root and google applications. But first let me tell you about Vibe UI 2.0, it china ROM without google applications and only support 2 language which is english and china only. Vibe UI 2.0 is the official release from Lenovo so this update will have many improvement and fix any bug from previous Vibe UI 1.5. This guide can only using recovery update mode, but this guide will erase your data so please do your own backup preparations.

Disclaimer :
This guide for educational purpose only, We not responsible if your device bricked after following this tutorial.  (DWYOR).
Lenovo S939 Update Vibe UI 2.0 with Root and Google Applciations

ROM Descriptions :
  • Build Number : S939_S921_VIBEUI_V2.0_1439_7.4.1_ST_S939_WC9F
  • Date : 25-09-2014
  • OS : Android 4.4 KitKat
  • Language : English and China
  • Google Applications : No
  • Root : No
Requirement :
Downloads :
  • For Manual :
  • For OTA Update :
    • VibeROMFlash 4.6 Mb, tool to download and to flash Vibe UI 2.0 automatically (this software use china language).
  • Root Genius Download and install this application to your computer.
  • GMSInstaller Google Applications installer
Lenovo S939 Update Vibe UI 2.0 with Root and Google Applciations
  1. First this guide only can be done if your current firmware is china version, so please make sure you already meets the requirement. For OTA update, you must enable USB Transfer. after connect your phone to computer drag notification and select Touch for other USB options ↦ USB Transfer
    Lenovo S939 Update Vibe UI 2.0 with Root and Google Applciations

  2. Just run the VibeROMFlash application, it will detect your device and start to locate the update. Once it found just press big green button in the middle of application (it mean "Start Download"), relay and wait download until finish. When progress bar reach 100% and click again the big green button (it mean "Start Upgrade")
    Lenovo S939 Update Vibe UI 2.0 with Root and Google Applciations

    Lenovo S939 Update Vibe UI 2.0 with Root and Google Applciations

  3. Update will take sometime, so please be patient for a while. After successful update please restart your phone and confirm that you already on Vibe UI 2.0
    Lenovo S939 Update Vibe UI 2.0 with Root and Google ApplciationsLenovo S939 Update Vibe UI 2.0 with Root and Google Applciations

  4. For Manual update, please move ROM file (without having to unzip it) to your external SD Card. Copy it on your SD Card root folder don't inside the folder.
  5. Turn off your device, and then turn it on again with hold and press Power button + Volume Up until you can see recovery mode main menu.
    Lenovo S939 Update Vibe UI 2.0 with Root and Google Applciations

  6. On the recovery mode, please select Wipe Data / Factory Reset ↦ Delete All User Data
  7. Select Wipe Cache Partition ↦ Wipe Cache
  8. Select Advanced ↦ Wipe Dalvik Cache
  9. Back to recovery main menu then select Install zip from sdcard  Choose zip from sdcard point to your downloaded ROM.
  10. Done, Wait until finish and the reboot your device. First time boot will be take some time so please be patience.
  11. For Rooting :
    • Open the Root Genius that already installed on your computer.
    • Connect your device with USB Debugging enable, just wait let the Root Genius to find the driver and display your phone information
    • Click Big Green Button on the left bottom to root your device.
    • Done
  12. For Install Google Play Services :
    • Move GMSInstaller to your external SD Card
    • Install like usually, and if it need root access just allow it.
    • After successful install just reboot your device, and it will configure android system 
  13. Done
This guide is so long please read careful, if you wanna remove unwanted china applications, you can download and install vibeui_cleaner after rooting your device, this installed with recovery mode. Please leave any comments if you had problems regarding this guide.

Labels: , ,

Tuesday, October 28, 2014

Lenovo S939 Install Official CN Firmware S939_S129_140217

Lenovo S939 Install Official CN Firmware S939_S129_140217 - If you wanna to update your Lenovo S939 first you must install or flashing your Lenovo S939 with CN firmware that have lower build number, in this case we use S939_S129. After finish installing or flashing this firmware you can freely update your device to Vibe UI 1.5 or Vibe UI 2.0, if you choose to update to Vibe UI 1.5 than you can refer to this Lenovo S939 Update Kit Kat Vibe UI v1.5 + Gapps + Root. This firmware is china version so it not include google play and contains china default applications that cannot be used outside china country, contain only english and china languages.
Even this guide is for Lenovo S939, it has possibility to brick your device and lost your IMEI so please make your own backup preparation before following this guide.

Disclaimer :
This guide for educational purpose only, We not responsible if your device bricked after following this tutorial.  (DWYOR).
Lenovo S939 Install Official CN Firmware S939_S129_140217


ROM Descriptions :
  • Build Number : S939_S129_140217
  • Date : 17-02-2014
  • OS : Android 4.2.2 Jelly Bean
  • Language : English and China
  • Google Applications : No
  • Root : No
Downloads :
  • S939_S129_140217 1.7 Gb, This only contains images files to upgrade or downgrade your device to S129_S939 not contains any flash tool, so you must download it separately.
  • USB VCOM Driver  Install this driver first on your computer, Turn off your device and remove the battery, using USB cable connect your device while look at My Computer  Manage  Device Manager there will be MTK65xx Preloader Devices show up for 5 second than disappeared, before disappeared right click on it and select Update Driver Software point it to USB VCOM Driver extracted folder. When it finish disconnect and connect again there will be Mediatek PreLoader USB VCOM Port on your device manager.
    Lenovo S939 Install Official CN Firmware S939_S129_140217

  • SP Flash Tool v5.1348 Flash tool that needed to flash current firmware to your device, recommended to use only this version unless you know what your doing.
Lenovo S939 Install Official CN Firmware S939_S129_140217
  1. +Download all required files above, please place it on the one folder for easy organize it. Extract all on the same folder and begin installation USB VCOM driver, Please make sure that USB VCOM driver is installed completely before continued to the next step, if you don't know how to do it you can contact me.
  2. Go to flash tool extracted folder and run Flash_Tool.exe, if you are using windows 7 or above please run it using administrator privilege to avoid permission error. On the flash tool please go to Options ↦ Option ↦ Download  and tick the DA DL All with Check Sum like picture below.
    Lenovo S939 Install Official CN Firmware S939_S129_140217

  3. Press [x] to close and back to flash tool again, Now click on Scatter-Loading button and point it to S939_S129_140217/target_bin/MT6592_Android_scatter.txt, this will also loaded all images files on the flash tool.
    Lenovo S939 Install Official CN Firmware S939_S129_140217Lenovo S939 Install Official CN Firmware S939_S129_140217

  4. When everything is set up, select Download Only and then press Download button or hit CTRL + D, flash tool will initialized and become stand by and ready to make connection with your device.
  5. Turn off your device, because Lenovo S939 using non removable battery you must make sure that your device is completely turn off before connecting to your computer. After completely turn off you can connect your device to your computer using USB cable, Flashing process will immediately begin to start and it will be take 5-6 minutes just wait until you can see GREEN CIRCLE with Download OK information.
    Lenovo S939 Install Official CN Firmware S939_S129_140217

  6. Done, That GREEN CIRCLE is mean you already successful flashing your Lenovo S939 with S129 CN Firmware. Now you can disconnect your device and try to turn on your device for the first time. 
  7. Go to System Setting ↦ About Phone look at Build Number and make sure it same with the downloaded ROM.
That it, now you can continued to upgrade your Lenovo S939 with Vibe UI 2.0 or Vibe UI 1.5 for better improvement, Thank you for reading this guide and if you got any problem regarding this guide please leave comments and describe your problems. Thank You

Labels: , ,