Thursday, April 30, 2015

Announcement of Android L upgrade delay


Statement From ASUS:

Asus was scheduled to provide ZenFone4, ZenFone5,ZenFone6, ZenFone5 LTE and PadFoneS with Android L upgrade in the end of April.We've sent the new version for final verification and we expect to release the upgrade soon.
Please refer to following table for new OTA plan. We would request the kind consideration and understanding of our customers with regards to any inconvenience caused by this schedule changing.

Labels: ,

How To Downgrade From Lollipop Beta to Kitkat


Today Asus Zenfone Blog post tutorial How to Downgrade from Android 5.0 Lollipop Beta to Kitkat 4.4.2. Couple days ago Asus Zenfone Blog Posted ROM Lollipop Beta for Asus Zenfone 5,  If you not satisfied with the performance or want to back to KitKat This Tutorial will help you. DWYOR and Backup your data first because this tutorial will erase all your data.

Files to Download:

  1. Asus Zenfone 5 4.4.2 System img (Download Here/MIRROR)
  2. Boot.img recovery.img fastboot.img (Download Here)

Instructions:

  1. Download Files Above and Extract 
  2. Activate USB Debugging (Go to Developer Options>USB Debugging)
  3. Connect Zenfone 5 Lollipop to PC/Laptop
  4. Open WW Folder and Open CMD (Shift+Right Click > Open Command Here)
  5. Check if your Zenfone Connected or Not. Type: ADB devices and you will see your device connected or not (Don't forget to click authorize on Zenfone 5 screen)
  6. Now Reboot to Bootloader by Typing: adb reboot bootloader
  7. After Entering bootloader then flash boot.img, fastboot.img, and recovery.img. type: fastboot flash boot boot.img then wait until finished type: fastboot flash recovery recovery.img then wait until finished, type: fastboot flash fastboot fastboot.img
  8. Go to System Image Folder and Open CMD (Shift+Right Click>Open Command Here)
  9. Type: fastboot flash system system.img and wait until compete

  10. Go to Droidboot and Choose Factory Reset
  11. Reboot and Your Zenfone will be back to KitKat

Labels: , , , ,

Huawei Recovery - How to Recover Data from Huawei Honor 6/Ascend P8/P7

Huawei - a new mobile brand has entered the brutal smartphone area. Lots of Huawei android phones obtain people’s reputation, like Huawei honor 6, Ascend P6/P7 and its newest Ascend P8.

However, I have heard that many Huawei users encountered issues of data loss. It seems troublesome for the one lost their precious files on their Huawei phone. If you unfortunately be one of them, don’t worry, you just came to the right place. A detailed and feasible solution is offered.

Before we get started, I’d like to introduce you a Huawei Recovery tool which is needed for recovering Huawei data: Jihosoft Android Data Recovery. This recovery tool offers reliable method for inexperienced users who lost important files,like contacts, photos, musics, videos, messages, WhatsApp, call history, and more files from Huawei. It supports various kinds of Huawei phones including Huawei honor 6, Acend P6/P7/P8, Ascend Mate 7 etc.


How to Recover Deleted Files from Huawei Phones.

First of all, stop using your Huawei phone/tablet once you realized you lost important data on it. This is very important, as any new content added after you lost data could make the deleted/lost file unrecoverable due to the overwriting.

Step 1. Free download, install, and run Jihosoft Android Data Recovery.


You can get it on its main page (http://www.jihosoft.com/android/android-phone-recovery.html)

 or simply download at cnet (http://download.cnet.com/Jihosoft-Android-Phone-Recovery/3000-2094_4-76171747.html)

For Mac users, you can refer to : http://www.jihosoft.com/mac/android-recovery-mac.html

Step 2. Select Specified Files You Want to Recover.

Start the Huawei recovery program, 3 option provided: “Multimedia”, ”Database”, and “WhatsApp”. You can simply choose the one you want. Multimedia including  photo, video, audio files, meanwhile, you are allowed to select the specified file format under this option. “Database” (including text messages, contacts, call logs which stored in the Huawei internal memory by default). The “WhatsApp” option includes WhatsApp messages, and WhatsApp attachments. Or you can simply select “All” to scan all data on your Huawei.


Step 3. Connect Huawei Device and Access Data on It.

Connect your Huawei phone/tablet with a working USB cable. Then set enable USB debugging on your Huawei, so that the program can access data on your phone(If you have done this before, just skip this and click “Opened?Next...” to continue.)


- For Android 2.3 or earlier: Go to "Settings" -> "Applications" -> "Development", then check "USB debugging".
- For Android 3.0 to 4.1: Go to "Settings" -> "Developer options" -> Check "USB debugging".
- For Android 4.2 or newer: Go to "Settings" -> "About Phone" < Hit "Build number" for several times until getting a note "You are under developer mode", Then go back to "Settings" -> "Developer options" ->Check "USB debugging".


Step 4. Scan and Preview Data from Huawei.

After your device has been identified and accessed by this Huawei Recovery software, click the button “Start” to scan data. This process may take a couple of minutes, which depend on the file size. When the scan finishes, you can click the files listed on the result list one by one to check the quality.


Step 5. Selectively Recover & Export Data on Huawei.

If you are satisfied with the scanning results, then you can selectively mark the file you want to recover and get back your lost files by hitting “Recover” button. It lets you save the files anywhere on your computer/Mac. The exporting files can be opened in different formats like .csv, .vcf, .xml, .html. Besides, you can print them out at your choice.


That’s it. The lost/deleted files on your Huawei is BACK. Very simple, isn’t it?

Labels: , , ,

Wednesday, April 29, 2015

Lenovo A536 flashing with Modified Vibe UI 2.0 Firmware

Lenovo A536 flashing with Modified Vibe UI 2.0 Firmware - After long time not give new content to this blog, now i will try to give you a guide how to install Vibe UI 2.0 on your european Lenovo A536 device. To be able following this guide there is some requirements so please read the requirements first and see if your device is compliant.
This firmware is made on the basic port from Lenovo S650 - Vibe UI 2.0 and Lenovo A328 - Custom Firmware Vibe UI 2.0, this firmware have ability to move the applications to external sd card and have ability to become USB drive when connected to computer.
Before following this guide please don't forget to backup your current running ROM and NVRAM partition, once you follow this guide there is no way back to restore without the backup file.

Disclaimer :
This guide for educational purpose only, We not responsible if your device bricked after following this tutorial, only for International or ROW firmware . Even this guide is already tested but it has possibility to brick your phone (DWYOR)

Lenovo A536 flashing with Modified Vibe UI 2.0 Firmware

Requirements :
Downloads :
  • Vibe UI 2.0 EURO 677Mb, ROM file that needed to flashing your device firmware to Vibe UI 2.0 only can be use using custom recovery
  • Memory Patch to be able move applications to SD Card
  • Vibra Patch to make buttons can vibrate 
Lenovo A536 flashing with Modified Vibe UI 2.0 Firmware
  1. Download the ROM, and place it on you SD card root folder. Mean don't place it inside the folder place it outside the folder and rename it become update.zip
  2. Shutdown your Lenovo A536 wait until completely turn off, Now press and hold Power button + Volume Up + Volume Down button this combination will bring your device to recovery mode (TWRP main menu) release it.
    Lenovo A536 flashing with Modified Vibe UI 2.0 Firmware

  3. On TWRP main menu, you can backup full ROM before continued to the next step but if you already backup just go to Wipe ↦ Advanced Wipe tick or select everything except System and Internal Storage or Micro-SD then Swipe to wipe it will wipe your device from any previous data.
  4. After finish wiping, back to TWRP main menu and select Install ↦ Select zip to install browse it to external SD card and select update.zip (1), Swipe to install wait until finish and repeat the step to install Memory and Vibra.
    Lenovo A536 flashing with Modified Vibe UI 2.0 Firmware

  5. After finish all just reboot your device, You will prompt if you also want to use SuperSu just select it and wait until completely boot, first boot will take 3-4 minutes so please give a little patient but if you already wait so long and feel that your device bootloop just go to recovery mode again (Step 2) then select Wipe ↦ Swipe to Factory Reset, try boot again
  6. Done.
Congratulations, Installing Vibe UI 2.0 for Lenovo A536 european version already completely. Vibe UI 2.0 using Android KitKat operating system with the latest user interface for Lenovo devices, I hope you enjoy with the firmware and please leave any comments if you found problems or broken links regarding this guide. Thank You

Labels: , ,

Asus Zenfone 5 LTE (A500KL) Lollipop Android 5.0 ROM


How to OTA update ? (Go to settings>About>System Update>Check for Update)
How to update via ADB sideload ? Here 


ZENFONE 5 LTE  Lollipop Android 5.0 firmware: 
WW VERSION
 Version  WW_12.4.5.22 
DescriptionASUS ZenFone 5 (A500KL) software Image: V12.4.5.22 for WW SKU
only* (Android L)
Note1: Please make sure update software version V11.4.6.94 first
before update to software version V12.4.5.22
Note2: Please unzip the file first then put the file to the
device root directory.

Please note! The listed apps below will be removed once the
Android 5.0 Lollipop upgrade is complete.

1. battery Widget
2. Google Text-To-Speech
3. Movie Studio
4. My Frame

If you haven't updated below apps, they will be removed once the
Android 5.0 Lollipop upgrade is complete.
1. Facebook
2. Flipboard

Please note! Some features are added or changed in this system
upgrade
1. Kindle
2. Asus Webstorage
3. Super Note
4. Lockscreen: remove standalone wallpaper & weather info
5. Quick settings/Recent app layout change
6. Dialer/Contacts: reduce tab count from 5 to 3; remove group
tab name/photo
7. InCall screen: remove InCall animation & cover
8. Set default IME as 注音 and English (remove 手寫+倉頡) when
the system is set in Traditional Chinese
9. Add My Ocean wallpaper
10. Add Day Scene Live Wallpaper
11. Add TripAdvisor
12. Add ASUS Auto-start Service Manager

a) Prevent unwanted apps from automatically starting up and
using RAM
b)Stop services immediately and prevent Android from
restarting these apps again
13. Improve VOIP phone call function
14. Improve music function
15. Revise Wallpaper function
 
File Size821 (MBytes)                                                 2015/05/13 update
Download fromGlobal

ZENFONE 5 LTE  Lollipop Android 5.0 firmware: 
TW VERSION
 Version  TW_12.4.5.21 
DescriptionASUS ZenFone 5 (A500KL) software Image: V12.4.5.21 for TW SKU
only* (Android L)
Note1: Please make sure update software version V11.4.6.94 first
before update to software version V12.4.5.21
Note2: Please unzip the file first then put the file to the
device root directory.

Please note! The listed apps below will be removed once the
Android 5.0 Lollipop upgrade is complete.

1. battery Widget
2. Google Text-To-Speech
3. Movie Studio
4. My Frame

If you haven't updated below apps, they will be removed once the
Android 5.0 Lollipop upgrade is complete.
1. Facebook
2. Flipboard

Please note! Some features are added or changed in this system
upgrade
1. Kindle
2. Asus Webstorage
3. Super Note
4. Lockscreen: remove standalone wallpaper & weather info
5. Quick settings/Recent app layout change
6. Dialer/Contacts: reduce tab count from 5 to 3; remove group
tab name/photo
7. InCall screen: remove InCall animation & cover
8. Set default IME as 注音 and English (remove 手寫+倉頡) when
the system is set in Traditional Chinese
9. Add My Ocean wallpaper
10. Add Day Scene Live Wallpaper
11. Add TripAdvisor
12. Add ASUS Auto-start Service Manager

a) Prevent unwanted apps from automatically starting up and
using RAM
b)Stop services immediately and prevent Android from
restarting these apps again
13. Improve VOIP phone call function
14. Improve music function
15. Revise Wallpaper function
 
File Size819,44 (MBytes)                              2015/04/29 update
Download fromGlobal

Labels: , , , ,

How to Effortlessly Transfer Files Between Android & PC Without Bluetooth or USB Cable


You probably know that you can transfer files between your Android phone and PC. And you also know that you can do it via Bluetooth and USB data cable.

Now, what if you have a PC that isn't Bluetooth enabled? Or there is no USB cable close at hand. And what if all the USB ports on the PC are currently in use? What are you going to do then, forget about the transfer?

No! Don’t! There is a third option that is even faster than Bluetooth and because it is a wireless method, it is more convenient than USB and better than cloud storage services (since you don't need an internet connection for it).

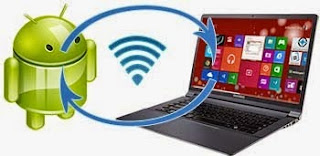
It makes use of Wi-Fi. Actually, your PC and Android will have to be connected to the same Wi-Fi network.

There are many apps that does this but we are going to use Anmobi's Xender

How To Transfer Files Between Pc and Android with Xender
STEP 1


On PC, switch on Wi-Fi, then start a hosted Wi-Fi network and connect your Android to the network.

STEP 2

Next, On your phone, fire up Xender. Setup your profile if you have not. Tap the More button and then
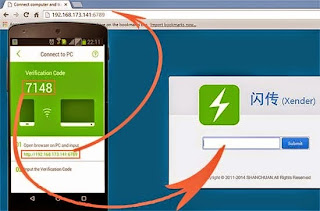
 Connect to PC.

STEP 3
Still on Xender, You will be shown a URL and a verification code. Launch any browser on PC and enter them as indicated below.


Just as I said before, you can transfer/exchange between the two devices be it an image, video, pdf, or even a full folder (in file anything at all).

STEP 4
To download files from the phone to PC, select the files (Ctrl + Click to select multiple files) and click the Download icon on the right of the screen. Remember that multiple files and folders will be auto-zipped prior downloading.

To upload files from Pc to the Android, navigate to the folder where you want to save the file and click the Upload icon. Next, click the Upload button from the pop-up window, navigate to the file and upload it.

That’s all. Do you have any question?

Labels:

Tuesday, April 28, 2015

How to Enter Asus Zenfone Lollipop Recovery


What is recovery?  In Android, recovery refers to the dedicated, bootable partition that has the recovery console installed.  A combination of key presses (or instructions from a command line) will boot your phone to recovery, where you can find tools to help repair (recover) your installation as well as install official OS updates. 

Today Asus Zenfone Blog will teach you How to Enter Recovery Mode on ASUS Zenfone 5/6 Lollipop

Entering Recovery Mode

  1. Turn off your Zenfone
  2. Hold Power button + Volume up
  3. When the phone is vibrating release power button
  4. Then the display change like this:
  5. You can select Normal Boot or recovery Boot by pressing Volume up/volume down. To enter recovery choose recovery mode
  6. Then You will see sleep android robot, Press Power button + Volume up and release the buttons
  7. The you will see Asus Zenfone Lollipop Recovery Mode

Labels: , , , ,

[Lollipop] Asus Zenfone Auto-start Manager

Asus Zenfone Auto-Start Manager


Today Asus Zenfone Blog will Introduce the new feature from ASUS Zenfone 2 / Lollipop Zenfone first Gen. How to Operate Auto-start Manager. Some apps may automatically start in background. These apps occupy memory, cause system lag, and drain battery. Auto Start Manager manages auto-start apps and helps free more memory, improve system performance and save power.

  1. Open Apps
  2. Select Auto-start Manager
  3. Allow (Enable auto Start) Deny (Disable auto-start to save Memory)


Labels: , , , ,

How to Enter One Hand Mode on ASUS Zenfone

ASUS Zenfone One Hand Mode

Today Asus Zenfone Blog will teach you How to Enter One Hand Mode. This Method can Be use for ASUS Zenfone 2, Zenfone 5 Lollipop and Zenfone 6 Lollipop. What is One Hand Mode? Since Zenfone 2 and Zenfone 5 has big screen it's must be difficult to operate without two hand. this feature make user can operate Zenfone with only one hand.

  1. Go to Apps
  2. Select Settings > Asus customized Settings
  3. One Hand Mode, tick Quick Trigger so you can double tap home button to operate one hand mode
  4. Double Tap Home Button

Labels: , , , , ,

Monday, April 27, 2015

Decompile, Edit and Recompile WhatsApp Using APK Tool


Watch Below Video For Detailed Instructions


Download Links


Labels: , , , ,

Transfer Files Between Laptop and Mobile Devices [Android, Windows & Iphone]

Shareit All Version Download Link : CLICK HERE

Sunday, April 26, 2015

Xposed Installer and Modules CWM Flashable ZIP


This CWM Flash-able Package Contains

1. Xposed Installer
2. Gravity Box
3. Xperia Xposed

Instructions:

1. Download Flashable Zip and Copy it to SD Card Root
2. Reboot to CWM Recovery
3. Flash ZIP File
4. Wipe Cache
5. Wipe Dalvik Cache
6. Reboot and Enjoy

Labels: , , , , ,

Xperia Xposed [Xposed Module] For Sony Xperia C


Requirements:

For Sony Xperia Devices Only
Xposed framework Installed

Instructions:

Download Xperia Xposed.apk and install it
Open Xposed Installer=>Modules=>Tick Mark Xperia Xposed as Showed in Above Screen Shot

And Reboot Your Device 

After Reboot Open Xperia Xposed To porform Various Tweaks

Labels: , , , , ,

Gravity Box [Xposed Module] For Xperia C


Requirements:

Xposed framework Installed

Instructions:

Download Gravity Box 3.5.5.apk and install it
Open Xposed Installer=>Modules=>Tick Mark Gravitybox as Showed in Above Screen Shot

And Reboot Your Device 

Labels: , , ,

Xposed Installer For Xperia C


How to install:
Your device Must be rooted
First step for everything you do: Create a nandroid backup and make sure you know how to restore it!
I'm not responsible for anything you do with your phone
There is also the risk to soft-brick your device. In such a case, see below for ways to recover from it.


Installation of the framework:
Download the Xposed Installer APK and install it
Launch the Xposed Installer, go to the "Framework" section and click on "Install/Update"
Reboot
Done!

You can verify this by starting the Xposed Installer again and making sure that the numbers in the "Framework" section are green.

Or It should like First Screenshot In this Post

Installation of any modules:
Download <module>.apk (e.g. via the builtin repository browser) and install it
Launch the Xposed Installer and go to the "Modules" section (you will also get there if you click on the notification warning you that the module is not enabled yet)
Enable the module by checking the checkbox
Reboot
Done!
(note that you can install the framework and enable/disable multiple modules at once and reboot afterwards)

Labels: , , , ,

Saturday, April 25, 2015

Dolby Digital Plus For Sony Xperia C [ MOD ]


Install Using CWM Recovery

BACKUP YOUR CURRENT ROM BEFORE FLASHING THIS
Uninstall Viper FX or anyother mod you are using in your phone before installing dolby plus
Download & copy Dolby Digital Plus By Karthik M.zip to SD Card
Reboot into recovery
Install the Dolby Digital Plus By Karthik.zip
Wipe cache and dalvik cache
Reboot system now
Finished and enjoy High Quality Music Experience on Your Headphones 

Labels: , , ,

¡PARA QUE SIGAN RECORDANDO VIEJOS TIEMPOS! Super Mario Bros (Deluxe Edition) v.1.0.0 [Juego Clásico] [Sin Emuladores] [Archivo APK]

Requiere Android 2.1 o superior.

El famoso Mario Bros está de vuelta en una nueva aventura, esta vez en un retroceso a una versión que fue lanzada para la Game Boy Advance, saltando a través de plataformas y enemigos y evitar ser capturados por no convertir enano o morir.

Acompaña a la pareja de fontaneros más famosa del mundo en una vibrante remake del clásico juego original.

Recorre todos los mundos de esta particular aventura gráfica y rescata a la princesa de las garras de tu archienemigo Bowser.

Hazte de hongos, flores de fuego y todo tipo de ayudas para vencer a tortugas, “goombas”, plantas carnívoras y muchos enemigos más.

Prueba tus habilidades y reflejos y completa niveles plagados de peligros. Descubre pasajes secretos, bonificaciones escondidas y pequeños “trucos” que te ayuden en tu empresa.

Imágenes del juego:


---
Link de descarga:  ARCHIVO APK


Labels:

Stylish Font For Sony Xperia C


Instructions

1. Download and Copy Stylish Font For Xperia C By Karthik M.zip to SD Card Root
2. Rebot your Device to CWM Recovery
3.Install Zip From Sd card=>Chhose Zip from SD CArd=>Select Stylish Font For Xperia C By Karthik M.zip=>Yes
4. Reboot your Device and Enjoy
5. Like My
             Page      

Labels: , ,

Driver Speedboat Paradise MOD (Unlimited Money) For Android

Driver Speedboat Paradise MOD  (Unlimited Money) For Android


ตัวเกม


ไฟล์เกม

DATA1
DATA2
DATA3

DATA ลงใน  SDCard/Android/Obb/

Labels: , ,