Sunday, September 17, 2017

How To Install flash TWRP Philz Recovery for Zenfone 5 Kitkat Lollipop

How To Install flash TWRP Philz Recovery for Zenfone 5 Kitkat LollipopHow to Install TWRP Philz Recovery on Zenfone 5 working with Kitkat and Lollipop Android operating system. Download Required file from end of post. You must check out One Click Root for Zenfone 4, 5, 6 and Zenfone 2. TWRP Recovery Zenfone 5 (Work at Kitkat/Lollipop)Step 1. Download File AboveStep 2. Enable USB Debugging (

Labels: , , , , , , , , , , ,

Saturday, September 16, 2017

Tutorial Upgrade Asus Zenfone 5 Ke lollipop dengan PC

Tutorial Upgrade Asus Zenfone 5 Ke lollipop dengan PCCara Upgrade Asus Zenfone 5 ke lollipop Via ADBLanjutan artikel sebelum nya tentang cara upgrade zenfone 5 dari kitkat ke lollipop (via mmc)sekarang pribadi akan membahas sedikit tentang Upgrade zenfone 5 dari kitkat versi ahir ke android L 87, namun sekarang akan menggunakan ADB Fastboot tool. lain hal nya dengan MMC yang hanya memasukan

Labels: , , , , , , , ,

Friday, September 15, 2017

Cara Mudah Root Zenfone First Gen Second Gen Lollipop 5 0

Cara Mudah Root Zenfone First Gen Second Gen Lollipop 5 0Pertama download dulu alat alatnya disiniLINK DownloadLINK DOWNLOADPilih salah satu link diatas, kalau sudah ekstrak semua yaStep by Step1. Instal dulu driver nya, instal kedua duanya ya di komputer andaDriver kedua cara instalnya adalah lewat Device manager pada komputer anda2. Setelah itu kita masuk ke Handphonenya dlu, masuk ke Setting -

Labels: , , , , , , , , ,

Monday, November 28, 2016

Xposed para equipos Samsung [Lollipop/Marshmallow] [v87.1] [28 Nov]


Esta es una version del Xposed framework desarrollada y probada en el Galaxy S6 (G920F) y el Galaxy Note 4 (N910C), pero deberia funcionar en todos los otros equipos Samsung (GS5, Note 5, GS6E, GS6E+...) que esten corriendo en TouchWiz Android 5.1.1 y 6.0.


Soporta ROMS stock y cercanas a stock.


Fue probado en el modelo G920F con esta Rom, y en un Note 5 por @jthrasher47 & @imfaraz,

Esta variante Xposed no se rompe el soporte para cualquier otro dispositivo con el apoyo de Xposed oficial, lo que significa que todavía soporta todos los dispositivos soportados por la oficial, esta versión añade soporte de Samsung y XZ índices comprimido.


Prerequisitos:

  • Stock (Odexed & Deodexed) 5.1/6.0 ROMS
  • CWM recovery


- ARM  arm32 operating system (Galaxy S5, Note 4,...)
- ARM64 arm64 operating system (Galaxy S7/S6, Note 5 y todas sus variantes...)
- SDK22  Android Lollipop 5.1.x
- SDK23 Android Marshmallow 6.0.x
 -alt- Esta version debe usarse para algunas variantes del Note 4: N910P/G y Note Edge N915F corriendo en ROM's TW Marshmallow (Estas ROM's vienen con 2 cambios mas no AOSP en Marshmallow, verifica aqui para mas detalles)  .


Las versiones de MM de Sprint MM no estan soportadas!


Cómo lo instalamos:

  • Instalar la aplicación de Xposed > Xposed Installer App version 
  • Haz un back up de tu sistema (importante)
  • Pasa los archivos a tu equipo, recuerda pasar el desinstalador de Xposed! > xposed-uninstaller-20160211.zip
  • Flashea el zip "xposed-vxx.x-sdkxx-tw-armxx-custom-build-by-wanam-xxxxxxxx.zip" con un custom recovery (TWRP/CWM...)
  • Reinicia y espera, puede tardar varios minutos en reiniciar.
  • Disfruta


CAMBIOS 


V87.1 (28/11/2016):
  
  • Esta actualización corrige un problema de compatibilidad con el nuevo Note5 UX Roms (Detalles técnicos).


 Para más detalles y agradecer al desarrollador visita xda


Labels: , , , , , , , , , ,

Thursday, November 24, 2016

Xposed Framework Lollipop/Marshmallow [Android 5.0/5.1/6.0, v87, 2016/11/24]


Esta es la versión 3.1.1 del Xposed Framework. Las principales características y correcciones de esta versión son:


    La versión 87 corrige la compatibilidad con la actualización de seguridad de noviembre de Google que causaba los bucles de inicio tan pronto como se activaba al menos un módulo. La causa raíz era bastante simple, pero una solución era bastante difícil de encontrar. He escrito sobre eso en GitHub, para aquellos que quieran conocer los detalles.


      Descargalo aquí >  XposedInstaller_3.1.1.apk [Nuevo]


      Descargalo aquí >   XposedInstaller_3.0_alpha4.apk


      Android 5.0 =sdk 21


      Android 5.1 =sdk 22


      Android 6.0 =sdk 23


      DESCARGAS


      xposed-v*-sdkXX-*.zip: Deber ser flasheado a través de un Custom Recovery para instalar el framework


      XposedInstaller_3.0-alpha*.apk: Deber ser instalado para administrar los módulos instalados


      Recuerda hacer una copia de seguridad antes de proceder con la instalación!!!


       Para más detalles visita: xda


      Se añade versión Material Design del Xposed Installer:


      ACTUALIZACIÓN [29/05/2016]

      Nuevo:

            Bug fixes
            Systemless detection @topjohnwu
            Ability to disable Xposed (reboot required)
            rovo89 framework updates are now showed instantly (@XlAfbk )


        Descargalo aquí > [BETA] Material Design Xposed Installer


        Fuente


        POR FAVOR COLABORA! Estamos solicitando sus donaciones para continuar adquiriendo equipos, espero puedan entender que ninguna compañía nos apoya y es muy difícil hacerse de todos los equipos para los cual nos preguntan. Puedes hacer la donación en el siguiente enlace


        Mas detalles: xda


        xda

        Labels: , , , , , , , , , , ,

        Sunday, October 30, 2016

        ROM (KOPA) Mokee OS 12.1 for Alcatel Flash 2 Lollipop

        ROM (KOPA) Mokee OS 12.1 for Alcatel Flash 2 Lollipop


        ROM (KOPA) Mokee OS 12.1 for Alcatel Flash 2 Lollipop Screenshot

        ROM (KOPA) Mokee OS 12.1 for Alcatel Flash 2 Lollipop Screenshot


        MoKee Open Source is based on the Google AOSP. We update our source code frequently to keep up with the latest development, and not forgetting to merge in special features of our own at the same time. 


        A small group of people from around the world who are interested in Android launched this project on the 12th of December 2012, and is committed to make this ROM better and better. Like most contributors of open source projects (Omni, CyanogenMod, Slim AOSPA etc), we are doing all these in our free time as our passion… 

        Flash at your own risk.

        Bugs?
        You tell me.

        Rom Link:

        [Mokee OS 12.1 ##download##]

        Google Apps Link:

        [Opengapps ##download##]

        Select Arm 64-5.1-micro

        How to Install?
        -Reboot to TWRP
        -Wipe Data/Factory Reset
        -Install zip-choose Mokee 5.1.zip
        -Install G apps (optional)
        -Wipe Dalvik/Cache
        -Reboot Phone
        -Done

        Wait 5-10 minutes for boot up.

        Credits:
        KOPAfamily
        JonacxDgreat
        Maximum 

        Most of all
        God
        Yours truly: Roland

        Labels: , , , , , , , ,

        Monday, February 29, 2016

        How to Fix bootloop / deadboot for CM Flare S3 power (lollipop)

         How to Fix bootloop / deadboot for CM Flare S3 power (lollipop)


        This tutorial on how to fix bootloop or deadboot in Flare S3 Power running in Android 5.1 version via SPFT. This is updated Stockrom  last Nov. 18, 2015. This only work in S3 power Lollipop version I'm not sure if could work to upgrade your Kitkat to Lollipop.
        CM FLARE S3 POWER LOLLIPOP


        Requirements:
        PC/LAPTOP(WINDOWS OS)
        USB CABLE
        PHONE
        FLARE S3 POWER stockrom (needrom)


        FOR WINDOWS XP/7 -INSTALLING DRIVERS
        1. Download Mediatek Driver and Extract then Install the driver for 32 or 64 bit operating system of windows 7.
        Driver Choose 32 or 64 bit
        2.  Before you plug your phone in PC, you need to focus in Device Manager, then plug your phone without the battery you only have approximately 5 seconds to appear MT65xx device that shows under Other devices, you need to right click it as soon as you see it.
        MTK USB PORT

        Then after you rightclick, click to Update driver software

        3. Then choose - Browse my computer for driver software
        Browse Driver

        Browse the Mediatek MT65xx Preloader Driver folder

        Make sure you know the version of OS to choose the right driver for your PC.

        Choose your OS version, then choose if 32-bit or 64-bit for your PC.

        E.G. s Win7  folder:
        usb2ser_Win7.inf - if 32-bit
        usb2ser_Win764.inf - if 64-bit

        4. Another options, to find right driver for your phone is to open your internet while your phone is connected without the battery and automatically searching driver for your phone.

        FOR WINDOWS 8/8.1/10 -INSTALLING DRIVERS
        1. Download all necessary files and Enable USB Debugging mode in your phone..
        2. Install Drivers USB_VCOM_Driver.rar
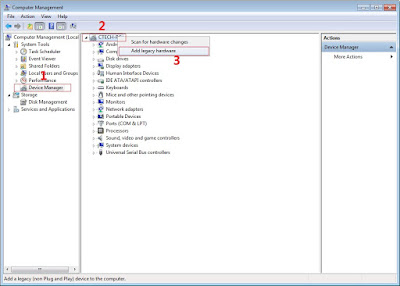
        In Device Manager Right click on PC name(Right Side) and then click on Add legacy hardware as shown in image below.

        add legacy
        Now in Add Hardware Wizard click on Next » Install the Hardware that i manually select from a list (Advanced) » Show All Devices » Next » Have a Disk, Now select the any inf file from where you extracted the downloaded VCOM driver package.

        mediatek preloader

        3.  Now Click on Next and select Install this driver software anyway and wait for finishing the process.

        Install driver anyway

        4.  After installation is finished then Restart your computer, That's it.
        If still not success in installing driver just Disabled Driver Signature Verification
        1. Go to PC Settings>General>Troubleshoot>Advanced Options>Startup Settings>Disabled Driver Signature Enforcement>Then Restart
        disabled driver signature verification
        Once you disabled. Then follow the procedure above to install the driver. Once success proceed to next step.

        II-FLASHING VIA SPFT
        1. Open flash_tool.exe, click on the Download Tab
         Extract the downloaded AFP2 stock rom to the new folder you created.
        Click flash tool

        2. Click Scatter-loading and browse for the scatter file (MT6592_Android_scatter)
        3. For Bootloop only
         Make sure flashing mode is set to "Download Only" and check mark all except Preloader.
        Note: If deadboot/hardbrick set "Download+Format" and check Preloader.
        4. Click Download.
        mt6592-scatter-file-spft

        5. Turn off your phone, connect your phone to the PC and wait for the flashing to commence.
        6. Green Circle image with check will show once flashing is completed. That's it!

        SPFT SUCCESS

        7. Disconnect your phone in USB cord then open if still bootloop then try to factory reset in recovery settings. To go in recovery mode reboot your phone hold and press power on and volume up simultaneously until recovery mode appeared.


        Credits:
        Needrom
        Dess Lagnirac

        Labels: , , , ,

        Sunday, February 21, 2016

        How to root CM Flare S3 Octa Lollipop and install Custom Recovery

        How to root CM Flare S3 Octa Lollipop and install Custom Recovery

        After an official update in Cherry Mobile Flare S3 Octa Kitkat to Lollipop version. I decided to make an update on how to root and Install Custom recovery. Hence, you can't use your custom recovery in kitkat to new update of lollipop version. I have 3 methods to root but I will teach you the most easiest way.
        Root Flare S3 Octa Lollipop  Picture


        Requirements:


        CM Flare S3 Octa


        Warning: Rooting can void your warranty!
        Do it at your own risk!
        FIRST METHOD
        I-ROOTING
                                                           
        I'm going to teach you on how to root CM Flare S3 Octa using updated Kingroot which can root even Android 5.1 or Lollipop version. 

        1. Download and Install KINGROOT4.8.0.APK
        2. Open Kingroot and click Optimize Now
        kingroot

        3. Wait to finish and click continue.
        4. You can uninstall now other apps like Purify.
        5. Download Rootchecker in Playstore to verify.


        II-Installing Custom Recovery
        Requirements:
        Rashr tools
        CWM (rename to recovery.img)
        TWRP (rename to recovery.img)
        1. Download Rashr Tool
        2. Boot into Recovery
        3. Locate recovery.img then flash!
        Enjoy!

        If Root was removed once reboot. Try to  flash this SuperSU-Beta-2.52.zip.

        Here's stock recovery if you want to go back in stock recovery.


        Credits:http://androidcribs.com
        Kingroot
        Yuweng for TWRP


        SECOND METHOD
        Warning: Rooting can void your warranty! Do it at your own risk!

        Requirements:
        CM flare S4
        PC
        USB CABLE

        Download all:


        (run exe file to load needed drivers)


        2. Vcom drivers: .. (install sa pc)


        (extract the file then copy to desktop)


        4. CWM (rename to recovery.img)
            TWRP (rename to recovery.img)
             copy this CWM/TWRP inside (minimal adb fastbool tool folder)
        recovery copy


        (copy this to your root directory of sdcard(sa labas lang ng sdcard wag sa mga folder ok)


        Before you Proceed don't blame me for any damage that will happen to your device...Do it at your own risk!!!!!


        Procedure:
        1. first enable developer option go to setting click build number (tap 7 times) now go to developer option turn on usb debugging turn on oem unlocking
        OEM UNLOCKING


        2. Boot your device to Fastboot mode (hold power button and vol up) choose fastboot mode or boot into bootloader, then connect your phone to PC via USB cable. Open folder fastboot from minimal adb fastboot tool(run as administrator)
        Click Run me.bat
        fastboot click run me.bat

        3. Type this command:

        "fastboot oem unlock" 


        fastboot oem unlock

        Then hit Enter

        don't include (")  in adb ok! Just like in the image above.
        4. Then ON your device follow the instructions (choose vol up to unlock/vol down if you dont want to continue unlocking)Then wait for minimal adb to successfully unlock your bootloader (it will erase all your files and restore device to factory state)remove your device then turn it on..(on screen it will show android erasing-- after that it will boot up wait 5 to 10 minutes)skip set up wizard(skip lang ng skip)then repeat step 1.then follow the next step below


        Follow this guide to flash cwm recovery on your flare s4

        Procedure: 
        1. How to Use Minimal ADB and Fastboot Tool to Install Custom Recovery Boot your device to Fastboot mode(hold power button and vol up) choose fastboot mode)open minimal adb fastboot tool(run as admin).
         Follow step 2. above Click Run Me.bat

        2. then type this command: 
        "fastboot flash recovery recovery.img"


        fastboot flash recovery

        Then hit Enter
        (again di kasama ung "" sa command hahaha)wait untill flashing finish it will take just a secs..

        3. remove your device now force it to boot to recovery hold power/volume up (choose boot to recovery) then choose install files to sdcard (flash superSu) then Boom rooted kana!
        always choose fix root access when rebooting... on cwm


        Labels: , , , ,

        Monday, February 1, 2016

        Cara Upgrade Xiaomi Redmi 2/Prime ke MIUI 8 Lollipop 5.1 Terbaru

        MIUI 8 xiaomi.eu Lollipop 5.1

        Bersamaan dengan diperkenalkannya Xiaomi Mi Max pada tanggal 10 Mei kemarin, Xiaomi juga resmi merilis user interface terbarunya, MIUI 8. Karena dirilis bersamaan, praktis Mi Max menjadi perangkat pertama dari Xiaomi yang sudah langsung menggunakan MIUI 8 ini.

        Dikutip dari GSMArena, setidaknya ada tujuh pembaruan yang cukup signifikan pada MIUI 8 dibanding MIUI 7. MIUI 8 kini mendukung multi-window untuk menjalankan lebih dari satu aplikasi bersamaan. Namun fitur ini baru mendukung aplikasi tertentu saja, tidak semua aplikasi.

        Selanjutnya, Xiaomi menciptakan fitur walllpaper carousel dimana wallpaper dapat berganti-ganti, baik pada homescreen maupun lockscreen. Pada menu gallery, tampilan juga berubah, kini mendukung opsi editing foto lebih lengkap, seperti stiker dan filter.

        Sementara untuk meningkatkan performa baterai dan keamanan, Xiaomi mengoptimalkan fitur power saving. Fitur ini dapat memblokir aplikasi yang tidak Anda izinkan untuk berjalan sehingga akan benar-benar berhenti bekerja.

        Pada bagian kamera, MIUI 8 kini juga dilengkapi dengan scanner barcode atau QR code. Jadi Anda bisa langsung men-scan barcode menggunakan aplikasi kamera tanpa perlu men-download aplikasi pihak ketiga. MIUI 8 versi beta baru akan dirilis pada 1 Juni mendatang dan akan tersedia untuk seluruh varian Redmi, Mi Note, Mi 2, Mi 2s, Mi 4, Mi 4C, Mi 4S, dan Mi 5.

        Dan kali ini admin akan membagikan kepada kalian semua Tutorial tentang Upgrade Redmi 2 ke MIUI 8, setelah sebelumnya upgrade ke miui 7. Bisa dibilang MIUI 8 ini memiliki banyak perubahan mulai dari interface dan beberapa fungsi seperti Cloned Apps, Second Space, dll.

        Karena redmi 2 ini tersedia berbagai variant, sedikit Informasi tentang Redmi 2 WCDMA wt88047(HM2014811, HM2014817, HM2014818, HM2014821) dan Redmi 2 TD-SCDMA wt86047(HM2014813, HM2014816, HM2014812)

        TUTORIAL UPGRADE

        1. Salin file ROM MIUI 8 di SDCard
        2. Ektrak Fastboot Tool di Desktop
        3. Taruh file TWRP didalamnya
        4. Rename twrp-xxxxxx.img menjadi twrp.img
        5. Masuk ke Mode Fastboot pada Xiaomi Redmi 2/Prime(Tekan tombol Vol up + power secara bersamaan) lalu sambungkan ke PC dengan USB
        6. Di dalam folder fboot tahan tombol SHIFT lalu klik kanan mouse lalu pilih Open Command Window Here
        7. Ketik fastboot flash recovery twrp.img lalu tekan enter pada CMD
        8. Restart Redmi, Reboot to Recovery
        9. Pilih Wipe - Advanced Wipe Checklist Dalvik Cache, Cache, Data, Internal Storage, System - lalu Swipe to Wipe ; Done
        10. Pilih Install - Pilih file ROM MIUI 8 tadi lalu Swipe to Confirm Flash ; Done
        11. Reboot

        BAHAN

        Labels: , , ,

        Saturday, November 21, 2015

        Samsung Galaxy S6 Port rom for mt6582 devices

        This is Galaxy S6 rom ported to mt6582 devices. Do not flash on any other device not mt6582 unless properly ported to the said device.

        Rom Features:
        • All Features of Galaxy s6
        • Amazing smooth
        • Nice Dialer
        • Framework Lollipop
        • Galaxy Apps


        Kernel Version: 3.10.54

        Known Bugs:

        • Flashlight not working


        Screenshots


        Downloads
        RomGalaxy S6 forTHL 2-2-1.zip (If you don't understand the language on the download page, use a translator, or Chrome browser)
        File Size: 381 Мb


        NOTE: I am not responsible for what might happen to your device after using this rom. Flash at your own risk!

        Reboot to recovery, then flash!

        Done!

        Labels: , , , , ,

        Wednesday, November 11, 2015

        Stable cyanogenmod 12.1 lollipop rom for Galaxy Note 2 LTE (GT-N7105)

        Galaxy Note 2 GT-N7105


        Galaxy Note 2 LTE (GT-N7105) users are in for some great news, as the industrious CyanogenMod team has rolled out the official stable build of Android 5.1.1 based CyanogenMod 12.1 ROM for Samsung's former flagship phablet. This CM12.1 stable release is based on the original AOSP ROM, which brings a handful of enhanced customisations along with some vanilla Android improvements.

        Check out CyanogenMod's official blogpost to learn more about this new official release. Avid Cyanogen fans and Android fanatics alike must note that the stable releases are the final builds and the best versions of CM12.1 ROM released till date. Interested users may follow the step-by-step guide outlined below to install the Android 5.1.1 CM12.1 stable release on their Galaxy Note 2 LTE devices. Leakite will not be held responsible for any damage to your device during or after the firmware installation and users are advised to proceed at their own risk. Pre-requisites
        • The instructions given in this guide are meant for the international variant of Galaxy Note 2 (GT-N7105)only. Verify device model number by navigating to Settings > About Phone
        • Ensure the phone has at least 80% battery charge to prevent unexpected device shutdown (due to battery drain) while installing the ROM
        • Back up data and settings using a recommended custom recovery tool, like ClockworkMod (CWM) or TWRP, as it creates a complete image of the existing phone setup. In Recovery, choose Backup and Restore and tap Backup
        • Verify correct USB drivers for the phone are installed on the computer (download Galaxy Note 2 USB drivers)
        • Enable USB Debugging mode via Settings > Developer Options (if running Android 4.0 or above) or Settings > Applications > Development (if running Android 2.3 or earlier)
        • Ensure that the device is rooted with CWM recovery installed and its bootloader is unlocked
        Downloads Required

        Steps to Install Android 5.1.1 based CyanogenMod 12.1 stable build on Galaxy Note 2 (GT-N7105)  
        • Step 1 - Download Android 5.1.1 CyanogenMod 12.1 stable build for Galaxy Note 2 LTE on the computer. 
        • Step 2 - Connect and mount the phone's USB mass storageon computer with the USB cable.  
        • Step 3 - Now, copy the downloaded CM12.1 official stable build zip file to the root folder on the phone's SD card. 
        • Step 4 - Power off the phone and disconnect its USB cable from computer.  
        • Step 5 - Now boot the device into Recovery Mode by pressing Volume up, Home and Power buttons on your phone.  
        • Step 6 - Once the phone enters CWM Recovery, perform afull data wipe task by clicking Wipe Data/Factory Reset. Use the Volume keys to navigate between options and thePower button to select an option in the Recovery Mode
        • Step 7 - Then, perform Wipe Cache Partition and wait until the process completes.  
        • Step 8 - Now perform Wipe Dalvik Cache as well. To do this, go to the 'advanced' option and then click Wipe Dalvik Cache. This will help in preventing boot loop issues or any boot ROM related errors during firmware installation.  
        • Step 9 - Then return to the main recovery menu and chooseInstall Zip from SD card.  
        • Step 10 - Now click Choose Zip from SD card. Use volume keys to navigate to the CM12.1 stable build zip file that you copied earlier to your phone's SD card and choose it by tapping the Power button. Confirm the ROM installation on the next screen and the installation process will begin. Note: Repeat Step 9 and Step 10 to install Google Apps(Gapps) as well.  
        • Step 11 - Once both the Gapps and ROM are installed, go to"+++++Go Back+++++" and select Reboot System Now in the Recovery menu. 

        The phone will now reboot and the first boot may take about five minutes to complete. So, please be patient.

        Your Galaxy Note 2 (GT-N7105) is now running the latest Android 5.1 Lollipop via CyanogenMod 12.1 stable build. Go to Settings > About phone to verify the firmware version installed.

        Labels: , , , , ,

        Friday, September 11, 2015

        Custom ROM PAC MAN untuk Xiaomi Mi4i Fix All

        Custom ROM PAC MAN untuk Xiaomi Mi4i  Fix All

        Ganti MIUI 7mu dengan PAC ROM yuk ?!yap Custom ROM yang satu ini merupakan hasil design dari Android Original (AOSP), namun berdasarkan Android Lollipop 5.1.1. Custom ROM ini memiliki berbagai fitur yang sangat mengagumkan, juga memiliki tampilan yang elegant karena merupakan Original dari Android Lollipop.

        Pac Settings yang berada di Setting inilah yang menyimpan berbagai fitur yang sangat menarik. Ingin mengetahui Fitur dan tampilannya yang sebenarnyakan, silahkan unduh Custom ROMnya dan Install di Xiaomi Mi4i Anda tentunya dengan cara yang sangat mudah dipahami.

        Tampilan :
        Custom ROM PAC MAN Xiaomi Mi4i Fix AllCustom ROM PAC MAN Xiaomi Mi4i Fix All

        Custom ROM PAC MAN Xiaomi Mi4i Fix AllCustom ROM PAC MAN Xiaomi Mi4i Fix All

        Bahan : Link akan saya update jika ada pembaharuan


        Cara Install ADB
        1. Jalankan intaller yang tadi didownload
        2. Ketik y dan enter pada bacaan "do you want to install ADB and Fastboot?"
        3. Ketik y dan enter pada bacaan "install ADB system-wide?"
        4. Ketik y dan enter pada bacaan "do you want to install device driver?"
        5. Pilih OK untuk install driver dan tunggu beberapa waktu
        6. Selesai
        Cara Install TWRP
        1. Masukan file twrp-2.8.7.0-ferrari.img ke direktori adb di windows anda
        2. Ketik fastboot flash twrp-2.8.7.0-ferrari.img maka CWM sudah permanen di Android anda
        3. Ketik fasboot reboot untuk merestart Android anda
        Cara Install Custom ROM
        1. Salin File PAC ROM dan GAPPS di External
        2. Masuk Recovery Mode
        3. Pilih "Wipe and Format Options"
        4. Pilih Wipe data - yes, Wipe system - yes, Wipe cache - yes
        5. Pilih "Install ZIP"
        6. Cari file PAC ROM yang sudah di download tadi, Klik Yes tunggu sampai slesai dan kembali ke menu utama.
        7. Pilih "Install ZIP"
        8. Cari file Gapps yang sudah di download tadi, Klik Yes tunggu sampai slesai dan kembali ke menu utama.
        9. Pilih "Reboot System Now"
        10. Tunggu hingga proses reboot selesai

        Review by Rendy Adhie Pradhana ;
        Overall puas banget dengan performa nya. Saya coba untuk main game, COC + DomiNations, tidak ada kendala.

        MiBand berjalan sempurna, walau tidak bisa otomatis bypass lockscreen seperti di MIUI sih, tapi bisa diakalin koq… nanti saya share deh caranya :p

        Camera mantap, walau agak sedikit noisy sih kalau menurut saya, tapi pakai aplikasi Snap, jadi mantap banget… saturasi warna tetap natural, tidak berlebihan.

        Wifi lancar, barusan saya coba pairing menggunakan Xiaomi Yi lancar abis.

        GPS berjalan normal. Tidak ada kendala.

        Internetan pakai SIM? Bisa dong… cuma 4G belum saya tes, karena di Salatiga belum support *katrok #biarin wkakakak

        Source : XDA - Developers, Credit Todh.haraldsmoki3 , k2wl

        Sekian artikel tentang Custom ROM PAC MAN untuk Xiaomi Mi4i Fix All yang bisa adminkan presentasikan kepada kalian dan jika ada pertanyan mengenai artikel ini silahkan komentar di bawah. Silahkan like fanspage webinfoandroid agar tidak ketinggalan info terupdate mengenai Android

        Labels: , , ,