Wednesday, December 31, 2014

CONTACT


For work/job purpose, kindly contact me !


HIRE ME !

Camera KK v1.2 [Apk Full]

Requiere Android 4.0 o superior.

Cámara KK es una versión mejorada de la aplicación de Cámara nativa de Android KitKat (Android 4.4).

--- CARACTERÍSTICAS ---

- 3 modos: cámara, grabadora de vídeo y panorama
- Modo silencioso (sin sonido del obturador, puede que no funcione en algunos dispositivos)
vivo - fotos FX: 12 efectos (sólo en la versión completa)
- Apoyo SmartWatch Pebble (con vista previa en vivo)

- Una pizca de zoom
- teclas de volumen configurables
- imágenes de pantalla ancha
- Ajuste de calidad de imagen (baja / media / alta / ultra)
- Fuente de almacenamiento configurable (tarjeta / SD interna)
- Contador Regresivo
- Modo ráfaga
- Directrices
- Opción completa de brillo
- Video / La calidad de audio configurable
- Ajuste del visor Precisa
- UHD - grabación de vídeo 4K (Samsung S5 / S6 - Nota 4.3)
- Botones virtuales en modo de inmersión / Hide (Android 4.4)
- Características más frescas pronto ...

---
Link de descarga.  ARCHIVO APK


P.S. De estos mismos desarrolladores, también puedes revisar GALERÍA / EDITOR DE IMAGENES

Labels: ,

RCS & RDS isi completeaza portofoliul media cu 4 posturi de radio: ProFM, Music FM, Info Pro si Dance FM

Din luna decembrie, RCS & RDS isi completeaza portofoliul media cu patru posturi de radio pe care le-a achizitionat in urma tranzactiei cu grupul Central European Media Enterprises (C.M.E.).  ProFM, InfoPro, Music FM si Dance FM sunt cele patru statii de radio care se adauga, din aceasta luna, celor noua posturi de televiziune pe care compania le detine in prezent.

Achizitia celor patru posturi de radio face parte din strategia RCS & RDS de a le oferi utilizatorilor continut media variat si la un inalt standard de calitate. Produsele ProFM, InfoPro, Music FM si Dance FM vor completa gama de continut media pe care RCS & RDS il furnizeaza deja: de la stiri, informatii echilibrate si interviuri in exclusivitate, la cele mai importante competitii sportive din lume, de la cele mai noi productii cinematografice, la cele mai interesante si educative documentare, precum si continut muzical pentru tineri. 

Tranzactia dintre grupul RCS & RDS si Central European Media Enterprises a fost supusa aprobarii Consiliului National al Audiovizualului. ProFM este unul din cele mai ascultate posturi de radio din Romania. Conform ultimelor date ale Studiului de Audienta Radio, ProFM are, la nivel national, aproape 1,7 milioane de ascultatori in fiecare zi si peste un milion la nivel urban. Cota de piata zilnica a radioului este de 10% pe publicul comercial, la nivel national, si de 9.1% la nivel urban. 

RCS & RDS este unul dintre cei mai importanti operatori de telecomunicatii din regiune, furnizand servicii in Romania, Ungaria, Spania, Italia si Cehia. Compania este lider pe piata din Romania in furnizarea serviciilor de internet si de televiziune prin cablu si satelit, dar si unul dintre furnizorii principali de servicii de telefonie fixa si mobila, internet mobil precum si alte servicii de continut. Compania detine singura televiziune de stiri in format full HD, Digi24 HD, cu 8 statii locale, 3 canale de sport, Digi Sport 1, 2 si 3, care difuzeaza cele mai importante competitii sportive din Romania si din lume, un canal de filme Pay-TV, Digi Film, 3 programe de documentare, Digi World, Digi Life si Digi Animal World, si o televiziune muzicala, Utv.

Labels: ,

Tuesday, December 30, 2014

Android 5.0 Lollipop Update, 4 Things You Need to Know.

Since the initial Nexus Android 5.0 Lollipop released, we started to hear more about Google’s new update in the few weeks. As expected, Android 5.0 Lollipop brings a slew of new features, like its more tangible interaction, fluid material design with purposeful motion, more ways for security, etc. More and more Android users cannot wait to update their devices. Though, Android 5.0 Lollipop received lots of praise, something you still need to know before upgrading your Android devices.


Your Android device can get Android 5.0 Lollipop?


Android 5.0 Lollipop has started rolling out to a great number of devices already. You need to know if your device is available for upgrading. Here is a list of most phone which can get Android 5.0 Lollipop.
Google Nexus 4/5/6/7/9/10, Motorola E/G/X/G(2014)/X(2014)/Droid Turbo, HTC One/One M7/One M8(by February 3rd, 2015 )/Samsung Galaxy S3/S4/Note 4/Note 3/Note 2/S5, LG G3 and some of Sony Xperia Z series will get at the beginning of 2015. Is your device can get Android 5.0 Lollipop now? So if those "90-day" manufacturers stick to their word, you could see be seeing Android Lollipop on your device before the end of January. The final code was delivered to OEMs on November 3rd.


What Common problems of Android 5.0 Lollipop upgrade?


While a lot of the chatter among Android users was good, we also heard about some of the Android 5.0 Lollipop problems affecting various users. Including Wi-Fi issues, battery issues, lagging and crashing, video playback problem. Every new system has bug to be fixed in the beginning. As the list of Android 5.0 Lollipop problems grew, so did the pressure for Google to release an Android 5.0.1 Lollipop bug fix update to alleviate some of these initial problems.


Did you have your data backed up before the upgrade?


Android users who have already upgraded their devices, over 50% backed their data before the upgrade. Around 5% users who didn’t back up their data caused problem of data loss after updating to Android 5.0 Lollipop. As we all known, it is common issue that you may fail the update. Thus, the first thing to do is backing up data on your device and keep your data for security. Once you lost data during the upgrade, at least you have a backup files for recovery.


What if you failed Android 5.0 Lollipop upgrade?


If by any chance that you failed Android 5.0 Lollipop upgrade, the most important thing you care about may be getting back valuable data on your device. If you have available backup, restoring data after Android 5.0 Lollipop upgrade is not a big deal. However, as I said above, over half Android users don’t regularly back up their data, even they are having their device upgraded. In that case, an Android Data Recovery program may help you recover data from Android phone. Jihosoft Android Phone Recovery is recommended here. It is specially designed to restore data including text messages, photos, history logs, contacts, musics, videos, and more on Android Phone without backups.

Labels: , , ,

NHL 2K v.1.0.3 [APK + Datos]

Requiere Android 4.0 o superior.

Este año, NHL 2K vuelve mejor que nunca! Sacia tus ganas de hockey con la novedosa y estelar versión para móviles de la NHL. 

Todos los seguidores de la NHL disfrutarán de nuevos y emocionantes modos de juego, como un vertiginoso modo de 3 contra 3 en una minipista, tandas de penaltis por turnos en multijugador y un completo modo My Career con gráficos mejorados y actualizaciones en vivo de las plantillas.

¡Comprueba si tienes lo necesario para llevarte la copa de NHL 2K!

-My Career: controla un jugador y gana puntos de habilidad para que mejoren las puntuaciones a lo largo de varias temporadas.
-Minipista: vertiginoso modo de juego 3 contra 3 de estilo arcade.
-Penaltis: tanda de penaltis multijugador por turnos con Google Play. Enfréntate a tus amigos o disfruta de un partido dinámico.
-Actualizaciones en directo de las plantillas.
-Compatible con mando.

Links de descarga:


Para instalarlo en nuestro dispositivo:

1. Instalar el .apk
2. Copiar "com.t2ksports.nhl2k15" a la carpeta > sdcard/Android/obb
3. Y ejecutar el juego

Labels:

How to root Zenfone 5 Kitkat V2

For kitkat only JB may not work. Before root kindly backup your data. 


Requirements:

1. Root z5 kitkat v2 
2. Intel driver
3. USB Cable
4. Windows pc

I am using windows 7 for this work.


am not resposible for any damage or soft/hard brick will happened to your device!

1. Download first Intel driver on your PC extract  and install it.
Follow the Screenshot below
Rooting Zenfone 5 Kitkat V2 Screenshot 1


Rooting Zenfone 5 Kitkat V2 Screenshot 2

Rooting Zenfone 5 Kitkat V2 Screenshot 3
Rooting Zenfone 5 Kitkat V2 Screenshot 4

2. Once driver succesfully installed, connect your phone to your pc using usb cable. Don't forget to enable debugging mode. To do that, go to settings>about>software information>build number (tap 7 times to enable developer option) then, go back to settings>developer options>usb debugging (enable/check it).


Rooting Zenfone 5 Kitkat V2 Screenshot 5

3. Then, Test for authorized connection between pc and phone. Go to downloaded rootz5kitkatv2 on your pc and click files>hold shift + right>choose open command window.
Rooting Zenfone 5 Kitkat V2 Screenshot 6
4. Then cmd will prompt. Then type " adb devices" hit enter. The left side is your serial number and the right side is the word "device" it means your good to go.
Rooting Zenfone 5 Kitkat V2 Screenshot 7

Rooting Zenfone 5 Kitkat V2 Screenshot 8
5. If the word "unauthorized" will appear instead of "device" then youre not good to go. So unplugged your phone from pc and reconnect again. A prompt from your phone will appear. Just check allow always to continue.
Rooting Zenfone 5 Kitkat V2 Screenshot 9

6. Please read the instructions carefully. These time we will root your phone. Now, stay connected to your pc with your mobile and open the file "rootz5kitkatv2" that you download file. Double click "root-zenfone5-ww" or "Root-ZenFone5-en"


Rooting Zenfone 5 Kitkat V2 Screenshot 10

7. The bat file will open and the rooting process is now starting. Your phone will reboot 5 to 6 times. Just press any key to continue. Wait for some more time 
Rooting Zenfone 5 Kitkat V2 Screenshot 11
last reboot screen ...
Rooting Zenfone 5 Kitkat V2 Screenshot 12
8. Last reboot will appear, check your phones app drawer, if you can see SuperSU, congrats! you are now rooted.
Rooting Zenfone 5 Kitkat V2 Screenshot 13
9. To survive root access during OTA updates, go to supersu>settings>enable pro. Once done, go back again supersu>settings>enable survival mode.
Rooting Zenfone 5 Kitkat V2 Screenshot 13
Congrats your Zenfone are now rooted!


Special thanks to:
avvavm of xda
shakalaca

Labels: ,

Monday, December 29, 2014

Convert Any Website into Android Application in Android Studio


PART - II


PART - III


GET MY PROJECT CODE HERE


                                       GET MY ANDROID APK FILE HERE


Labels: ,

How to Enable Multi User on Zenfone


Need Rooted Zenfone

Instructions How to Enable Multi User on Zenfone:


  1. Root Your Zenfone 
  2. Install Xposed (Tutorial Here)
  3. Install Multi User Module from Xposed

Some Screenshoots:


Labels: ,

Sunday, December 28, 2014

Flashable Stockrom of Myphone rio fun V2 Kitkata

Fully Stockrom-odexed only works in myphone rio fun V2 android 4.4.2 Kitkat

My Phone Rio Fun Picture


REMINDER! Please make sure to back your NVRAM folder or IMEI before Flashing this one!

Flash it with your own RISK!!!

am not resposible for any damage or soft/hard brick will happened to your device!

Download Link:  mpriofunv2_FLashable.zip
----------------------------------------------------------------------------------------------


How to flash this ROM?

1. Go to Recovery Mode CWM/CTR (Carliv Touch Recovery)
2. Wipe>Wipe Preflash> Wipe all
3. Mount System and data
4. Install Zip>Choose Zip from SD card>Flash
5. Wait until the process will be completed


Note:Please give a proper credit to me and don't share it without sharing my blogs. Thank you!


Labels: , ,

Lenovo A536, Perform OTA Update to the Latest Version ROW_S167

Lenovo A536, Perform OTA Update to the Latest Version ROW_S167 - Firmware update for Lenovo A536 with the build number A536_S167_141216_ROW already release on the early of December, this can be obtain with OTA update.
Interesting of this update is, this can be installed from any previous version but i also have the condition that your previous version still using Lenovo Standard Recovery and not have been modified on system file. This update is will format or erase all your data on the device so please make backup preparation first before continued following this guide, it not only patch your system.
So today guide is how to perform OTA update for Lenovo A536 to the latest firmware version S167_ROW.

Disclaimer :
This guide for educational purpose only, We not responsible if your device bricked after following this tutorial. Even this guide is already tested but it has possibility to brick your phone, (DWYOR)


Lenovo A536, Perform OTA Update to the Latest Version ROW_S167

Preparations :
  • For china devices, do this with your own risk. Only tested on device sold outside the china country.
  • Only available for ROW version firmware, china firmware please don't do this because it will not work.
  • Make sure battery is > 50% and already have backup preparations
Download :
  • A536_S167_141216_ROW 1 Gb, contains full installation file for update your Lenovo A536 to the latest version S167_ROW
Lenovo A536, Perform OTA Update to the Latest Version ROW_S167
  1. This update don't required any computer so it not need to install any driver on your computer, just download A536_S167_141216_ROW to your computer and after finish move or copy it to your device external SD Card.
  2. On your device rename the A536_S167_141216_ROW to update.zip, just rename it don't extract it, just leave it as update.zip and this file must be place on the root of your external SD Card
  3. Turn off your device, wait for completely turn off then press and hold Power button + Volume Up + Volume Down, release it when you can see recovery mode.
  4. Installation will begin automatically once you successful go to recovery mode, just wait installation to be finish. It will take 3-4 minutes to finish.
    Lenovo A536, Perform OTA Update to the Latest Version ROW_S167

  5. Done, When installation finish it will reboot your device automatically. First boot will take longer, usually it will take 4-5 minutes to finish. After successful boot just verify that your Build Number is same with the downloaded ROM. Go to System Setting ↦ About Phone ↦ Version Information
Congratulations, You have successful update your Lenovo A536 with the latest ROW version firmware. Please leave comments when you found any problems or broken links regarding this guide, and Thank you for visit

Labels: ,

¿Cómo descargar archivos de ADF.LY?

Hoy en día, muchas páginas web utilizamos adf.ly para proteger o acortar los enlaces de descargas, y esto provoca algo de confusión entre los usuarios.

En este artículo, trataremos de explicar brevemente cómo descargar archivos codificados con adf.ly, o lo que es lo mismo, como acceder a estos enlaces protegidos.

IMPORTANTE: Lo primero que hay que saber, es que adf.ly sólo es un servicio para acortar o proteger los enlaces. No se descarga nada directamente de él, ni de la página de publicidad que te muestra, sino que se descarga del enlace protegido o acortado.

¿Y entonces? ¿Cómo descargamos de adf.ly? ¿Qué debemos hacer?

- El primer paso es acceder al enlace y se nos mostrará una pantalla tal y como esta:


- Como podemos ver en la imagen, se nos mostrará una cuenta atrás de cinco segundos en la parte superior derecha.

- Luego, tenemos que esperar esos cinco segundos y nos aparecerá una imagen como la siguiente:


- Como se ve en la imagen anterior, nos ha aparecido un botón amarillo en la parte superior derecha que pone “Saltar publicidad”, hacemos click en él y éste nos redirigirá a la página de descarga.


- Y por último, ya una vez en la página de descarga, sí podremos bajar a nuestra computadora el archivo protegido o codificado sin problemas.

Es así de simple, no hay qué hacer nada más. Sé que esto es algo muy sencillo pero me he encontrado con muchos usuarios que no saben como descargar de adf.ly, o que se confunden.

NOTA: Existen muchos otros acortadores de enlaces, como pueden ser AdFocus, LinkBucks, Short.st, Ow.ly, etc... pero todos ellos funcionan exactamente de la misma forma. Esta guía le es aplicable a todos.

Recuerden que si tienen alguna duda o han encontrado algún problema con la guía pueden dejar un comentario aquí o en la fan page.

P.D. Si quieren abrir los links mucho más rápido desde su celular, les recomiendo entonces utilizar el siguiente navegador:  PUFFIN WEB BROWSER

Hasta la próxima.

Labels:

Saturday, December 27, 2014

TWRP Recovery for ASUS Padfone S T00N PF500KL


DWYOR (Do it With your Own Risk)


TWRP-ASUS-PAdfone-S-t00N


Requirements:


  • Rooted Padfone S
  • Terminal Manager (Download from Playstore)
  • Backup your data first before perform this action.

Download TWRP Recovery img:

Instructions:

  • Download file above and place it to internal memory
  • Open Terminal Manager and Type: 

dd if=asus_t00n_twrp_2_7_1_1.img of=/dev/block/platform/msm_sdcc.1/by-name/recovery

  • Then re-opened to recovery, after the reboot, when the ASUS logo disappears about 60 seconds and so on, press power button, you can see the TWRP menu Hello. I have not verified all the features, free to try again, please remember to interested backup your mobile phone data.

Labels: , , ,

Why the application hangs or loss of data while inserting PadFone to Station?


Why the application hangs or loss of data while inserting PadFone to Station?

One of the main features of the PadFone series is the Dynamic Display technology. In short it’s the switching between the screens while still staying in the active app without the loss of data. It enables seamless transfer of applications from the phone to the tablet.

If the application is abnormal while inserting PadFone to Station, please try to enable "Keep all applications alive". You may refer to the steps below for more information.

Steps

1. Tap on "Application"


2. Tap on "Settings" option.


3. Select "ASUS customized settings" from Settings menu.


4. Select "PadFone Settings"


5. Select "Dynamic display switch list"


6. Find the app which you want to enable Dynamic display and check the box.


7. Slide the "Keep all applications alive" switch to the "ON" position.

Labels:

Friday, December 26, 2014

[Benchmarking] ASUS Padfone S, Super Phone from ASUS


If there’s a word better than awesome we’d use it, the Padfone S is going to make everybody scream with excitement, not only it is impressive in its hardware performance and quality, it’s price tag is going to make many smartphone makers worry and it only costs an additional cheap price for the phone’s tablet station, you get a high performance smartphone and tablet in an extremely affordable package.


Labels: , , ,

How to Recover Data from Android Devices with Android Data Recovery

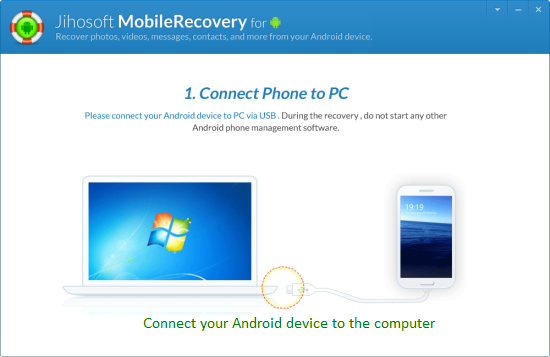
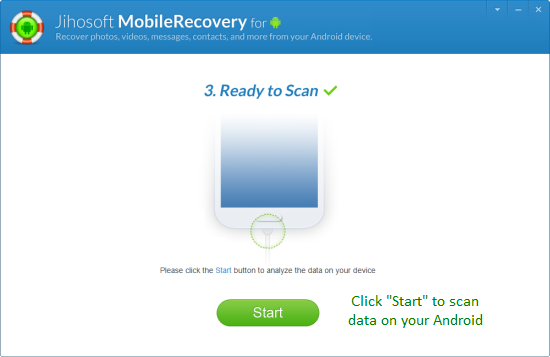
Android, the world's most popular mobile platform, which is used everywhere, by every type of customer. That's why Android phone powers hundreds of millions of users in more than 190 countries around the world. Everyday, we add new data and delete old data on our phone. However, many Android users experience the data loss of Android phone due to various kinds of reasons, like factory reset (Device Reset), system crash, ROM flashing, deleting data accidentally, new system upgrade, stuck in black/white screen of death, locking by forgotten password, and virus attack etc. It's really a disaster that important data lost forever. Is there any way to restore deleted data from Android Phone? The good news is that there is an Android Data Recovery programs specially designed to solve the problem of data loss on Android phone/tablet.


Key Features of Android Data Recovery:


  • Support wide variety of Android Phone, like Samsung Galaxy S5, S4, S3, S3 mini, Note 2, Note 3, Note 4, HTC One, LG, Sony, Motorola, ZET, Huawei, etc. Meanwhile, it compatible with all version of Android OS including the latest Android 4.4.4 KitKat.
  • Allows you restore various kinds of files, including contacts, photos, text messages, call logs, videos, musics, and other documents.
  • Selectively preview and retrieve data from Android. All data found can be restored directly.
  • Simple to use and risk-free. You can recover deleted data with a few clicks.


Step By Step Tutorial:


  • Step 1.Download and install Android Phone Recovery. An Android Data Recovery program  highly recommended here is Jihosoft, which is specially dedicate to android data recovery tools.


  • Step 2.Connect your Android device to computer via USB. Then double click the icon to run Jihosoft Android Phone Recovery. It will automatically detect your device.(keep your device open)


  • Step 3.Enable USB debugging on your Android device(optional). If you have already enabled USB debugging, just discard this step. 


You may want to learn how to enable USB debugging on your Android device.
  • Step 4.Analyze and scan data on you Android device. After enabling USB debugging, simply hit the button "Opened? Next....", and then tap "Start" to analyze and scan data on your device.


    • Step 5.Selectively preview and restore data on Android. In this step, you will see all data found on your device displayed on the scanning result. Click them one by one to choose what you want to retrieve. Finally, hit the button "Recover" to get lost data back. You can save them wherever you want on computer. 


    More tips and tricks you need to know:


    • When you delete data on your Android device, it isn't really erased- it continues existing. That's why we can restore deleted files. Deleting a file's pointer and marking its space as available is an extremely fast operation. In contrast, actually erasing a file by overwriting its data takes significantly longer. For example, if you're deleting a 1 GB file, that would be near-instantaneous. To actually erase the file's contents, it may take several minutes – just as long as if you were writing 1 gigabytes of data to your Android device. In that case, once you accidentally lost files, you'b better stop using your device to avoid overwriting and permanently loss.
    • If by any chance that this Android Data Recovery program cannot identify your Android device after enabling USB debugging, reconnect it and try again. Keeping an eye on the screen of your Android device, you'll get a pop-up message. Just click "OK" to allow USB debugging.
    • Don't disconnect your device in the process of recovery and you better connect one Android device at a time to avoid the unnecessary connection troubles.

    Labels: , , , ,

    Unboxing and Specifications ASUS Padfone S PF500KL


    Also known as Asus PadFone S PF500KL
    Network Technology GSM / HSPA / LTE
    Launch Announced 2014, March
    Status Available. Released 2014, July
    Body Dimensions 143.4 x 72.5 x 10 mm (5.65 x 2.85 x 0.39 in)
    Weight 150 g (5.29 oz)
    SIM Micro-SIM
    - Padfone Station with 9 inches IPS display, 1920 x 1200 pixels, 4990 mAh battery, front camera. 250.4 x 172.3 x 11.6 mm, 514 grams
    Display Type Super IPS+ LCD capacitive touchscreen, 16M colors
    Size 1080 x 1920 pixels, 5.0 inches (~441 ppi pixel density)
    Multitouch Yes, up to 10 fingers
    Protection Corning Gorilla Glass
    Platform OS Android OS, v4.4.2 (KitKat)
    Chipset Qualcomm MSM8974AB Snapdragon 801
    CPU Quad-core 2.3 GHz Krait 400
    GPU Adreno 330
    Memory Card slot microSD, up to 64 GB
    Internal 16 GB, 2 GB RAM
    Camera Primary 13 MP, 4128 x 3096 pixels, autofocus, LED flash
    Features Geo-tagging, touch focus, face detection
    Video 2160p@12-25fps, 1080p@30fps, 720p@60fps
    Secondary 2 MP, 1080p@30fps
    Sound Alert types Vibration; MP3, WAV ringtones
    Loudspeaker Yes
    3.5mm jack Yes
    Comms WLAN Wi-Fi 802.11 a/b/g/n/ac, dual-band, Wi-Fi Direct, hotspot
    Bluetooth v4.0, A2DP
    GPS Yes, with A-GPS
    NFC Yes
    Radio TBC
    USB microUSB v2.0 (SlimPort TV-out), USB Host
    Features Sensors Accelerometer, gyro, proximity, compass
    Messaging SMS(threaded view), MMS, Email, Push Email, IM
    Browser HTML5
    Java Yes, via Java MIDP emulator
    - Active noise cancellation with dedicated mic
    - ASUS WebStorage (50 GB storage)
    - MP3/WAV/eAAC+ player
    - MP4/H.264 player
    - Document viewer
    - Photo/video editor
    Battery
    Stand-by Up to 417 h (2G) / Up to 528 h (3G)
    Talk time Up to 30 h (2G) / Up to 22 h (3G)
    Misc Colors Titanium Black, Platinum White, Dark Ruby

    unboxing asus padfone s | www.asus-zenfone.com
    unboxing asus padfone s | www.asus-zenfone.com

    unboxing asus padfone s | www.asus-zenfone.com
    unboxing asus padfone s | www.asus-zenfone.com

    unboxing asus padfone s | www.asus-zenfone.com
    unboxing asus padfone s | www.asus-zenfone.com

    unboxing asus padfone s | www.asus-zenfone.com
    unboxing asus padfone s | www.asus-zenfone.com

    unboxing asus padfone s | www.asus-zenfone.com
    unboxing asus padfone s | www.asus-zenfone.com

    unboxing asus padfone s | www.asus-zenfone.com
    unboxing asus padfone s | www.asus-zenfone.com

    unboxing asus padfone s | www.asus-zenfone.com
    unboxing asus padfone s | www.asus-zenfone.com

    unboxing asus padfone s | www.asus-zenfone.com
    unboxing asus padfone s | www.asus-zenfone.com

    Labels: ,