Friday, January 16, 2015

Updated Recovery[CTR 3.0] for MyPhone Agua Rio V2 Kitkat

Updated Recovery[CTR 3.0] for MyPhone Agua Rio V2 Kitkat Screenshot 1

Requirements:
Rooted
MobileUncleTools.apk


Note: Rename recovery_CTR_30_MyPhoneAguaRio.img to recovery.img

Procedure:
Step 1:Install MobileUncleTools.apk

Step 2: Move the recovery.img in your SDCARD outside the folder which you can see easily.

Step 3: Open Mobile Uncle Tools Grant SuperSu
Click Recovery Update
Then choose Recovery.img Click OK


Enjoy! You can now back up your Myphone Agua Rio V2 Kitkat..


Credit:
Carliv of xda for program
me for porting this

Labels: ,

Friday, January 9, 2015

[TUT]How to Fix Bootloop Myphone Rio FUn V2 Android 4.4.2 Kitkat Version

Hi I made this tutorial to help those who are "bootloop" in myphone rio fun V2 Kitkat. I wrote this blog to help you how to restore your backup using CTR 2.2 that works in Rio Fun V2 Kitkat.
This Tricks are inclusive for those who has CTR only. I ported CTR 2.2 for kitkat but still can't fix in mount cache so that backup are not fully complete and missing file like cache and nandroid.md5. You can't restore it without this file but I have solution and tested by my member in myphone rio fun development in facebook group. So I suggest you to flash my CTR 2.2 before anything else happen in your phone like bootloop or stock only in logo because of system failures or other reasons and etc. If you don't have CTR otherwise you need stock rom but still doesn't have stock rom  available for Rio Fun V2 Kitkat because of some other reasons.


For tutorial in my CTR 2.2 [CLICK HERE]

Requirements:
Rio Fun Kitkat v1.08 and v1.09
Rooted
CTR
PC


Download the ff:
1.  2014-12-01162016 for v1.08
    2015-04-24.08.25.00.rar for v1.09(updated)
2. nandroid.md5(4shared)
    nandroid.md5(mediafire)

Procedure
1. Go to sdcard/mmc create folder clockworkmod inside this folder create folder name backup.

2.  Download my backup date 2014-12-01162016 for v1.08 or  2015-04-24.08.25.00.rar for v1.09 and nandroid.md5 then extract all.

     Then move nandroid.md5 in my backup 2014-12-01162016 for v1.08 or 2015-04-24.08.25.00 for v1.09
     Just  like shown in image below
Fixing Bootloop For My Phone Rio Fun V2 Android 4.4.2 Kitkat Version Screenshot 1


3.  paste in folder clockworkmod/backup/2014-12-01162016 for v1.08 or 2015-04-24.08.25.00 for v1.09

4. Insert your sdcard in your phone and go to CTR or recovery mode

5. Wipe Cache and Dalvic Cache, Mount Sytem and Mount Data

6. Go to Restore and open folder 2014-12-01162016 for v1.08 or 2015-04-24.08.25.00 for v1.09  then restore!

7. When complete then reboot, if still bootloop go to CTR then factory reset!

Now your phone is working!


Note:Please give proper Credit to me and Don't share my file without sharing my blogs! Thank you!


Labels: ,

Saturday, January 3, 2015

Updated Carliv Touch Recovery 2.7 for Myphone rio fun V1. Android 4.2 Jellybean

Requirements:
Rooted

Updated Carliv Touch Recovery 2.7 for Myphone rio fun V1. Android 4.2 Jellybean Screenshot 1
Whats New?

- rebuilt from base (cwm 6.0.3.7) and add improvements on top.
- reintegrated bottom virtual navigation keys, to compensate the non-function of swipe in some phones
- better compressed backups integration - pigz support from cm-11
- new "nvram backup/restore" menu functionality: the nvram partition will be backed up in clockworkmod/backup/.nvram/nvram-xxxxx folder as nvram.img. This will help if you lose IMEI and other communication features. It will work only if you have the nvram partition defined in recovery.fstab. If the nvram partition is damaged (as in flashing an oversized recovery) this will not help you, and you need SPFlashTools to reflash with format your phone official firmware, and after that flash this recovery, boot in recovery and restore nvram.
- the recovery has now an increased stability, many issues are solved
- the content of the backup folder will contain only what an usual clockworkmod backup contain, and that will make it easy to restore backups made with older versions.
- new GUI images, very light
- some other changes.

Procedure:
Step 1:Install Mobileuncletools.apk

Step 2: Move the recovery.img in your SDCARD outside the folder which you can see easily.

Step 3: Open Mobile Uncle Tools Grant SuperSu
Click Recovery Update
Then choose Recovery.img Click OK


If not work try to rename recovery(1).img to recovery.img
Or flash via SPFT in PC: Download [HERE] check only recovery then click download in SPFT.


Note:Please give a proper credit to me and don't share it without sharing my blogs. Thank you!


Special thanks
carliv of xda

Labels: ,

Sunday, December 28, 2014

Flashable Stockrom of Myphone rio fun V2 Kitkata

Fully Stockrom-odexed only works in myphone rio fun V2 android 4.4.2 Kitkat

My Phone Rio Fun Picture


REMINDER! Please make sure to back your NVRAM folder or IMEI before Flashing this one!

Flash it with your own RISK!!!

am not resposible for any damage or soft/hard brick will happened to your device!

Download Link:  mpriofunv2_FLashable.zip
----------------------------------------------------------------------------------------------


How to flash this ROM?

1. Go to Recovery Mode CWM/CTR (Carliv Touch Recovery)
2. Wipe>Wipe Preflash> Wipe all
3. Mount System and data
4. Install Zip>Choose Zip from SD card>Flash
5. Wait until the process will be completed


Note:Please give a proper credit to me and don't share it without sharing my blogs. Thank you!


Labels: , ,

Friday, December 5, 2014

How to transfer application in myphone rio fun

This  one of the problem in my phone rio fun running in kitkat version. So that I made a tutorial on how to bypass this problem. I have two method to bypass it
Myphone rio fun Kitkat version can only send video such as .MP4, songs such as .MP3 and image such as .JPG except Application which is ".APK" extension

This is easy as candy..lol Just read and understand the procedure.

Method 1:
Requirements:
Rootexplorer


1. Just rename the application file .apk to mp4,or.mp3 ,or.jpg or .zip using your rootexplorer then send now via bluetooth.
Then change when you receive the file and rename to .apk again in order to install. That's it


Method 2:

Requirements:
Superbeam.zip
Rootexplorer

This one of the best apps to transfer file via WIFI. You don't need internet connection to transfer. This app create a FAKE wifi and you can connect it directly.

Note: Your pairing phone need to install this Superbeam.zip in order to send or download the file.
You don't need to install this application the one who send the file need to install this Superbeam.

1. Download Superbeam.zip and extract via rootexplorer then install the 2 apps including PRO version.

2. Once installed the superbeam go to file manager or rootexplorer then choose the file you want to send and choose superbeam to send file.

3. Connect via Direct wifi of your phone to other phone who send the file.

4.Once connected open the default browser or chrome who download the file then go to the ip address that you can see in the image below then insert this  http://192.168.49.1:8080 

How to transfer application in myphone rio fun Screenshot 1
Note: Click the other device to see the right ip address and password.

 5. Then you can see the file in your browser and  you can download now. That's it!


Labels: ,

Thursday, December 4, 2014

Updated CTR to Myphone Rio Fun Kitkat

Sorry guys but still have bug in Mounting CACHE but just ignore it..All features are work properly like Mounting in system,data,backup and Partitioning,
When I'm done I will release soon the update version

Updated CTR to Myphone Rio Fun Kitkat Screenshot 1

Requirements:
Rooted
MobileUncle Tools
For v1.08
Recovery.img (4shared)
Recovery.img  (mediafire)
For v1.09
recovery_riofun_kk_v1.09(rename to recovery.img)

Note: Check your custom build version to find out your version v1.08 or v1.09

Step 1: Install MobileUncle Tools

Step 2: Move the recovery.img in your SDCARD outside the folder which you can see easily.

Step 3: Open Mobile Uncle Tools Grant SuperSu
Click Recovery Update

Reboot into Recovery mode Click OK
Reboot


Note: You will see a blue butterfly
Rename into recovery.img if still not work

You can now Mount system,data,backup and Partitioning.
If you want to make unli internal proceed here [Click Here] Same procedure in jellybean rio fun.

You can use my CWM BACKUP

Proceed this if you want to know how to restore your backup file [CLICK HERE]

Note:Please give a proper credit to me and don't share it without sharing my blogs. Thank you!

Labels: ,

Updated to root for myphone rio fun kitkat no need PC

I have two method to root myphone Rio fun V2 android 4.4.2 kitkat. Method 1 using kingroot and method 2 it need CTR.(carliv toch recovery) or any custom recovery like twrp,cwm,philz touch etc,


Note: Rooting can void your warranty!
I am not resposible for any damage or soft/hard brick will happened to your device!


Method 1

Install KingRoot_Android_3.4.7.apk then click Root:


Method 2
This method need to be rooted.
Requirements:

CTR/TWRP
SuperSu2.01.zip


1. Go to Recovery
2. Mount System and Mount data
3. Install update via zip SuperSu2.01.zip
   Then wait..
4. Reboot and wait you notice your android is upgrading..
5.Check if you install SuperSU
Rooting my phone rio fun Screenshot 1


Your done!

Download rootchecker in playstore to verify if you are successfully rooted.


Note:Please give a proper credit to me and don't share it without sharing my blogs. Thank you!

Labels: ,

Wednesday, November 26, 2014

Myphone Rio Fun v2 Kitkat android 4.4.2 Stock Rom

Here's my stock rom in myphone rio fun V2 Kitkat Android 4.4.2.v1.09
This is updated version of rio fun Kitkat V2. Sorry for the inconveniece of ads considering this only for your donations just to keep my blog alive. After you click skip ads the download link will appear. And you can download now for free. Enjoy and keep up sharing everyone!

My Phone rio fun picture


Download here:
1. myphoneRioFunV2Kitkat.zip
2. My_Phone_Agua_Rio_Fun_v2.zip

3. Fulldump_mpriofun_v1.09_kitkat

How to flash please proceed this [ClickHere]

Please do not reupload or share it with my blog. Thank you!

Labels: ,

Thursday, November 20, 2014

How to partition myphone rio fun Andorid 4.4.2(Kitkat)

How to partition myphone rio fun Andorid 4.4.2(Kitkat)


Requirements:
1.must be rooted - (if not proceed in this link [ClickHere]
2. sd card 4gb and up
3. usb card reader
4. PC/LAPTOP


Attention:


I am not resposible for any damage or soft/hard brick will happened to your device!
Do it at your own risk!

Procedure:
1. First back up all your files to the computer because partitioning will wipe your data.
2. Insert your SD card to a usb card reader and open it on your computer.(not via USB cable)
4. Download Mini Tool and Open it in your PC/LAPTOP. Locate your SD card (be careful in choosing and make sure not to choose the drive of your computer)
5. Right click and choose Delete.

Partition for My Phone Rio Fun Screenshot 1

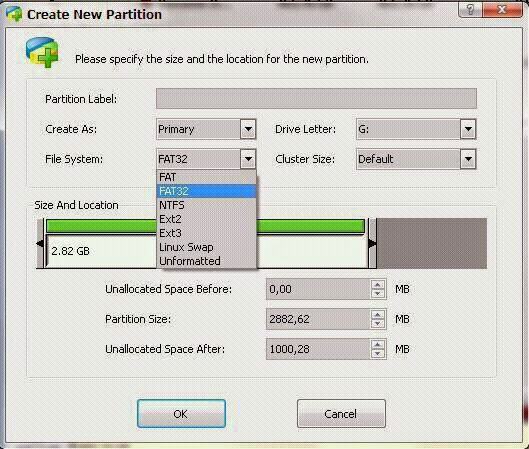
6. Right click on it again and choose Create New. Create “FAT32″ partition (This is where all your media files will go. Be sure to make it bigger than the 2nd part)

7. Select “Create as: PRIMARY
Partition for My Phone Rio Fun Screenshot 2

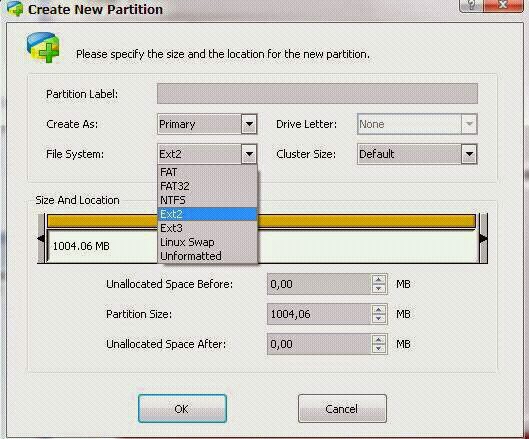
8. Next, create an ext2. I suggest a value of 512Mb would be big enough but its your choice...
9. Select “Create As: PRIMARY” (make sure that it is both set to primary because it will not work if it is not set to primary)

Partition for My Phone Rio Fun Screenshot 3

10. Click the “Apply” button on the top left corner and wait for it to finish the process. Done.
11. Put back your SD card to your phone and switch it on.
12. Download and install Link2sd from Google Play Store link given above
Link 2sd Main Picture

13. Download lucky patcher and click menu of patches. Watch the videos below on how to patch using Lucky Patcher.


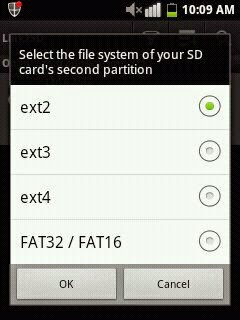
14. Open Link2sd. You will be prompted to choose between ext2, ext3, ext4 and FAT32. Select ext2.


Partition for My Phone Rio Fun Screenshot 4

15. It will say mount script created. Reboot your phone now.
16. Open link2sd and if the message doesn’t show up, you succeeded.
17. Go to Link2sd>Settings>check the autolink (to automatically move apps upon installation)
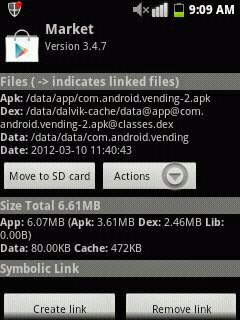
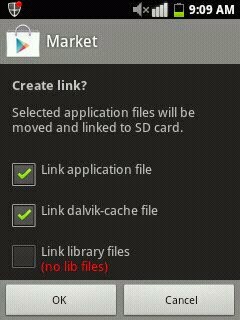
18. If you already have some apps, select “move to phone” then after moving select “Create Link” (be sure to check the three files: app, dalvic-cache and library files)
Partition for My Phone Rio Fun Screenshot 5Partition for My Phone Rio Fun Screenshot 6


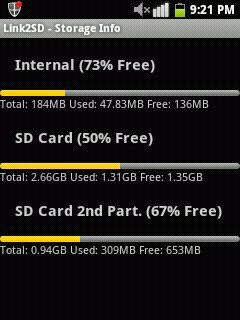
19. To check your memory, select “Storage Info”. This will show you the current state of your internal memory, FAT32, and ext2 partition.
Partition for My Phone Rio Fun Screenshot 7

20. Now you’re done.After partitioning and Successful mounting..

Next Step on how to unli internal your  myphone rio fun

 Install Rootexplorer 
data/sdext2  check the box of sdext2 change owner/

owner- 1000
group- 1000

Click OK

Then set permission of sdext2

rwxrwx--x

 Go to root folder/data
 COPY this 5 folder

app
app-lib
app-private
dalvik-cache
data

 PASTE in data/sdext2 

Check all this 5 folder  click option
 LINK TO THIS FOLDER
 GO back to DATA or click the back button
 Click option CREATE LINK
 pop up show OVERWRITE click Yes
Do all this in 5 folder
(app,app-lib,app-private,dalvic cache,data)


 now Reboot!

 Enjoy you are now unli internal..


Special Credits:
Sanny5 of XDA forum
myphone rio fun techies
myphone rio fun [DEV]

Labels: ,

Monday, November 17, 2014

How to root myphone rio fun 4.4.2 android Kitkat version


My Phone Rio Fun Main Picture
Due to increasing demand, I made a tutorial on how to root myphone rio fun latest version (KITKAT android 4.4.2). This is not the same for jellybean 4.2 which framaroot would be used for rooting and doesn't work in kitkat version. This also easy steps just follow carefully.
"Do it at your own risk. I am not responsible for any damage to your mobile phone."

Requirements:
myphone rio fun kitkat 4.4.2
PC/LAPTOP Windows OS
usb cable
1. Download vroot 1.7.6 or latest version --> [CLICKHERE]

2. Install vroot to your pc/laptop.
3. Got to Developer options and enable USB debugging on your phone.
4. Connect your phone in pc/laptop using usb cable.
5. Open Vroot  in pc/laptop then check user agreement and click connect device.
6. Click Root the device then wait. Check for confirmation for your phone
Just click the right part because its in "Chinese Language".
Note: Your phone will restart and ask for confirmation again.
Then wait for few minutes to finish. 
7.Turn off usb mode and Remove now your phone then check if there's "blue Horse image" install in your device.
Rooting My Phone Rio Fun Screenshot 1

8. Download rootchecker in playstore to verify if you are rooted and Success.

Watch this video for more info and tutorial.
Thanks..

Labels: ,

Thursday, October 9, 2014

How to root your Myphone Rio Fun V1 Android 4.2 JB

How to root your Myphone Rio Fun V1 Android 4.2 JB
It's sounds familiar right? But did you know what is root?. What are the main purpose why our android phone need to be root?. This is not root that see in the plants or trees, just kidding.
Ok guys, I will teach you how to root before that what root means? If you heard like symbian OS phone need to be hacked and Iphone or IOS need to be jailbreak, this what I mean, android must need to be rooted. The main reason some application are not capable to install if you are not rooted and some of this application are very useful in your phone. Is like a manager if you are rooted and you are the boss of your phone. Because android phone has restrictions to the system when you are rooted you can modify and manipulate it without permisions. Just like a manager or a boss. You can do what ever you want in your phone. I will post later my top 10 rooted apps that are very useful and need of your android phone..Ok gotcha..

Requirements:
(search in google playstore latest version)

Step: Just install SuperSu and click baharir! Reboot That's it 

Note: You will notice you have SuperSU apps installed in your phone.
Framaroot Rooting


Then verify

Download Rootchecker in playstore 

install rootcheker then open
Click Verify Root Access
If show Congatulations  This device has root access and now you are success then jump now!..just kidding..lol
ROOTCHECKER SCREENSHOT


Labels: , ,

How to Create CWM Recovery (backup) in myphone rio fun V1 android 4.2 JB

This is the most important procedure to back up your phone and how to create ClockWorkMod Recovery  (CWM). Our phone are risks for bootloop or hang only in the logo because of some apps are not capable nor shit by the virus or what ever.
So if this happened you can back your phone into normal state when your CWM was created. It's like a restore point in your  windows desktop computer that you can restore to normal state. Then you are now confident to download and modify your phone if you have CWM recovery.
Ok let's proceed.

Requirements:


Step 1: Extract  MobleUncle+CTR(CWM)R_Fun.zip
 using root explorer or zip achiever
Install Mobile Uncle Tools

Step 2: Move the recovery.img in your SDCARD outside the folder which you can see easily.

Step 3: Open Mobile Uncle Tools Grant SuperSu
Click Recovery Update
Screenshot CWM


Then choose Recovery.img Click OK

Screenshot CWM 2

Reboot into Recovery mode Click OK
Reboot


Note: You will see a blue butterfly

Step 4: Choose Backup and Restore
Click Backup then wait until finished!

Then Reboot your phone

Congrats guys now you have CWM recovery. To verify check your sdcard open root explorer sdcard folder clocworkmod>backup>date of your backup
Here's mine you can use my cwm 2014-09-12.12.33.48.rar

Note: I Suggest you to backup your phone with minimal apps or backup
your phone first before you install any apps u want.


Labels: , ,