Saturday, November 19, 2016

[ROM][MT6753] CM 12.1 20161107 Build For Alcatel Flash 2

[ROM][MT6753] CM 12.1 20161107 Build For Alcatel Flash 2

[ROM][MT6753] CM 12.1 20161107 Build For Alcatel Flash 2 Screenshot

[ROM][MT6753] CM 12.1 20161107 Build For Alcatel Flash 2 Screenshot


CyanogenMod is a free, community built, aftermarket firmware distribution of Android 5.1(LP), which is designed to increase performance and reliability over stock Android for your device.

Disclaimer:

#include
/*
* Your warranty is now void.
*
* I am not responsible for bricked devices, dead SD cards,
* thermonuclear war, or you getting fired because the alarm app failed. Please
* do some research if you have any concerns about features included in this ROM
* before flashing it!
*/ 

CyanogenMod is based on the Android Open Source Project with extra contributions from many people within the Android community. It can be used without any need to have any Google application installed. Linked below is a package that has come from another Android project that restore the Google parts. CyanogenMod does still include various hardware-specific code, which is also slowly being open-sourced anyway. 

Bugs:SELinux status is Enforcing causing the camera to not function properly Emulated Storage(??)You tell me in the comment section below. 

Workarounds:-I've already put the SelinuxModeChanger app alongside the ROM. Just flash root, grant the app root access, set the selinux to Permissive then Reboot, and your Camera shall work fine.-Use XInternalSD to be able to play games with obb data saved in internal storage.-If you have backups using Titanium Backup, change Backup Folder Location in Titanium Backup to restore your apps (Backup) Navigate to Titanium Backup/Settings/Backup Folder Location/Detect/Select Storage/Sdcard1/TitaniumBackup then tap Use The Current Folder. But for this to work we have to remap the keys first since our device doesn't have menu key and Titanium Backup doesn't have menu button either. Go to system/usr/keylayout/Generic.kl and find "key 580 APP_SWITCH" (shown in the screenshot below), change the APP_SWITCH to MENU then hit reboot. You now have to long press the Home Key for Recent Apps Panel to show. Now go back Titanium and do what is said in the first statement.-Use Stickmount app on play store to be able to use OTG.

CyanogenMod is based on the Android Open Source Project with extra contributions from many people within the Android community. It can be used without any need to have any Google application installed. Linked below is a package that has come from another Android project that restore the Google parts. CyanogenMod does still include various hardware-specific code, which is also slowly being open-sourced anyway. 

Everything is working fine.

Download Link: [CM12.1-20161107_Flash2 ##download##]

Credits:
BlueFlame4
CyanogenMOD
Mel Andrew (Cyandrew)- porter
Knight Owls Porting Assassins

Labels: , , , , ,

Sunday, October 30, 2016

ROM (KOPA) Mokee OS 12.1 for Alcatel Flash 2 Lollipop

ROM (KOPA) Mokee OS 12.1 for Alcatel Flash 2 Lollipop


ROM (KOPA) Mokee OS 12.1 for Alcatel Flash 2 Lollipop Screenshot

ROM (KOPA) Mokee OS 12.1 for Alcatel Flash 2 Lollipop Screenshot


MoKee Open Source is based on the Google AOSP. We update our source code frequently to keep up with the latest development, and not forgetting to merge in special features of our own at the same time. 


A small group of people from around the world who are interested in Android launched this project on the 12th of December 2012, and is committed to make this ROM better and better. Like most contributors of open source projects (Omni, CyanogenMod, Slim AOSPA etc), we are doing all these in our free time as our passion… 

Flash at your own risk.

Bugs?
You tell me.

Rom Link:

[Mokee OS 12.1 ##download##]

Google Apps Link:

[Opengapps ##download##]

Select Arm 64-5.1-micro

How to Install?
-Reboot to TWRP
-Wipe Data/Factory Reset
-Install zip-choose Mokee 5.1.zip
-Install G apps (optional)
-Wipe Dalvik/Cache
-Reboot Phone
-Done

Wait 5-10 minutes for boot up.

Credits:
KOPAfamily
JonacxDgreat
Maximum 

Most of all
God
Yours truly: Roland

Labels: , , , , , , , ,

Saturday, October 24, 2015

[TUT] How to Root and Install TWRP recovery Alcatel Flash 2

[TUT] How to Root and Install TWRP recovery Alcatel Flash  2 
I already include 2 method on how to root your Alcatel Flash 2. Based on the visitors and share their experiences. For the latest version 3.6 (latest today) use method 1 instead of method 2.  
Alcatel Flash  2  Logo

Android 5.1 Lollipop
5 inch HD 720p IPS Display
Asahi Dragontrail Glass Protection
MiraVision Image Technlogy
64bit 1.3GHz Octa-Core A53-Cortex
Mediatek MT6753 Processor
Mali-T720MP4 GPU
2GB RAM
16GB Internal Storage
Expandable via MicroSD up to 128GB
13MP Primary Rear Camera
Samsung ISOCELL S5K3M2 Sensor
Phase Detection Auto Focus
f2.0 aperture 80* degrees wide angle lens
Dual Tone LED Flash
5MP Front Camera
1/4" sensor size
f2.2 aperture 84* degrees wide angle lens
LED Flash
Dual SIM / Dual Standby / Dual LTE
LTE Cat 4 / 3G UMTS / 2G GSM
WiFi b/g/n
Bluetooth 4.0
GPS, aGPS, GLONASS
Stereo FM Radio RDS
SupportsUSB-OTG
3000mAh Li ion Non-Removable Battery


Warning: Rooting can void your warranty!
Method 1: Use this for latest version 3.6_160218(latest as of today) 
Requirements:
Kingroot4.1.zip (download and extract)


Procedure:

Step1: Root using KingRoot One-click ROOT!
Note: need to be have internet connection for this.

Then download Root checker in Playstore to verified.

Note: If you failed in method 1 you need to skip and proceed to method 2.

Method 2: (not recommended for latest version 3.6_160218)
Rooting via PC and Flash via SPFT

Requirements:
PC
USB Cable


Download Links:
Mediatek VCOM Drivers:

SP Flash Tool:

Flash 2 TWRP & Scatter File:

BETA-SuperSU-v2.52.zip:


 Instructions
1. Download all necessary files and Enable USB Debugging mode in your phone..
2. Install Drivers USB_VCOM_Driver.rar
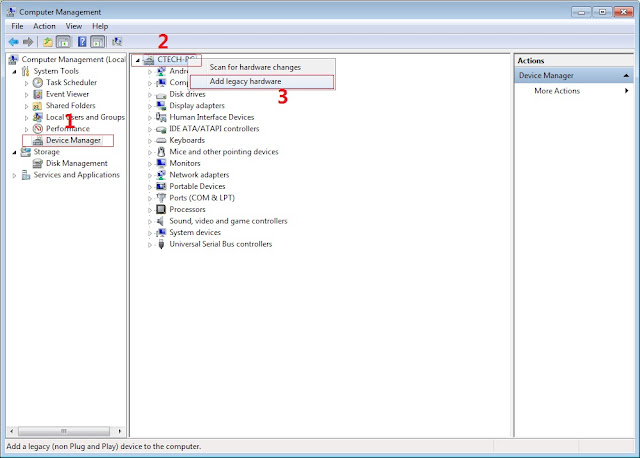
In Device Manager Right click on PC name(Right Side) and then click on Add legacy hardware as shown in image below.

Rooting and Install TWRP recovery Alcatel Flash  2  Screenshot 1
Now in Add Hardware Wizard click on Next » Install the Hardware that i manually select from a list (Advanced) » Show All Devices » Next » Have a Disk, Now select the any inf file from where you extracted the downloaded VCOM driver package.

Rooting and Install TWRP recovery Alcatel Flash  2  Screenshot 2

 Now Click on Next and select Install this driver software anyway and wait for finishing the process.

Rooting and Install TWRP recovery Alcatel Flash  2  Screenshot 3

    After installation is finished then Restart your computer, That's it.
3. Extract SPFlash tool and flash2_twrp.zip
4. Copy the BETA-SuperSU-v2.52.zip to your phone.
5. Open flash_tool.exe, click on the Download Tab
Rooting and Install TWRP recovery Alcatel Flash  2  Screenshot 4

6. Click Scatter-loading and browse for the scatter file(included in the flash2_twrp.zip) (MT6753_Android_scatter)
7. Make sure flashing mode is set to "Download Only" and check mark only on the Recovery.
Rooting and Install TWRP recovery Alcatel Flash  2  Screenshot 5

8. Click Download.
9. Turn off your phone, connect your phone to the PC and wait for the flashing to commence.
10. Green Circle image will show once flashing is completed.
11. Important: Disconnect your phone from the computer, press and hold Vol Up + Power.
12. Boot menu will show, select Recovery.


From the custom recovery (TWRP), it is recommended to backup your phone first, before rooting.


To root:
1. Reboot your  phone then press and hold Vol Up + Power On
 the TWRP Recovery , click Install.
2. Select BETA-SuperSU-v2.52.zip.
3. Flash it, no need to wipe cache, you can reboot as it is.
4. Enjoy your rooted AF2.

Then download Root checker in Playstore to verified.
Rooting and Install TWRP recovery Alcatel Flash  2  Screenshot 6


Note: For materialized TWRP you can proceed here.

For those bootloop and hardbrick proceed here.

Credits:
Mr. Long NT
AF2 group
Marc Rabang Farrales


Labels: , ,