Thursday, March 19, 2015

[TUT]Revised Version of Unli Internal With Images

This is the revised version for unli-internal tricks, which you can expand your internal memory. Some  android device has limited internal storage and if you want to extend your internal memory just to install more apps and games this is suitable for you. This are tested and works well in myphone rio fun V2 android 4.4.2 kitkat version. Tried at your own risk. Please  follow the procedure carefully to prevent bootloop in your device.

Requirements: 
Rooted

Note: I am not resposible for any damage or soft/hard brick will happened to your device!

First Root your android phone. How to root? Proceed and [CLICKHERE]
After rooting your device make sure you have CTR or Carliv Touch Recovery or any Custom recovery like CWM,TWRP and Philz Touch or etc. 

To flash the CTR please proceed here:MYPHONE RIO FUN ONLY

 Click--> FOR KITKAT (ANDROID4.4.2)
 Click-->  FOR JB VERSION (ANDROID4.2)

Please MAKE A BACKUP after flashing ctr. If ever you are bootloop in this procedure you can restore your backup easily. 

Procedure 1:
How to back up in CTR
1.Reboot into Recovery Again.
2.tap Backup and Restore
3.tap backup then Wait 
4. After backup then reboot.

Now proceed to partition of sdcard.

Procedure2:
Partition Your SD card Using CTR.
Note: Please backup your sdcard files coz it delete all after partition.
go to mount and storage then format sd card.
(custom recovery)
1. go to advance
2.go to partition sd card
3.tap 1024 or 2048
4.swap file is 0 ( zero )
5.partition type ext4
6.wait until partition done
after partition sd done ..Go back then reboot. Now procedure for the tricks for unli-internal

Procedure 3:
Step 1: Download and install Link2SD_3.6.2.apk. Then open Link2SD_3.6.2.apk
Pop up mount scipt created choose ext4. Then if Success! reboot your phone. 

Link2sd Preview 1
Step 2:
Download and install luckypatcher.apk. Open luckypatcher.apk then navigate to Link2sd


Lucky Patcher Preview
Step 3;
Navigate to Open Menu of Patches

Luckypatcher Link2SD
Step 4:
Choose Custom patch.
Luckypacther Custom Patch

Step 5: Tap apply then wait...

Luckypacther Custom Patch Apply

Step 6: Go to Lin2sd click Settings:


LINK2SD Settings

Step 7: Check Auto Link then Tap Auto Link Settings

LINK2SD Settings Preview 2

Step 8: In Auto Link Settings, Check them all

LINK2SD Settings Preview 3

Step 9: Download and install Rootexplorer.apk. Then go to root folder/DATA

Rootexplorer Settings Preview 1
Step 10: Check the box
APP
APPLIB
DALVIC CACHE
APP-PRIVATE 
Then copy
Rootexplorer Settings Preview 4
Step 11: Tap SDEXT2 folder
Rootexplorer Settings Preview 5

Step 12: Paste here all 4 folder that you have copy. Just shown in image below:

Rootexplorer Settings Preview 6

Step 13: Check the box of sdext2 folder. Then tap the lower right just shown in image

Rootexplorer Settings Preview 7
Step 14:
Tap Permissions


Rootexplorer Settings Preview 8

Step 15: Check the box then tap ok,that shown in image: this should be after you check (rwxrwx--x)

Rootexplorer Settings Preview 9

Step 16: Check the box of sdext2 folder then tap again the right lower.
Then navigate to Change owner


Rootexplorer Settings Preview 10
Step 17:
Select Owner=1000-system
           Group= 1000-system
Then Reboot!
Rootexplorer Settings Preview 11
Step 18:
After reboot, open link2sd the tap upper left part. That shown in image below

Rootexplorer Settings Preview 12

Step 19: Tap Relink all application files then reboot again.

Rootexplorer Settings Preview 13
Enjoy!
Rootexplorer Settings Preview 14

Special Thanks:
Louise Ganal
Vinz Reyes Manuel


Labels: , ,

Sunday, November 9, 2014

[ROM] Galaxy S4 Basic Edition for MT6572

[ROM] RioFun - GTI9500 Galaxy S4 Basic Edition


Features:

Semi Galaxy S4 UI
Stock S4 Icons
Odexed ROM
Galaxy S4 Animation
Init.D Ready
No Tweaks ( Tweak it your own )


REMINDER! Please make sure to back your NVRAM folder or IMEI before Flashing this one!
How to backup your imei [CLICK HERE]

Flash it with your own RISK!!!

I am not responsible for any damage or soft/hard brick will happened to your device!


Screenshots:
S4 Rom Screenshot 1
S4 Rom Screenshot 2
S4 Rom Screenshot 3
Credits to:
Eldon Rio fun admin
MIRAGE S1 GROUP
WARREN DANTES

Labels: , ,

Sunday, October 12, 2014

Samsung Boot animation,Samsung S5 theme with Samsung Ui(no need to flash)

This one of my favorite themes. If you want to look your phone
like Samsung S5 try this application .This is safe and no need to flash.
Tried and tested in myphone rio fun.

Look like this
Sasmsung Boot Animation Screenshot 1

Sasmsung Boot Animation Screenshot 2

Requirement:
ROOTED
Busybox (download in playstore)

DOWNLOAD ALL THIS FILES:
1.ROOTEXPLORER.APK

2. HKTHEMEMANAGER.APK

3. SAMSUNGS5THEMES.APK 

4. BOOTANIMATION.ZIP

5.  BOOTAUDIO.mp3

6. XPOSED INSTALLER.apk
   
7. GALAXY s5 Locker.apk 


Step 1: Backup your phone first,
Proceed this link How to Create CWM Recovery (backup)
Open HK THEME MANAGER click Samsung GALAXY S5
Screenshot 3


Select SET THEME
Screenshot 4

HKTHEMER Screenshot 5


Choose items for change and Check all the box  then Set Theme

Click Update Later

Step 2: Open Xposed installer>Framework>Install/Update Then reboot
Xposed Installer Screenshot 6


Xposed Installer Screenshot 7

Go back to Xposed Installer> Modules> check the box HKtheme Manager
then Go back to Framework>Soft Reboot
Xposed Installer Screenshot 8


Now you have S5 Theme and Samsung S5 Ui

Note: Step 3  for Samsung S5 boot animation.

Step:3 Open Rootexplorer Go to Root Folder>System>data>media
Rename bootanimation.zip to bootanimation.bak for backup
Then move the bootanimation.zip files you downloaded files above
in media folder to replace.
Next move the bootaudio.mp3 in System>data>media
To remove boot logo go to System>data>media>images>
delete boot_logo or move to sd folder for backup
Bootanimation Screenshot 9

Then reboot..that's it!
Install Galaxy S5 Locker if you want S5 Locker that image shown below
S5 Locker Screenshot 10

I will post later Samsung S5 boot logo...Enjoy!


Labels: , ,

Friday, October 10, 2014

Stuck on Bootloop w/o backup on cwm Myphone Rio Fun

Hi guys I made a tutorial again for newbie on how to fix bootloop Myphone Rio Fun (Jellbean). In order to flash stockrom you need to
install driver based in your windows version. Just follow the procedure below.

Do it at your own risk and be careful. It can cause hardbrick or deadboot so follow my tutorial carefully.

Requirements:
PC/LAPTOP(WINDOWS OS)
USB CABLE
PHONE


Myphone Rio Fun
Stockrom

FOR WINDOWS XP/7 -INSTALLING DRIVERS
1. Download Mediatek Driver and Extract then Install the driver for 32 or 64 bit operating system of windows 7.
Driver Choose 32 or 64 bit
2.  Before you plug your phone in PC, you need to focus in Device Manager, then plug your phone without the battery you only have approximately 5 seconds to appear MT65xx device that shows under Other devices, you need to right click it as soon as you see it.
MTK USB PORT

Then after you rightclick, click to Update driver software

3. Then choose - Browse my computer for driver software
Browse Driver

Browse the Mediatek MT65xx Preloader Driver folder

Make sure you know the version of OS to choose the right driver for your PC.

Choose your OS version, then choose if 32-bit or 64-bit for your PC.

E.G. s Win7  folder:
usb2ser_Win7.inf - if 32-bit
usb2ser_Win764.inf - if 64-bit

4. Another options, to find right driver for your phone is to open your internet while your phone is connected without the battery and automatically searching driver for your phone.

FOR WINDOWS 8/8.1/10 -INSTALLING DRIVERS
1. Download all necessary files and Enable USB Debugging mode in your phone..
2. Install Drivers USB_VCOM_Driver.rar
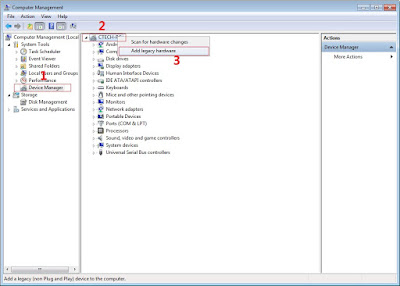
In Device Manager Right click on PC name(Right Side) and then click on Add legacy hardware as shown in image below.

add legacy
Now in Add Hardware Wizard click on Next » Install the Hardware that i manually select from a list (Advanced) » Show All Devices » Next » Have a Disk, Now select the any inf file from where you extracted the downloaded VCOM driver package.

mediatek preloader

3.  Now Click on Next and select Install this driver software anyway and wait for finishing the process.

Install driver anyway

4.  After installation is finished then Restart your computer, That's it.
If still not success in installing driver just Disabled Driver Signature Verification
1. Go to PC Settings>General>Troubleshoot>Advanced Options>Startup Settings>Disabled Driver Signature Enforcement>Then Restart
disabled driver signature verification
Once you disabled. Then follow the procedure above to install the driver. Once success proceed to next step.
5. Download SP_Flash_Tool_v5.1352.01.rar and extract then click flash_ tool to open
Click Flash tool

6. Click Scatter_loading and open your scatter file like image below(I'm using mt6572 scatter File)

Click Scatter Loading


7. Check all except preloader. (If your device is hardbrick/deadboot apply check in preloader)

Uncheck Preloader


8. Click download
Click Download


9. Wait until green circle appear

SPFT SUCCESS GREEN CIRCLE


Remove your phone to usb cable then insert your battery and On your android phone..Enjoy!

Note: If not reboot try factory reset in recovery mode of your phone.

You can watch Video Tutorial below
Credits: Androidxda


You can download and select your device for available STOCKROM
If invalid IMEI occur after flashing follow this tutorial on how to fix IMEI.


Credits:
Paul Montano for stockrom
Myphone Rio Fun Group

Labels: ,

Thursday, October 9, 2014

Tutorial for unlimited internal in myphone rio fun

One of the popular and cheapest phone in the Philippines which made by Myphone

with affordable price of  P 2,999 with different fantastic color. 
MY PHONE RIO FUN

Specs:
Dual SIM
Operating System or Software Version
Android 4.2
Hardware Platform
MT 6572M

1.3GHz Dual Core
GSM Band
900MHz/1800MHz/1900MHz
Data Segment
EDGE, GPRS
Flash Memory
512MB+512MB
GPS
NO
Touch Lens
G+F
Input Method
Google Pinyin IME, Android Keyboard
External Memory
32GB
LCD Type
TN
LCD Size
5.0″FWVGA 480*854
Front Camera
0.3 MP
Back Camera
3.2 MP

Due to insufficient memory that has only 145 mb internal
storage there's a way to swap your internal memory
to sdcard and big thanks to the developer for sharing
this tricks. I will teach you how to expand your internal
storage.


Requirements:
memory card 4gb and up
Step 1. Back up your phone first.
Proceed this link How to Create CWM Recovery (backup) 
Go to Recovery mode or  Reboot your phone
Then hold on and off button,volume up and down
simultaneously
Until recovery and factory mode appear
Choose Recovery mode
Advance
Partitioning SD Card
Choose 1024 or 2048
Swap size: 0
Partition Type: ext4
Then Reboot your phone

Step 2: Install and  Open Link2SD apps
 pop up show (ext2,ext3,ext4, etc.) 
then choose ext4. Grant SuperSu
(Mount Script Created etc.) should be appear. 
If not try to proceed step 1 again. If still not created, 
your mmc was the problem. It depends in your mmc 
and I suggest you to use  mmc with Class 4 and up.

Step 3: Install  rootexplorer then folder data/sdext2  check the box of sdext2 change owner/ 

owner- 1000
group- 1000

Click OK

Then set permission of sdext2
rwxrwx--x


Step 4
 Go to root folder/data
 COPY this 5 folder

app
app-lib
app-private
dalvik-cache
data

 PASTE in data/sdext2 

 Step 4. Check all this 5 folder  click option
 LINK TO THIS FOLDER
 GO back to DATA or click the back button
 Click option CREATE LINK
 pop up show OVERWRITE click Yes
Do all this in 5 folder
(app,app-lib,app-private,dalvic cache,data)

 now Reboot!

 Enjoy you are now unli internal..
UNLI INTERNAL SCREENSHOT


As you can see your internal storage memory use
 is turn to negative. 

For revised version of Unli internal(New Tricks)
Follow this link [CLICKHERE]


Labels: ,