Tuesday, October 25, 2016

[Tech] How To Convert Computer Software To Android Application, EXE To APK

Today is the day that I will show you how to convert any computer application to android application without waste of time, just follow the procedures below, we are receiving a lots of SMS on how to use computer application on android device so today we get the solution.


Now you can convert Windows file into Android applications on your android mobile . It may help you to use windows applications on android mobile. It’s a very easy to convert Exe File in to APK File. Executable (Exe) files only support the windows applications so we can not directly run on android mobiles because android mobiles can support Android application Package only that’s
why we need to convert Exe File into APK File.


By using these software we can use windows applications, tools and games on android mobile. You can run Exe file on android mobiles. If you
want to convert any Exe file into Apk File then have a look here. I will share how to convert windows applications into Android applications.


Here i will give you full information about how to convert Exe file to Apk File. This process is very simple and easy. Just it will take 10 minutes of your own time. During this process we need to have few software’s like Change my software and Applications in Exe File. Just follow the below instructions here.


PROCEDURES
1: First and fore most thing is to download Exe to APK converter software on your computer. Click Here to Get Software

2: After finishing the download process you need to select Exe to APK Converter tool.


3: After launching the software now you have to choose ” i have a portable application “.


4: Now you have to select the Exe application on your computer. It will take some time to upload Exe file. After that you need to select convert button. you can see below image.


5: It’s start conversion process. It’s will take some time because it depended on file size. While going on process do not do anything. Leave it alone.


Step 6 : After finishing of process you will get conformation message like you have done successfully.


That’s it now can install converted Exe file in your Android phone. Enjoy using windows applications on android mobile.

The most important thing is you must have ” change my Software ” otherwise you cannot convert. It’s available for free.

Just simply convert exe file and enjoy windows games, applications on android mobile. If you are facing any problem while converting exe to apk, just comment below. I will try to give you answer of your problem.

Labels:

Monday, October 24, 2016

Download Latest Imei Analyzer For Calculating All Device Imei Number

Hello Guys Here Is The Latest Imei Analyzer Tool Free Download

Here is the description and some more info about the imei analyzer, just read and download it now.

IMEI Checking: Check whether the given IMEI (15-digit number) is valid or not by calculating the Check Digit (using Luhn algorithm) and then comparing with the Check Digit of the given IMEI. There is also the option that allow you to fetch data (Brand and Phone Model) from the popular website www.imei.info.

IMEI Calculating: You can enter the IMEI without the Check Digit (only 14 digits) and this app will calculate the Check Digit by using Luhn algorithm.

IMEI Analyzing: Breakdown the IMEI into the following parts:
• Type Allocation Code (TAC)
• Reporting Body Identifier (RBI)
• Mobile Equipment Type Identifier
• Final Assembly Code (FAC)
• Serial Number
• Check Digit

More info about IMEI:
IMEI stands for International Mobile Station Equipment Identity. The full IMEI number is 15 digits in length.

You can obtain the IMEI by open the phone's dialpad and enter *#06*. Or you can see it in the label on the back of the phone, behind the battery. And If You Have Any Problem You Can Drop Your Comment Here.

Source:- org.vndnguyen.imeianalyze
Also You can search it download it on google play.

Download Now

Labels:

Saturday, October 15, 2016

[Brick] How To Unbrick Your Tecno P5 H5, H6 Android Device Easy Steps

[Brick] How To Unbrick Your Tecno P5 H5, H6 Android Device Easy Steps

Wa Are Receiving Alots Of Message From Diffrent Location, How To Unbrick Tecno P5 H5, H6 Phone, So Today I'm Going To Show You How To Unbrick It.


  • This article features the best way to fix or unbrick your Tecno h5,h6,m3,p5,f7 And Other MTK devices like Infinix Zero, And X507
  • As the rate of android devices and usage increases, people tend to brick their phone without getting alarmed about the causes.
  • In this tutorial you will learn
  • *What is bricking 
  • *What causes bricking 
  • *How you can unbrick your device 
  • Bricking as termed is a situation where your device is unable to function .
  • This means when you bricked your phone you won’t be able to boot it and while booting, it would get stucked at the brand’s logo (tecno, infinix, samsung)
  • CAUSES
  • 80% of bricked phone are caused by changing fonts,  try to understand that an unrooted phone can also be bricked but in most cases rooted phone bricks more to unrooted.
  • Rooting has lots of advantages and disadvantages but if you can leverage some ideas in protecting your phone then rooting is meant for you
  • Though font changing ain’t the only cause to brick your phone as installation of dangerous and unsupported apps can also cause bricking.
  • Read the next step in fixing your bricked device
  • I have prepared two easy methods in unbricking your tecno device, the first step requires no pc and the second requires the use of a pc
  • 1. Get an unbricked phone of the same model and version.
  • (That shouldn’t be hard get it from a friend)
  • 2. Switch off the good phone you get then long press the volume up + the switch
  • 3. Now Use the volume down to scroll to backup and restore
  • 4. Chose backup in next screen and click yes to confirm
  • 5. After the backup is completed boot the good device and copy the backup file to the bricked SD card
  • 6. Insert the SD card in the bricked device and long press volume up + power on then click on backup and restore
  • 7. In the next screen select restore and your bricked device should come back to life.

2nd Method


This method is the most suitable method to unbrick a die hard bricked rooted phone but you need a pc


  • 1. Download pdanet and MTK droid tools on your pc
  • 2. Google Search your device boot.img and download for tecno phones boot.img click here
  • 3. Switch ON your dead phone, don’t get vexed if it get stucked at the tecno logo
  • 4. Connect your dead phone to the pc and install pdanet
  • 5. Open the MTK droid tools and extract it’s content (maintaining the folder path)
  • 6. Open your extracted MTK droid tools folder and launch MTK droid tool(with a green logo)
  • 7. The software will display your phone details with a yellow box at the bottom ,click root and select yes for any prompt and chill till that box turns green
  • 8. After turning green click on the backup and recovery then chose boot.img
  • 9. Hit on Recovery and Boot then select the boot.img you downloaded for your bricked device type
  • 10. Click yes to confirm any prompt
  • 11 Then you will be asked to boot device into recovery mode just select yes
  • 12. Now your device should be unbricked and you should have a cwm recovery installed

CONCLUSION

Before rooting your phone make sure you boot it into a recovery mode by downloading your phone clockworkmod(available online) then boot it in recovery using mobile uncle tools.

Thanks for reading, drop any qualms and make sure you share it to your friends


Labels:

Thursday, October 13, 2016

[Islamic] Sunayen Manzon Allah (S.A.W) Dari Biyu Da Daya

Sunayen Manzon Allah (S.A.W) Dari Biyu Da Daya SUNE KAMAR HAKA:-


1= MUHAMMADU
2= AHMADU
3= HAMIDU
4= MAHMUDU
5= AHIIDU
6= WAHIIDU
7= MAHIIN
8= HASHIRUN
9= A'QIBU
10= DAHA
11= YASIN
12= DAHIRU
13= MUDAHHARU
14= DAYYABU
15= SAYYIDU
16= RASULU
17= NABIYYU
18= RASULUR RAHMATI
19= QAYYIMU
20= JAMI.U
21= MUQTAFI
22= MUQAFFA
23= RASULUL MALAHIMI
24= RASULUR RA'HATI
25= KA'MILU
26= IKLILU
27= MUDASSIRU
28= MUZAMMILU
29= ABDULLAHI
30= HABIBULLAHI
31= SAFIYYULLAHI
32= NAJIYYULLAHI
33= KALIMULLAHI
34= KHATIMUL ANBIYA
35= KHATIMUR RUSLI
36= MUHYI
37= MUNJII
38= MUZAKKIRU
39= NASIRU
40= MANSURU
41= NABIYYUR RAHMATI
42= NABIYYUT TAUBATI
42= HARISUN ALAIKUM
43= MA'ALUMUN
44= SHAHIRU
45= SHA'HIDU
46= SHA.HIDUN
47= MASH.HUDU
48= BASHIRU
49= NAZIRU
50= MUNZIRU
51= NURU
52= SIRAJAN
53= MISBAHU
54= HUDAN
55= MAHDIYYU
56= MUNIRU
57= DA'IN
58= MAD.UWUN
59= MUJIIBU
60= MUJABU
61= HAFIYYU
62= AFU.WUN
63= WALIYYUN
64= HAQQUN
65= QAWIYYUN
66= AMINU
67= MA.AMUNU
68= KARIMU
69= MUKARRAMU
70= MAKIINU
71= MATIINU
72= MUBIINU
73= MU.AMMALU
74= WASULU
75= ZUO.QUWATIN
76= ZUO.HURMATIN
77= ZUO.MAKAANATIN
78= ZUO.IZZIN
79= ZUO FADLIN
80= MUDA.UN
81= MUDI.UN
82= QADAMUS SIDQI
83= RAHMATUN
84= BUSHRA
85= GAUSU
86= GAISU
87= GIYASUN
88= NI.IMATULLAHI
89= HADIIYATULLAHI
90= URWATU WUTHQA
91= SIRADULLAHI
92= SIRADU MUSTAQEEM
93= ZIKRULLAHI
94= SAIFULLAHI
95= HIZBULLAHI
96= NAJMUS THAQIB
97= MUSDAPHA
98= MUJTABA
99= MUNTAQA
100= UMMIYYU
101= MUKHTARU
102= AJIIRU
103= JABBARU
104= ABUL QASIM
105= ABU DAHIRII
106= ABU DAYYIB
107= ABU IBRAHIM
108= MUSHAFFA.U
109= SHAFI.UN
110= SALIHU
111= MUSLIHU
112= MUHAIMINU
113= SADIQU
114= MUSADDAQU
115= SIDQU
116= SAYYIDUL MURSALINA
117= IMAMUL MUTTAQIIN
118= QA.IDUL GURRIL MUHAJJILIN
119= KHALILUR RAHMAN
120= BARRU
121= MUBARRU
122= WAJIIHU
123= NASIHU
124= NA.SIHU
125= WAKIILU
126= MUTAWAKKILU
127= KAFIILU
128= SHAFIIQU
129= MUQIMUS SUNNATI
130= MUQADDASU
131= RUHUL QUDUSI
132= RUHUL HAQQI
133= RUHUL QISDI
134= KA.AFII
135= MUKTAFIIN
136= BALIGUN
137= MUBALLIGUN
138= SHAAFIN
139= WA.SILUN
140= MAUSULUN
141= SABIQUN
142= SA.IQUN
143= HAADIN
144= MUHDII
145= MUQADDAMU
146= AZIZU
147= FADILUN
148= MUFADDALU
149= FATIHU
150= MIFTAHU
151= MIFTAHUR RAHMATI
152= MIFTAHUL JANNATI
153= ALAMUL I.MANI
154= ALAMUL YAQIINI
155= DALILUL KHAIRAT
156= MUSAHHIHUL HASANATI
157= MUQIILUL ASARATI
158= SAFUHU ANIZ ZALLATI
159= SA.HIBUS SHAFA.ATI SA.HIBUL MAQAMI
160= SA.HIBUL QADAMI MAKHSUSU BIL IZZI
161= MAKHSUSU BIL MAJDI
162= MAKHSUSU BISH SHARAFI
163= SA.HIBUL WASIILATI
164= SA.HIBUS SAIFI
165= SA.HIBUL FADIILATI
166= SA.HIBUL IZARI
167= SA.HIBUL HUJJATI
168= SA.HIBUS SULDANI
169= SA.HIBUR RIDA.I
170= SA.HIBUD DARAJATIR RAFIIATI
171= SA.HIBUT TAJI
172=SA.HIBUL MIGFARI
173= SA.HIBUL LIWA.I
174= SA.HIBUL MI.IRAJI
175= SA.HIBUL QALIBII
176= SA.HIBUL BURAQI
177= SA.HIBUL KHATA.TAMI 178= SA.HIBUL ALA.MATI
179= SA.HIBUL BUR.HANI
180= SA.HIBUL BAYANI
181= FASIHUL LISANI
182= MUDAHHARUL JINANI 183= RA.UOFUN
184= RAHIIMUN
185= A.ZUNU KHAIR
186= SAHIHUL ISLAMI
187= SAYYIDUL KAUNAINI
188= AINUN NA.IM
189= AINUL GURRI
190= SA.ADULLAHI
191= SA.ADUL KHALQI
192= KHADIBUL UMAMI
193= ALAMUL HUDA
194= KA.SHIFUL KURABI
195= RA.FIUR RATBI
196= IZZUL ARABI
197=SA.HIBUL BAYAN
198= SA.HIBUL FARAJI (S.A.W.A) ALLAHUMA SALLA ALA SAYYIDUNA MUHAMMADIN WASALLIM.
Allah Yakara-kara Mana San Manzon Allah S.A.W

Labels: ,

[Tech] How To Install Windows XP/95 On Any Android Phone Easy Steps

[Tech] How To Install Windows XP/95 On Any Android Phone Easy Steps

Today i'am going to show you how to install Windows 95 or Windows XP on any android device, from version 4.1.0 to above, just follow the steps bellow.

Feeling bored? No new ROMs to install? Run Windows 95 on your device and get some nostalgia to your mobile phone/tablet! It's really easy.

At first, I wanted to tag this as useful tools but honestly, there's really no "useful way" to use Windows 95 on your Android device, is it? Just remember the oldes' days, right.

To run Windows 95, you need to download an image file. Hit the link below to download Windows 95 and Windows XP IMG files:
(If you're on a mobile phone, please enable desktop mode or download the Mega app from Google Play Store).

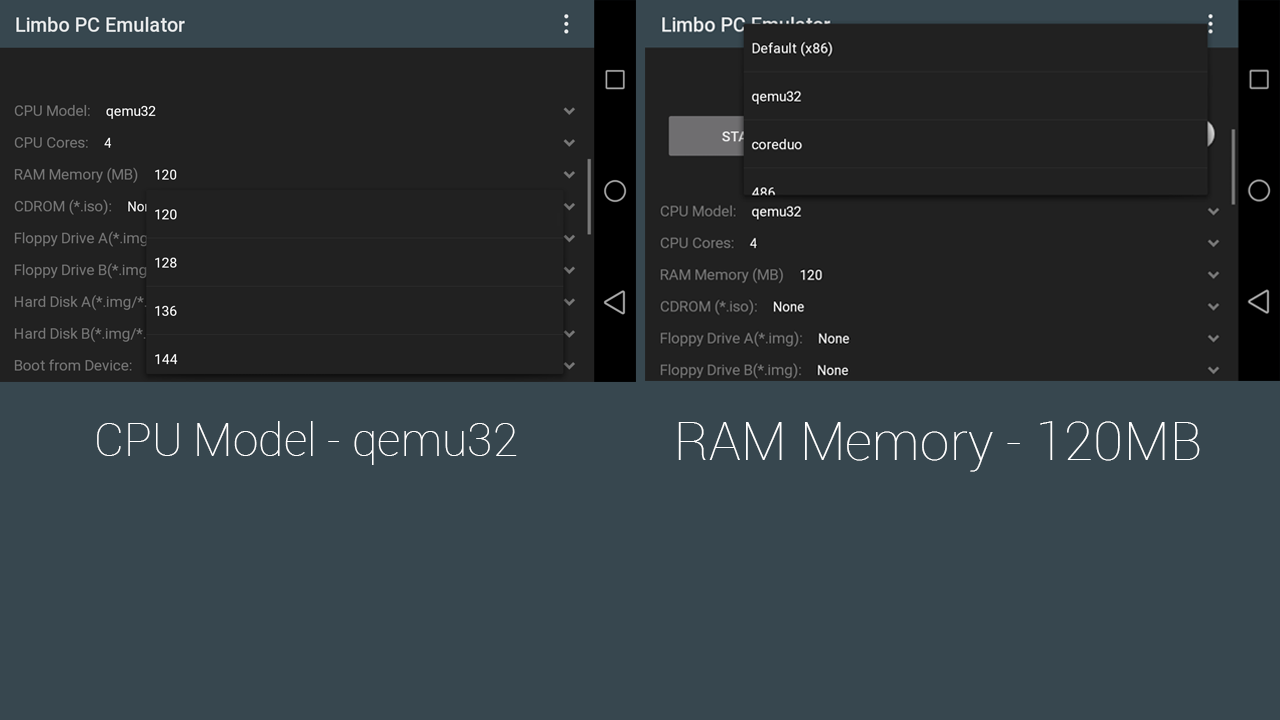
One more thing, we need an emulator. Limbo PC Emulator should be fine. Download It Now!
Let's set up the emulator.
  1. Open it up
  2. Tap on Load VM, select New
  3. Set User Interface to SDL
  4. Scroll down to Hard Disk A, open the image you downloaded
  5. set CPU model to qemu32
  6. RAM Memory set to 120MB or 60 if you have smaller RAM (you can set it up higher for faster bootup and overall performance but it might crash. See available RAM in settings to know how high can you go).
  7. Hit START!
  8. You're done.
See The Limbo Screenshot Bellow.
Untitled 1

Labels:

[Tech] How To Enable MultiWindow On Any Android Version 6.0.1 Marshmallow

[Tech] How To Enable MultiWindow On Any Android Version 6.0.1 Marshmallow

Hey you guy now you can enable multiwindow on any android marshmallow device. Android M preview is out. For those that already flashed it, there might be a really really cool thing for you to try. In fact, Android M comes with multiwindow.

It's experimental but seems to be working. Let's try it out!


  1. Firstly, boot into recovery. Be sure to have a custom recovery, TWRP works the best.
  2. Be sure the /system partition is mounted (Go to mount -> mount the system)
  3. Connect your device to your PC, be sure to have your device recognizable by ADB, type adb devices - your device should pop up. (Don't have ADB? Download here!)
  4. Let's access the build.prop, type the following commands in to the terminal:
adb shell
cd /system
vi build.prop
Let's change a line to enable userdebug mode. Change the line:
ro.build.type=user
to
ro.build.type=userdebug

Reboot your phone. Navigate to developer options in settings (to enable dev options, go to "about phone" and tap on "build number" several times).

Open recents and boom, you have it.


(Source)

Labels:

[Tech] How To Control Your Computer From Your Android Phone Using Chrome Remote Desktop

[Tech] How To Control Your Computer From Your Android Phone Using Chrome Remote Desktop

Nowadays you can control your computer with your android phone using Chrome Remote Desktop.

You've probably heard of programs such like TeamViewer that are capable of something called remote desktop feature which mirrors the activity from your PC to other device. Chrome Remote Desktop lets you do excatly this and lets you to control your PC from your Android phone! Moreover, it's extremly smooth easy to setup!
As mentioned above, it's extremly easy to setup this thing and extremly easy to run. Moreover, it's extremly smooth, TeamViewer looks like a laggy stuff compared to this one.
 

As you can see on the images, you can take absolute control of your/friend's PC and everything goes absolutely smooth and fast.

To setup this thing, you need to download two files,
Setup your PIN code, open your Android app, paste it in there and you're basically there.
If you tick the option to remember the PIN, you can access to your PC absolutely everytime. You don't really need to verify the PIN everytime you want to connect. That's All?

Labels:

[Guid] How To Install Custom Recovery Image On All Android Device Without Computer.

[Guid] How To Install Custom Recovery Image On All Android Device Without Computer.

Hello My Dear Friends Today I Present You, How To Install Custom Recovery Image For All Mobile Android Device With Your Self.

In Android Device custom recovery helps you to perform lots of task such as install custom Roms and flash files, install custom themes on the device and more. Without custom recovery you can’t do such type of task on your android device.

All android mobile and tables come with the pre install ed stock recovery, but the stock one offers very basic options and didn’t helps you to install and flash other ROMs on your device. To do that you need a custom recovery installed on your device. And the most popular custom recovery are ClockworkMod Recovery or CWM and TWRP Recovery.

With the help of custom recovery you can restore and manage backups of your current ROM, flash a kernel from internal storage, format your phones internal storage partitions and install custom roms. But most of the user don’t know how install custom recovery on the Android devices, so today here we let you know how you can flash or install custom recovery to any android phone or Tablet.

To install custom recovery on your device you need rooted device, you can find lots of rooted guide on our Rooting section here. After that follow any one method from the below to install ClockworkMod Recovery or CWM and TWRP Recovery recovery on your device.

Install Custom Recovery

Install Custom Recovery

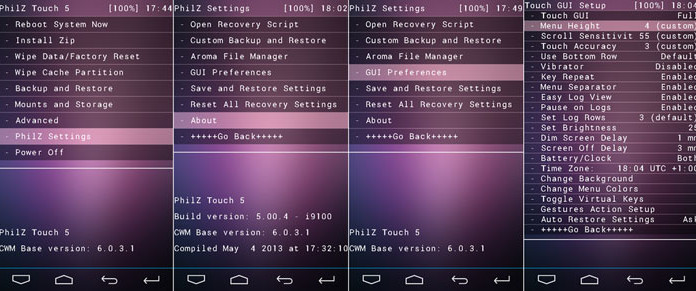
How to Install ClockworkMod Recovery with ROM Manager

One of the easiest method to install recovery on your device, no need to run any command or flash anything manfully on your device. All you have to install a android application from the Google Play store and install the recovery on your rooted device.

Install ClockworkMod recovery

Install ClockworkMod recovery

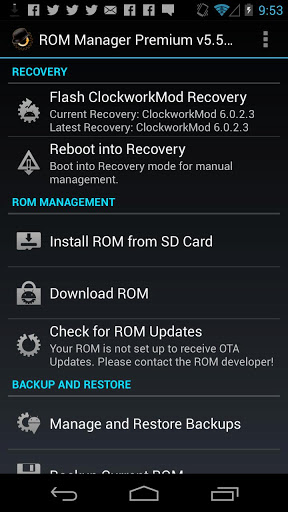
Step 1. Go to Google play store from your device and install ROM Manager from the market on your device. With this application you can install the latest ClockworkMod Recovery on your device with a single click.

Step 2. Once the application is installed on your device, run the application on your device. One the application screen you can see a options Flash ClockworkMod Recovery. Just tap on it and follow the instructions.

Step 3. Now it will take some time and let the application install the latest ClockworkMod Recovery on your device. Select to reboot the device if it prompts you to.

Step 4. Once the device is rebooted, open the ROM manager application and here you can see the latest version of ClockworkMod Recovery installed by launching Rom Manager. That’s it now the ClockworkMod Recovery is installed on your device, if a newer version is available in the future, tap on that option and follow the instructions to update your custom recovery.

How to Install TWRP Recovery with GooManager


Step 1.
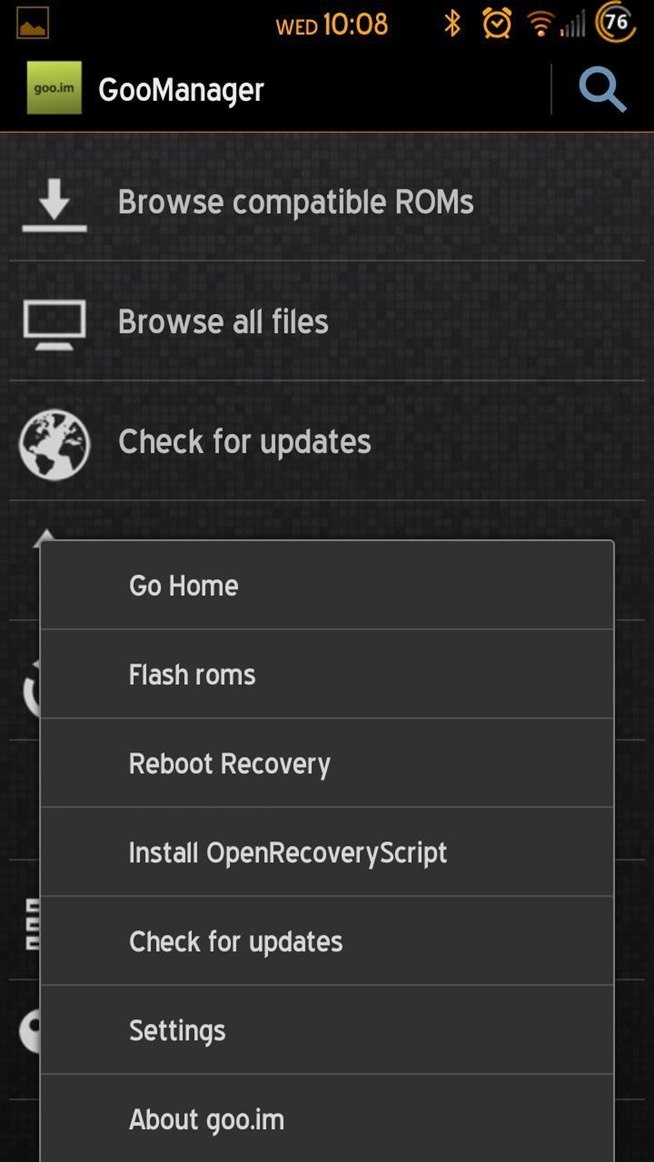
Download and Install Goo manager on your device from the Google play store. One of the best application to install custom ROMs and install the latest TWRP Recovery on any android device.

Step 2. After installing the application, run the app on your device. Press Menu and select the Install OpenRecoveryScript option.

Install TWRP Recovery with GooManager

Install TWRP Recovery with GooManager

Step 3. Now this will search the latest recovery script for your device and install it on your device. The installation process will take some time.

Step 4. Once the process will complete, confirm that it installed successfully by booting into it. You can do this right from the Goo Manager option, press menu and select the Reboot Recovery option.

That’s it now the custom recovery is installed on your device and you are free to install custom rom and install custom themes on your Android device.


Source: Tothemobile

Labels: ,

Monday, October 10, 2016

How to Create MTK65XX Backup With MTK Droid Tools And Flash your Bricked Phone Using SP Flashing Tools

Hello Guys Now I'am Going To Show You How to Create MTK65XX Backup With MTK Droid Tools And Then Flash your bricked, phone using SP Flashing Tools.

Mediatek devices are hugely popular Phones because they run well and are relatively cheap to produce. The more popular these devices become, the more people create mods to add some personalisation and sometimes this goes wrong, this is why learning how to unbrick your phone is always worthwhile and you really never know when you might need it.

Things you need to have, apart from your Android phone and USB cable are:

  • ADB Drivers for your phone from here (If your phone is not getting detected).
  • MTK Droid Tools from here.

OK, all downloaded? We’re ready to go then.

1. Extract the MTK Droid Tools and run the program.

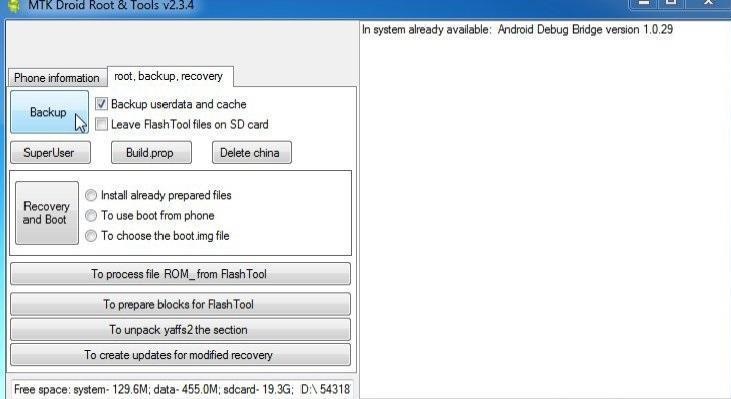
2. Plug your phone in (with USB Debugging enabled) and you should see a screen like this one, the blue status bar shows that your phone is succussfully connected:

side-drawer


3. Go to the ‘root, backup, recovery’ tab, as circled above.

image

4. Check the ‘Backup userdata and cache’ box (as shown above) and click ‘Backup’.

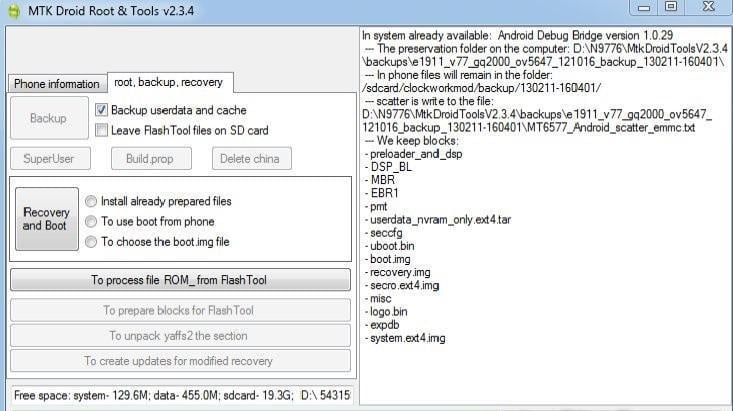
5. Now your full current ROM will be backed up, this part may require some patience as it can take a while. You’ll get a screen like this:

image-1


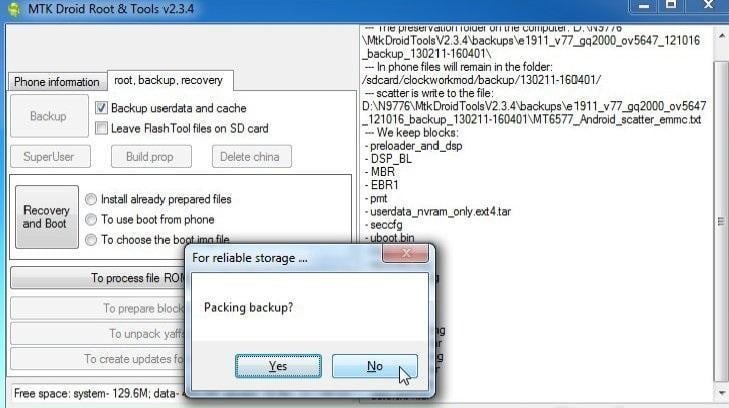
6. You’ll get a pop-up asking if you want ‘Packing Backup?’ Select ‘No’ as seen in the image below.

image-2


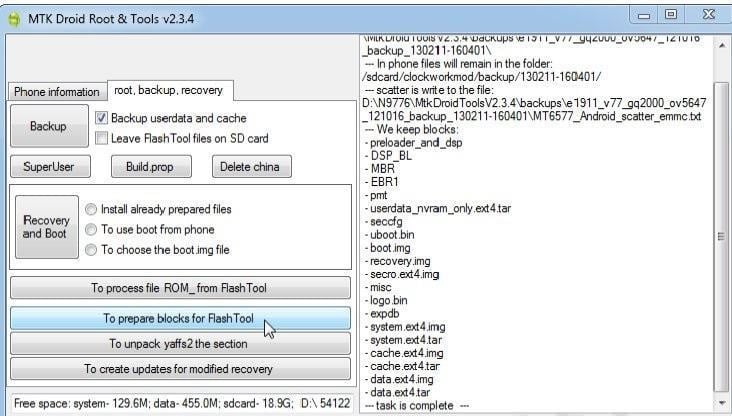
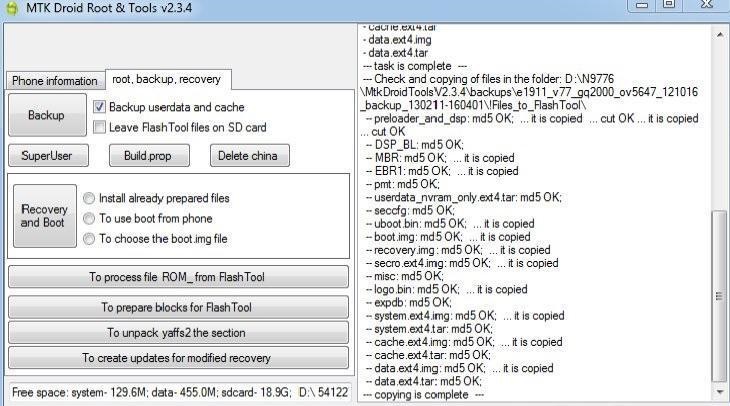
7. Once the ROM backup is complete then click on ‘To Prepare Blocks For FlashTool’ as can be seen below:

image-3


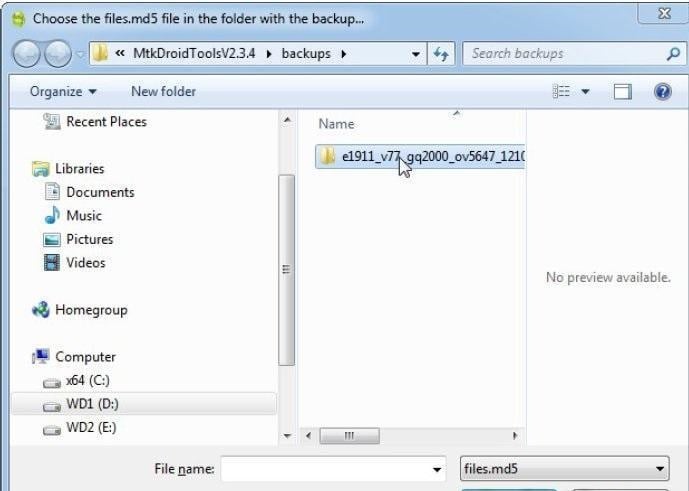
8. Next you have to select the the md5 sum file, to do this just browse the backups folder and there’ll be a folder entitled with the name of your phone. Open this folder.

image-4


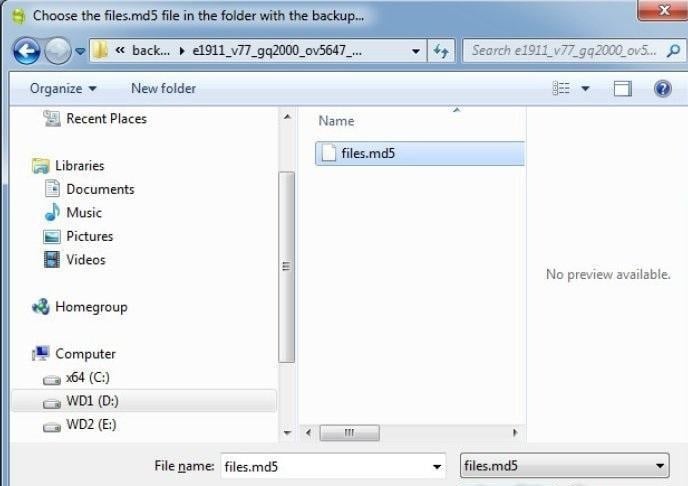
9. Inside this folder is a file entitled ‘files.md5’, click on it.

image-5


10. After selecting files.md5 you’ve completed the creation of Blocks for Flash tool, and you’ve backed up your ROM.

image-6


To proceed with Unbricking your phone, follow with these steps.

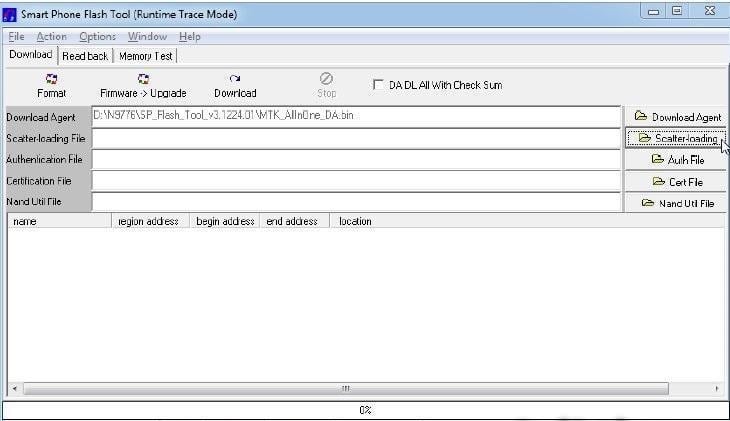
11. Open SP flash tool and select ‘scatter loading’

image-7


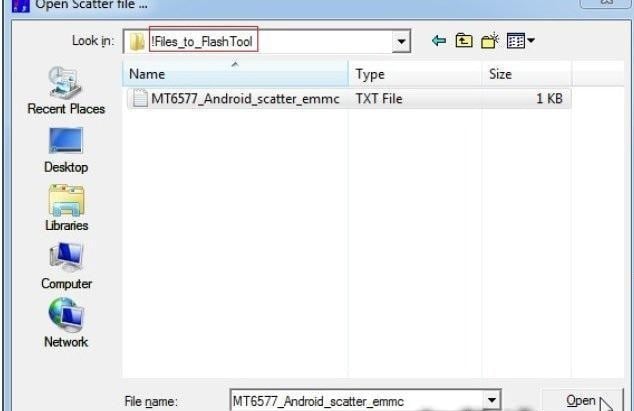
12. Look for iFiles_to_FlashTool and click the txt file inside then ‘Open’, as shown below:

image-8


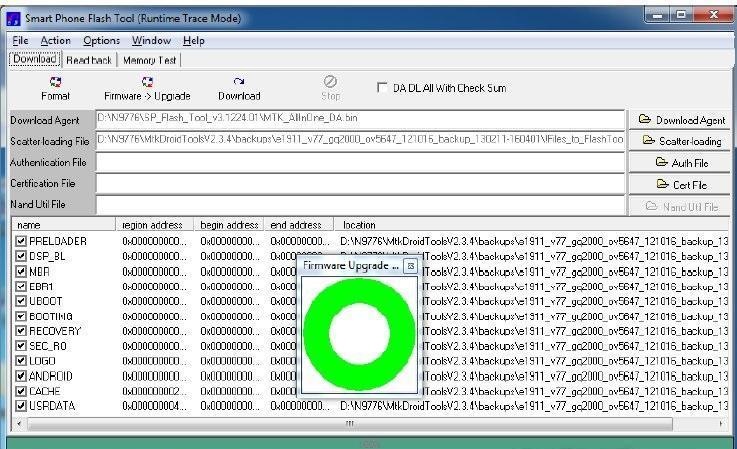
13. Next you should see a screen like this one:

image-10

If you’ve reached this point, it should be the end of your troubles, your phone is fixed!

Now according to your problems here are the solutions:

14 a) If you are stuck at bootloop then just select ANDROID(system.img),  You don’t need to post the whole ROM again.

14 b) If your phone is hardbricked then just click on Firmware>Upgrade to download the whole ROM

You may need to remove the battery but for some phones this is not necessary. When you’re finished you will get a screen like this:

Labels: ,

How To Unbrick, Flash Stock Rom, Custom Rom Using SP Flash Tools For All MTK Android Device

How To Unbrick, Flash Stock Rom, Custom Rom Using SP Flash Tools For MTK Device

What Is Sp Flashing Tools

Allow You To Flash Any Stock Rom Or Custom Rom On The Android Smartphone, Here We Are Going To Talk Abit About The Smartphone Flash Tools And It's Features.


Knowing how to use SP Flash tool can be very handy if you own a PC or have access to one. SP Flash tool, which stands for Smartphones flash tool, is a software developed by MediaTek to help Android owners address several issues affecting Android phones. The SP Flash tool is meant specifically for Android phones using MediaTek’s chipsets. We are talking MTK devices like Gionee, Infinix, Tecno, Itel, or generally over 80% of smartphones in Nigeria.

SP flash Tool

Here are some of the things you can fix with the SP Flash tool
-unbricking a bricked MTK Android phone
-changing ROMs of MTK android phones to custom ROMs
-upgrading the OS of MTK phones to a newer OS
-conversely, you can download upgrade the OS to an older version if you so wish.
All these operations are generally termed ‘flashing’

So what do you need if you want to flash your MTK device with the SP flash tool.

1. A computer
2. USB cable
3. SP Flash tool
4. MediaTek USB VCOM drivers.
5. Phone you want to flash
6. Files to be flashed( ROM + scatter files). You can download your phone’s stock ROM from the manufacturer’s website.


Also, an internet search will reveal several sites where you can get these ROMs including custom ROMs if your intention is to swap ROMs

Step 1: Download and install the USB VCOM drivers to your system. If you have it already, just skip to step 2

Step2: Download the latest SP flash tool from here to your computer. Go to the folder where the SP Flash tool is located and launch it as administrator

SP flash tool

Step 3. Remove the battery from the phone. Put it back in. Don’t boot the phone. If the battery is non-removable, just switch off the device.

Step 4. On the SP flash tool interface, locate the ‘scatter loading‘ tap at the far right and click on it.

Step 5. Navigate to where your ROM is and locate the scatter file (usually a .txt file) which should be part of a .zip file. Select the scatter file and click open.

SP Flash tool

Step 6. Click the download button in the SP flashing tool interface to start the flashing process

Step 7. Connect the phone (still switched off) to the computer using the USB cord. You can press volume up or volume down button for the software to easily recognize the phone

SP Flash Tool

Step 8. A progress bar would appear to show you the flashing process has started.

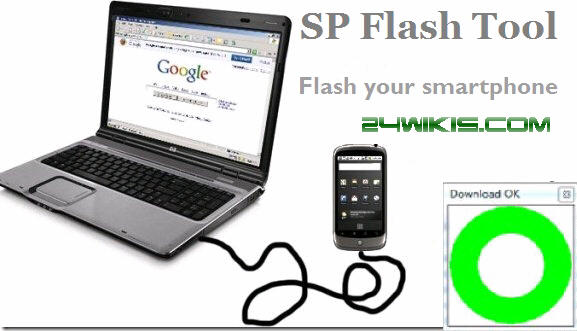
Step 9. The time taken to complete stage 8 would depend on the size of the ROM and the specs of the computer. A successfully completed flashing would be indicated by a green circle and a ‘Download Ok’ box.

SP Flash tool

Close the SP Flash tool and detach the phone from the computer. Your smartphone has now being successfully flashed. Remove the battery from the phone; wait for about 20 seconds, insert the battery and power it on. After booting, do a factory reset to clear any more errors.

Note : make sure you only flash ROMs that are made specifically for that phone.


Source: Techproduct and spflashtooldownload

Labels:

Friday, October 7, 2016

Learn How To Backup Your Android Mobile Phone Using Titanium Backup

Learn How To Backup Your Android Mobile Phone Using Titanium Backup


Hey You Guys Today I'am Going To Show You How To Complete Backup Your Android Phone, Is Easy To Do It Just Follow The Steps:

Wha Is Titanium Backup is a great and useful app and also a must
have app on a rooted android phone. It is a great tool used to backup
your apps and either user or system apps.You need to backup your apps because if you want to flash a new ROM you
will need to backup your apps in other not to lose all your data and
saved games.

It can be used to create profiles to enable you to use two or more social media The pro version can be used to freeze any unwanted or bloatwares apps on
your phone & RAM consuming app. It can schedule future backups .


And can be used to convert a user app to system app. It can convert your
backup to flashable.zip to flash through any recovery You can even use
to clear dalvik cache without even booting to recovery.

Download Titanium backup Pro HERE

For Apps backup
Open your app drawer open titanium backup. For backing up a single app just click on backup/restore select the app you want to backup then
click the backup button there. 

But if you want to backup all your apps in a single click. Click on the button on the top right corner
.

Click on RUN behind Backup all user apps. 

Click on the tick  button on the top right corner.


 It will start wait till it finish

 After it is done it is going to notify you on the notification bar. Now you have all your apps backup To restore back your apps Click on the button on the top right corner


Scroll down Click on RUN behind Restore all apps with data.

Titanium Backup pro

Click on the tick  button on the top right corner.

Titanium Backup

 It will start wait till it finish

Titanium Backup

You have all your apps backup. incase you are facing problem you can comment.

Labels: ,

Tuesday, October 4, 2016

How To Disable Or Enable Driver Signature Enforcement In Windows 7

How To Disable Or Enable Driver Signature Enforcement In Windows 7


Hello Guy Today I'am Going To Show You How Disable Driver Signature On Your Computer Windows 7, This Is Not A New Method It's Old One But Upto Now Is Working.
Just Follow The Steps Bellow.

You can enable/disable this by following the procedures bellow:
Disabling Driver Signature Enforcement:


  1. Go to Start > All Programs > Accessories and Right-Click on Command Prompt and select Run As Administrator.


  • Click Yes when prompted.
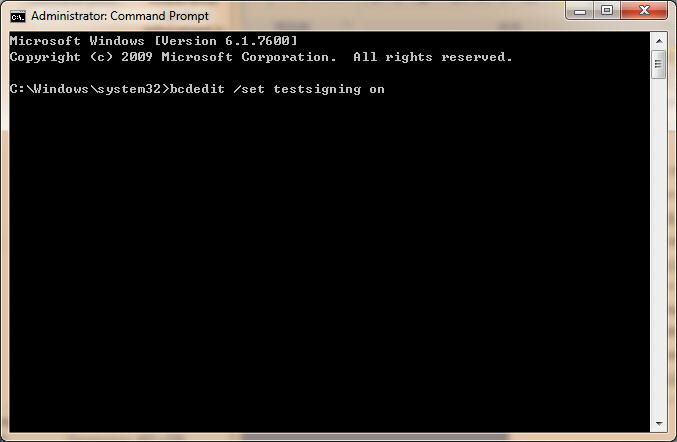
  • Type bcdedit -set TESTSIGNING ON and Hit Enter.


  • Restart your Computer

  • NOTE: You can also do this through F8 when booting your computer for the first boot.
    Enabling Driver Signature Enforcement
    1. Go to Start > All Programs > Accessories and Right-Click on Command Prompt and select Run as Administrator.


  • Click Yes when prompted.
  • Type bcdedit -set TESTSIGNING OFF and hit enter.
  • Restart your computer.
  • If You Confused Just Comment Bellow.

    Labels:

    Sunday, October 2, 2016

    How To Unlock Pattern Of All MTK Android Devices Without Lose Your Files Using Miracle Box

    How To Unlock Pattern Of All MTK Android Devices Without Lose Your Files Using Miracle Box


    How to unlock / Remove All MTK Android devices Pattern That Has Been locked without Factory Reset.

    In This Topic I will show you how to Unlock the locked pattern lock of any MTK Android device without factory Data reset.

    DOWNLOAD and Install MT65XX driver.DOWNLOAD Miracle Box.
    Launch Miracle Box
    Click MTK Tab
    Click Unlock/Fix
    Tick Read Pattern
    Click Start Button
    Turn off device and connect to PC using USB Miracle Box will detect device Wait for few seconds for Miracle Box to analyse the pattern of the device.

    Done, the process is complete The Pattern code will be displayed in numbers. Input according to the 3X3 matrix input on the device.

    Example: 125789 You will draw the pattern from dot 1 to 2 to 5 to 7 to 8 to 9
    That's All If You Have Any Problem You Can Reply With Your Comment.

    Labels:

    Download Latest Cracked GPG Dragon version 3.50 Use It Without A Box

    Download Latest Cracked GPG Dragon version 3.50 Use It Without A Box


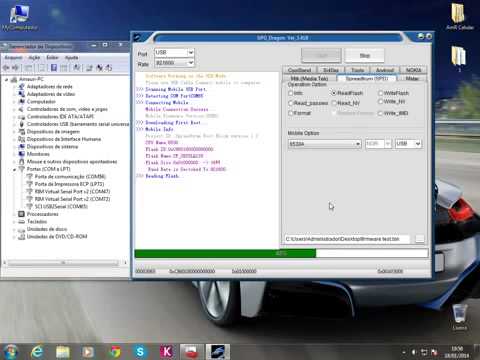
    This Is The Latest GPG Dragon Multi Flashing Tools, You Can Flash Blackberry,Nokia,Spreadtrum,MTK,Android Chines,Coolsand,Samsung,LG, And Others Phones Without Using Any Box, Just Download This Cracked GPG Dragon Tool.

    GPG Dragon is a Chinese phones repair tool that is able to flash and repair cell phones which have chipsets like Coolsand, Spreadtrum, Qualcomm, Mtk, etc.

    GPG Dragon features
    MTK
    write/read flash
    repair IMEI
    repair Touch screen
    read unlock code

    SPD (SpreadTrum)
    write/read flash
    read unlock code
    format
    change IMEI

    Qualcomm
    Old models support via COM port and new models support via USB port, read mobile code (unlock)

    Nokia and others Phones...............

    Download GPG Dragon Cracked version 3.50 from here
    The zip file inside dragon folder has no use After Download extract and launch
    .

    Please if you enjoy using this GPG Dragon Software, support the developers by buying the box.

    Labels:

    Wednesday, September 28, 2016

    How To Make Your Android Mobile Phone Look Like A Computer Xp Using Xp Mode

    Hello Guys Today I'am Going To Show You How Make Your Android Mobile Phone Look Like a Computer Windows XP, This Is Not a New Thing But I Knew Is a New To Some People.
    Without Waste Of Time Now I Will Show You The Easier Way To Do that On Your Andriod Mobile Phone Just Follow Me Guys.
    Download Xp Mode From The Link Download Now After You Have Downloaded, Install it, Then Go Back To Your Applications Menu Then Find The Xp Mode Launch It And Then Press Home Menu Button Of Your Android Phone It Will Ask You To Choose Default Click On Xp Mode Then Click On Always.
    Here Is The Screenshot Of The App.


    That's All Drop Your Comment For Any Kin Of Problem.

    Labels:

    Tuesday, September 27, 2016

    How To Flash Any Tecno Feature Phone Using Multi Port Download Tool

    Hey You Guys Today I'am Going To Show You How To Flash Any Tecno Smalls Phone's Without Using Any Box, Just Fellow The Steps Bellow.

    This tool is developed by MediaTek and is used to flash feature phones with firmwares in the format of
    .cfg 

    An example of feature phone is Tecno T340.


    STEPS


    1.DOWNLOAD and install feature phones driver.


    2.DOWNLOAD MultiPortDownloadTool.
    3.Launch MultiPortFlashDownloadProject.exe


    4.Click OK on the dialogue box that pops up with Fail.


    5.Click File and select Open Download Agent File.


    6.Select MTK_AllInOne_DA.bin.
    7.Now Click Image Folder button.


    8.Navigate and select the folder containing the ROM.


    9.Click OK on the window that appears with Load Files Success.


    10.Insert battery into the phone.


    11.Open Device manager.


    12.Click on Ports (COM & LPT)


    13.Connect the phone.


    14.Check and note the COM Port number that appears.


    15.Disconnect the phone.
    16.Now on Multi Download Tool, tick COM Port number, USB &
    17.Select Download ROM and Format.


    18.Click Start button on the line which the COM Port number of the phone was connected.


    19.Connect phone.


    The process starts with a red bar followed by purple then yellow.

    When you see DL OK with 100% yellow bar, the process is complete Disconnect and reboot Phone


    NOTE; If for any reason, the com ports on the multi port download tool do not tally with the com ports on system device manager.

    To resolve this, open flash tool, click on options and select set begin COM port. Set and apply, If You Face Any Problem Just Comment With Your Problem

    Labels:

    Saturday, September 24, 2016

    Best Method To Change IMEI Of All MTK Android Smartphone Without Computer

    Hello Guys Today I'am Going To Show You how to change all MTK android phones IMEI number without using computer, There's lots of Android owners have been looking for a way to change their MTK Android phones IMEI number without Computer, the fact remains that not everybody have his own Computer to change their MTK android phones IMEI numbers.


    To change all MTK android phones IMEI number without PC

    You need to Download Mobile Uncle Tools from Google play store.

    Mobileuncle MTK Tools


    You can as well download English Version below:

    Mobileuncle English version


    English version Screenshots:


    App Description:

    Mobileuncle Tools is power tools for MTK android device:1 display device info

    2 information of device and running status

    3 easy open engineer mode and MTK engineer mode

    4 backup IMEI for MTK mobile

    5 recovery online update

    6 easy update tool via sdcard

    7 Enable USB Mass Storage Device,connect cable first

    8 crack operator GPRS lock for MTK

    9 free the network access limited via GPRS

    10 power GPS search

    11 Power the gps search satellite ability

    12 enable AP

    13 easy reboot to recovery


    Important Note:

    Backup valid IMEI no

    Its really difficult to get for individual, so take copy IMEI no of your old unused mobile phone, and be sure we will never switch on the phone ever again. If you switch it on, the both sim will not register to the network.

    Its all done.

    Instruction on how to change all MTK android phones IMEI number without PC:
    Go to Engineer mode in mobile Uncle tool


    Select Engineer mode[MTK]


    Go to CDS information


    Select Radio Information


    Here you can see Phone1 and Phone2, in that select phone2, because most of the Chinese clone phone the 1st Sim which is a 3G will work perfectly. Only the problem happens when we insert the second sim. If you check you can see the IMEI of 1st sim will start with 35xxxxx and the 2nd will start with 88xxxxxxxx. That is why the second sim is not able to register to the network, because its not in international formatted IMEI. So usually we need to change the IMEI of phone 2.

    Select the phone 2

    Here you can see a command line with AT+. Now just add this command to it

    AT+EGMR=1,10, 15 digit YOUR NEW IMEI NO

    And press end at command button.


    [ if you want to change the the phone 1 IMEI AT+EGMR=1,7, NEW IMEI NO ]

    Yes we all done¦ now you can restart the phone and check the IMEI by pressing *#06#


    Remember your Android device must be rooted before trying this and this is important because you can now use AIRTEL GLO ETISALAT and MTN BIS on Blackberry and Computers ...

    Labels: