Monday, July 25, 2016

Tutorial on How to Flash Stock Rom(Original Firmware) of Acer Liquid Z5 (Z150) via Sp Flash Tool

Tutorial on How to Flash Stock Rom(Original Firmware) of Acer Liquid Z5 (Z150) via Sp Flash Tool


Welcome Acer Liquid Z5 (Z150) Users! 
Is your phone bootloop and you can't fix it because you don't have any recoveries? Does your phone still experience  lag eventhough your done formating your device or even factory reset(hard reset) it?Facing Deadboot(Hardbrick)? Well, I think flashing it with original firmware is the best solution for your problem.


Acer Liquid Z5 (Z150) Screenshots


Requirements:
PC and USB Chord
Acer Liquid Z5 (Z150)

Download the following:

Drivers:
MT65xx-USB-Driver
MT6577 USB VCOM Drivers

Sp Flash Tool: 
Sp Flash Tool

Stock Rom(Original Firmware):
Acer_Liquid_Z5_Z150_Stock_ROM

Scatter File:
Scatter File


We are not responsible if anything happens to your phone.

Step by Step Tutorial Fo Flashing Stock Rom(Original Firmware) Using Sp Flash Tool:

*This can fix bootloop
*Phone lagness
*Making back the Original Rom

1. Ready your cable and phone. Must have atleast 70% charge. Phone must be turned off.
2. All of the files are in zip file, so you need to extract them all.Better if you will make one folder for your files then extract it.
3. Enable USB Debugging mode in your phone.
4. Install all MT65xx-USB-Driver
5.Install  USB VCOM Drivers
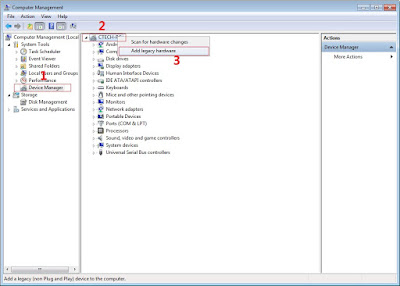
 In Device Manager Right click on PC name(Right Side) and then click on Add legacy hardware as shown in image below.

 USB VCOM Drivers Screenshots

Now in Add Hardware Wizard click on Next » Install the Hardware that i manually select from a list (Advanced) » Show All Devices » Next » Have a Disk, Now select the any inf file from where you extracted the downloaded VCOM driver package.

USB VCOM Drivers Screenshots

  Now Click on Next and select Install this driver software anyway and wait for finishing the process.


USB VCOM Drivers Screenshots

4.  After installation is finished then Restart your computer, That's it.
5. Open Flash tool click on the Download Tab
 Extract the downloaded Acer Liquid Z5 (Z150) stock rom to the new folder you created.
(NOTE: I'm using other screenshots of other phone since I don't have that device though the process is still the same so no worries).

Sp Flash Tool Screenshots

6. Click Scatter-loading and browse for the scatter file (MT6575_Android_scatter)
7. For Bootloop only
 Make sure flashing mode is set to "Download Only" and check mark all except Preloader.
Note: If deadboot/hardbrick set "Download+Format" and check Preloader.
8. Click Download.

Sp Flash Tool Screenshots


9. Turn off your phone, connect your phone to the PC and wait for the flashing to commence.
10. Green Circle image with check will show once flashing is completed. That's it!

Sp Flash Tool Screenshots

11. Disconnect your phone in USB cord then open if still bootloop then try to factory reset in recovery settings. To go in recovery mode reboot your phone hold and press power on and volume up simultaneously until recovery mode appeared.

Hope it helps! Thanks!

Labels: , ,

Thursday, September 17, 2015

[ROM] Cherry Mobile Flare X Stock Rom Flash Via SPFT

[ROM] Cherry Mobile Flare X Stock Rom Flash Via SPFT

Cherry Mobile Flare X Screenshots

Cherry Mobile Flare X
1.7GHz MediaTek 6752 64-bit octa-core processor
Mali T760 MP2 GPU
3GB of RAM
5.5-inch full HD IPS OGS display,
Gorilla Glass 3, 1920 x 1080 resolution
16GB of storage, with SDcard slot
13-megapixel rear camera, 
Sony IMX214 sensor, BSI
5-megapixel wide angle front camera
Dual sim (micro) dual 3G, LTE
WiFi, Bluetooth, GPS, NFC
USB-OTG capable
3000mAh removable battery
Android 4.4 KitKat with OTA for Lollipop 5.1


Download Link:
Flare_X_V2_20150811-082738.zip
Flash this Stock Rom via SPFT using PC follow this procedure [CLICKHERE]


Credits:
MARK BRIAN ABAD
ADAM GONTIER
CM FLARE X UNITED

Labels: , ,

Sunday, September 13, 2015

[ROM] FOR CHERRY MOBILE FLARE X OFFICIAL LOLLIPOP BETA / RC (Release Candidate) 3 FLASH VIA SPFT

OFFICIAL LOLLIPOP BETA / RC (Release Candidate) 3 FLASH VIA SPFT
Cherry Mobile Flare X Screenshots

OFFICIAL LOLLIPOP BETA / RC (Release Candidate) 3 : ---> with custom improvements:

REMINDER:
WALA PONG SMART AWAKE TONG ROM NATO PARA SIGURO DI MABILIS MALOWBAT.
Whats new?
  • New rebuilt Lollipop Project
  • MultiLang (Beta2 only had ENG/CN)
  • NFC Fully working (for those with the Advanced version)
  • New kernel
  • New Baseband
  • Fix media issues ( present on older Beta2)
  • Fix Front Camera
  • Sound calls quality is much better (finally !)
  • Rear Speakers Sound Quality is much better (finally !)
  • Battery Percentage Option now present (settings> battery)
  • Improve hardbuttons lights
  • Many, many other optimizations
Plus, added by me:
  • GAPPS (minimum)
  • Pre-Rooted (SuperSU)
  • Busybox enabled
  • And some other small corrections
  • MAY MOVE TO SD NA TO YUNG APP LANG, DI KO PA NATRY YUNG LINK TO SD NG OBB, TRY NYO NALANG :)
First of all : BACKUP, BACKUP, BACKUP 

Comming from KitKat layout:
Use the firmware upgrade option

Already on Lollipop layout:
Just use the download option

Please Follow this Tutorial for flashing via SPFT [HERE]

DOWNLOAD LINK


Credits to:
Dave Alloso
CM FLARE X OFFICIAL GROUP

Labels: , , ,

Saturday, February 28, 2015

[TUT]How to Flash Via SPFT with images Tutorial for Newbie

How to Flash Via SPFT with images Tutorial for Newbie
Hi guys I made a tutorial again for newbie on how to flash via SPFT in any kind of mediatek android device. I hope you can understand easily because I attached images. I used mt6572 for my scatter file  using SPFT v5.13. In order to flash stockrom you need to
install driver based in your windows version. Just follow the procedure below.
Do it at your own risk and be careful. It can cause hardbrick or deadboot so follow my tutorial carefully.
How to flash via SPFT for Newbie


Requirements:
PC/LAPTOP(WINDOWS OS)
USB CABLE
PHONE


FOR WINDOWS XP/7 -INSTALLING DRIVERS
1. Download Mediatek Driver and Extract then Install the driver for 32 or 64 bit operating system of windows 7.
Driver Choose 32 or 64 bit
2.  Before you plug your phone in PC, you need to focus in Device Manager, then plug your phone without the battery you only have approximately 5 seconds to appear MT65xx device that shows under Other devices, you need to right click it as soon as you see it.
MTK USB PORT

Then after you rightclick, click to Update driver software

3. Then choose - Browse my computer for driver software
Browse Driver

Browse the Mediatek MT65xx Preloader Driver folder

Make sure you know the version of OS to choose the right driver for your PC.

Choose your OS version, then choose if 32-bit or 64-bit for your PC.

E.G. s Win7  folder:
usb2ser_Win7.inf - if 32-bit
usb2ser_Win764.inf - if 64-bit

4. Another options, to find right driver for your phone is to open your internet while your phone is connected without the battery and automatically searching driver for your phone.

FOR WINDOWS 8/8.1/10 -INSTALLING DRIVERS
1. Download all necessary files and Enable USB Debugging mode in your phone..
2. Install Drivers USB_VCOM_Driver.rar
In Device Manager Right click on PC name(Right Side) and then click on Add legacy hardware as shown in image below.

add legacy
Now in Add Hardware Wizard click on Next » Install the Hardware that i manually select from a list (Advanced) » Show All Devices » Next » Have a Disk, Now select the any inf file from where you extracted the downloaded VCOM driver package.

mediatek preloader

3.  Now Click on Next and select Install this driver software anyway and wait for finishing the process.

Install driver anyway

4.  After installation is finished then Restart your computer, That's it.
If still not success in installing driver just Disabled Driver Signature Verification
1. Go to PC Settings>General>Troubleshoot>Advanced Options>Startup Settings>Disabled Driver Signature Enforcement>Then Restart
disabled driver signature verification
Once you disabled. Then follow the procedure above to install the driver. Once success proceed to next step.
5. Download SP_Flash_Tool_v5.1352.01.rar and extract then click flash_ tool to open
Click Flash tool

6. Click Scatter_loading and open your scatter file like image below(I'm using mt6572 scatter File)

Click Scatter Loading


7. Check all except preloader. (If your device is hardbrick/deadboot apply check in preloader)

Uncheck Preloader


8. Click download
Click Download


9. Wait until green circle appear

SPFT SUCCESS GREEN CIRCLE


Remove your phone to usb cable then insert your battery and On your android phone..Enjoy!

Note: If not reboot try factory reset in recovery mode of your phone.

You can watch Video Tutorial below
Credits: Androidxda


You can download and select your device for available STOCKROM
If invalid IMEI occur after flashing follow this tutorial on how to fix IMEI.


Disclaimer:
This tutorial was tested in Android 4.2 Jellybean Version but can work also to Android Kitkat 4.4.4 and  6.0 Marsmallow, our team are progressive and knowledgeable to update this thread on how to flash Stockrom up to most updated version of Android.

Labels: , , , ,