[G800F/M/Y][ROM][7.1][NDE63P] CyanogenMod 14.1 for G800F/M/Y
[G800F/M/Y][ROM][7.1][NDE63P] CyanogenMod 14.1 for G800F/M/Y
![[G800F/M/Y][ROM][7.1][NDE63P] CyanogenMod 14.1 for G800F/M/Y Screenshot](https://2.bp.blogspot.com/-kguYQimNOek/WCxk10k-M8I/AAAAAAAAAMg/QPE2p22gYAgfatDyoi5vjC3Z8pbJPmyogCLcB/s1600/Screenshot_20161107-211620_1_.jpg "[G800F/M/Y][ROM][7.1][NDE63P] CyanogenMod 14.1 for G800F/M/Y")
![[G800F/M/Y][ROM][7.1][NDE63P] CyanogenMod 14.1 for G800F/M/Y Screenshot](https://1.bp.blogspot.com/-YnW8CQJG4zA/WCxk3tjTFrI/AAAAAAAAAMk/rIlvPhgINgMp6XU_P5cqbYRC8ztxbV0IwCLcB/s1600/Screenshot_20161107-211502_1_.png "[G800F/M/Y][ROM][7.1][NDE63P] CyanogenMod 14.1 for G800F/M/Y")
First of all, Although G800F and G800H share the same name they are not related in terms of hardware due to the different SoCs used (Exynos vs. Snapdragon).
Hence please do not ask for support or ROMs for the G800H.
Disclaimer:
You flash this image at your own responsibility. I am not responsible for any damage that might be caused by flashing this image (bricked device, lost data, ...)
Flashing this kernel image will trigger the KNOX counter, so your warranty will be void.
Applications that use KNOX (e.g. "Private Mode") might not work anymore when returning to the stock ROM, as the device is regarded as compromised. Do not flash this ROM if you
Flashing this kernel image will trigger the KNOX counter, so your warranty will be void.
Applications that use KNOX (e.g. "Private Mode") might not work anymore when returning to the stock ROM, as the device is regarded as compromised. Do not flash this ROM if you
need those applications.
The image is only for Exynos3470 based S5 Mini variants SM-G800F/M/Y.
It might be instable, crash your device, drain your battery, or even might damage your smartphone (e.g. if an USB-OTG device drains too much power)
Some users reported that their touch-screen stopped working permanently after some weeks of usage. For some user's (two at the moment including me) NFC stopped working permanently. Probably this issues are not related to this ROM as also many stock user's complain about hardware issues (random reboots, black screens, unresponsive touchscreen) but you have been warned.
Backup your data before flashing and check if the original firmware is present (e.g. at SamMobile)
The image is only for Exynos3470 based S5 Mini variants SM-G800F/M/Y.
It might be instable, crash your device, drain your battery, or even might damage your smartphone (e.g. if an USB-OTG device drains too much power)
Some users reported that their touch-screen stopped working permanently after some weeks of usage. For some user's (two at the moment including me) NFC stopped working permanently. Probably this issues are not related to this ROM as also many stock user's complain about hardware issues (random reboots, black screens, unresponsive touchscreen) but you have been warned.
Backup your data before flashing and check if the original firmware is present (e.g. at SamMobile)
Important note: It is possible that flashing this ROM can cause efs partition issues. Therefore it is strongly recommended to make a backup of your efs partition before flashing this ROM. This can be done via TWRP.
Working features
HW accelerated GUI
Camera (pictures+video: Back+Front) (switching between camera and video-recording might crash the camera-app)
MTP storage
Flash Light
Bluetooth (A2DP, HFP, HID)
IR
Sound
SMS
Initiate and receive calls (the first ingoing call seems to have no sound)
Wifi
Mobile Data
USB-OTG (Keyboard, Mouse, USB-Audio, Mass-Storage)
NFC
Hardware sensors (Orientation, Compass, Proximity, Acceleration, Hall sensor, Step counter)
Light sensor (needed for auto-brightness)
Pulse sensor (preliminary and very inaccurate. Works with Apps like Kardiograph)
SD-Card as internal storage (new Android M feature)
GPS
Fingerprint scanner
Camera (pictures+video: Back+Front) (switching between camera and video-recording might crash the camera-app)
MTP storage
Flash Light
Bluetooth (A2DP, HFP, HID)
IR
Sound
SMS
Initiate and receive calls (the first ingoing call seems to have no sound)
Wifi
Mobile Data
USB-OTG (Keyboard, Mouse, USB-Audio, Mass-Storage)
NFC
Hardware sensors (Orientation, Compass, Proximity, Acceleration, Hall sensor, Step counter)
Light sensor (needed for auto-brightness)
Pulse sensor (preliminary and very inaccurate. Works with Apps like Kardiograph)
SD-Card as internal storage (new Android M feature)
GPS
Fingerprint scanner
Non-working features:
SELinux
SELinux
Before you start:
Backup your data, like call history, contacts, sms, WhatsApp messages, favourite app settings that are on internal and external sd (by using Titanium Backup or other apps available on PlayStore). At least all internal data will be lost in any case. If you have bad luck you might also loose data from your external sd card.
Download: Odin3-v3.07: [LINK ##download##]
TWRP 3.0.0 recovery image [25/03/2016]: [LINK ##download##]
CM 14.1 ROM for G800F/M/Y: [LINK ##download##]
Google Apps (contains Google Play, ...) for Android 7.1. The following is recommended:
Open GApps Project, Platform: ARM, Android:7.1, Variant: whatever you prefer (e.g. "mini" or "nano")
CM 14.1 ROM for G800F/M/Y: [LINK ##download##]
Google Apps (contains Google Play, ...) for Android 7.1. The following is recommended:
Open GApps Project, Platform: ARM, Android:7.1, Variant: whatever you prefer (e.g. "mini" or "nano")
Install recovery:
Reboot your device into Odin mode: turn off your device, then press Volume-Down + Home + Power button at the same time and release them.
Confirm the following warning message with the Volume-Up button.
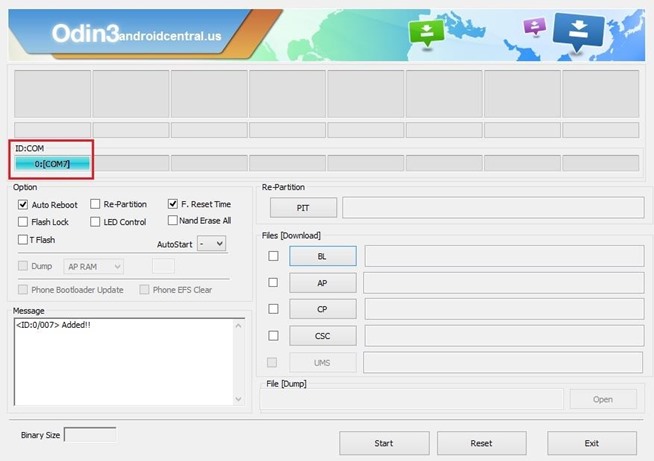
Connect your device to your PC via USB
Make sure the device driver's are installed on your PC
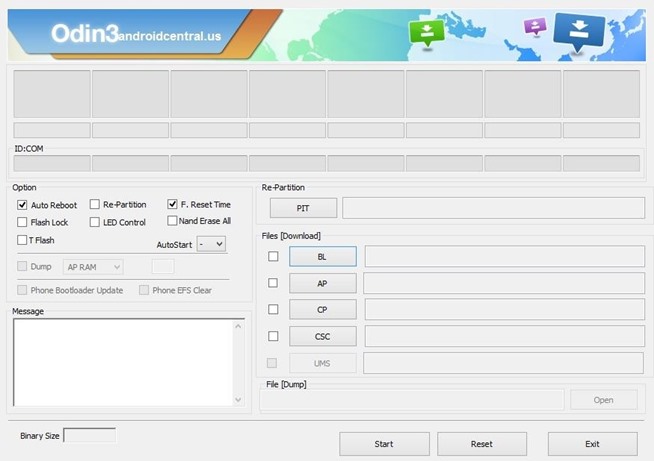
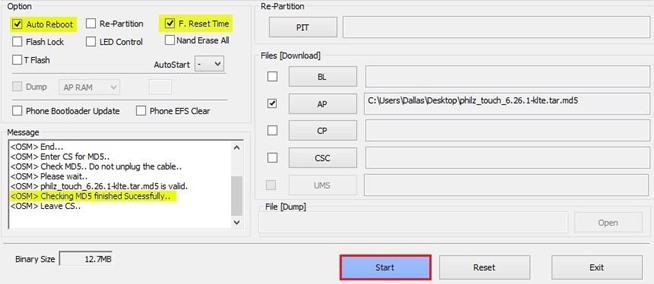
Start Odin
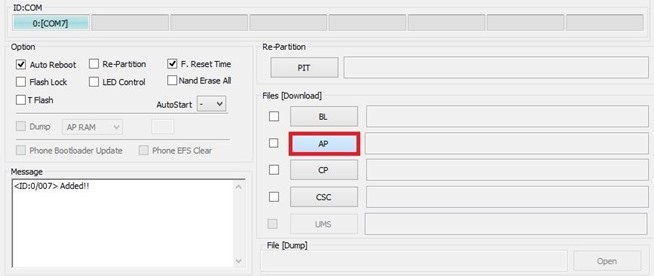
In Odin select PDA and select the recovery image (recovery.tar.md5)
Check that only "Auto Reboot" and "F. Reset Time" is set
Click on "Start": the kernel image should be flashed now and the device should reboot afterwards. By flashing the recovery, your warranty will be void.
After the recovery flashing process was successful, power of your device. If not restart into Download mode and flash again or flash the stock rom.
Confirm the following warning message with the Volume-Up button.
Connect your device to your PC via USB
Make sure the device driver's are installed on your PC
Start Odin
In Odin select PDA and select the recovery image (recovery.tar.md5)
Check that only "Auto Reboot" and "F. Reset Time" is set
Click on "Start": the kernel image should be flashed now and the device should reboot afterwards. By flashing the recovery, your warranty will be void.
After the recovery flashing process was successful, power of your device. If not restart into Download mode and flash again or flash the stock rom.
CREDITS:
hennymcc
CTXz
spookcity138
psyafter
ayke
Labels: custom rom, custom roms, Cyanogenmod, Cyanogenmod 14.1, G800F, G800M, G800Y, NDE63P, rom, Samsung galaxy S5
posted by kjnb @ November 16, 2016
0 Comments