mentech
mentech for all roms games apss and all phone fireaware
Wednesday, February 1, 2017
Friday, December 2, 2016
How to Flash Stock Rom in your Lenovo A369i
Labels: how to, lenovo, Lenovo a369i, Stock Rom
Saturday, November 19, 2016
how to flash Cherry Mobile Omega HD 3 stock rom via PAC file
Part One: Installing drivers
1. Extract the driver file.
2. Run dpinst.exe . Note that "x86" folder is for 32-bit computer while "amd64" is for 64-bit computer
3. We have to verify if the driver is installed, right-click on My Computer(WinXP)/Computer(Win7)/This PC(Win8) then Manage>Device Manager
4. Turn off your phone and remove the battery then insert back the battery again.
5. We have to first detect the phone to PC if its driver is working. Plug in the micro USB cord to your phone first but don't connect the USB cord to PC itself.
6. Timing is important! Hold volume down then immediately plug in the USB cord to your PC.
7. A poped-up notification appear to show if the drivers are successfully installed.
8. You may now remove the USB cord to the PC if success but don't remove yet the micro USB cord to your phone.
9. Now, we are ready to use Research Download!
Part Two: Using Research Download
1. Extract Research Download file
2. Extract your downloaded stock ROM file
3. Run ResearchDownload.exe
4. Click the first gear button. This will open up a browse menu. Use this to locate your .PAC file then click "Open" button.
5. Once the PAC file is loaded click play button .
6.Connect your Omega HD3 (while holding volume down)
7.You should see in research download that it has started flashing! (you can let go of the volume key now). When it is finished just press the stop button and disconnect your phone!
Additional:
* After the first boot of your phone, your current internal storage is xxxGB. Before doing anything else like rooting, installing or flashing recoveries, go to Settings>Factory data reset>Factory data reset then tap Reset Phone then tap Erase everything. Your phone will reboot to recovery. Wait for erasing and it reboot automatically. After that, your internal storage restore to its default size
Links:
Final Firmware For Omega HD 3 V1 By Team YuniX [MIUI Recovery Recomended] If You are Using this Firmware, Don’t Use The Firmware Below Thanks :D
[Click me!##download##]
Final Firmware For Omega HD 3 By Team YuniX [TWRP Recovery For V1 Users]
[Click me!##download##]
Spreadtrum Drivers
[Click me!##download##]
Research Download
[Click me!##download##]
Labels: cherry, Cherry Mobile, cm, flash, hd, how to, mobile, omega, PAC file, Stockrom, Tutorial
Monday, October 31, 2016
How To Root Infinix Hot 4 Using TWRP Recovery Mode In SP Flash Tools
As I use to say that sweet Android phone without root access and custom recovery installed is not yet a complete Android device for those who knows and enjoy the benefit of rooted and installed custom recovery mode but its unfortunate kingroot one click apk app is unable to get Hot 4 rooted but all hopes shouldnt be lost because in this article, I'll be showing us how to Root and also install TWRP Recovery on Infinix Hot 4 Android using Sp flash tools, so ensure you follow each steps carefully to root your Infinix Hot 4 using TWRP recovery.
NOTE:We will be installing TWRP Recovery for Infinix Hot 4 and then use it to root Infinix Hot 4 afterwards. Lets Start...
REQUIREMENTS
- PC/Laptop Running Windows.
- Working USB Cable
- SP Flash Tool. Download Here.
- ADB VCOM Drivers (normally I use PDAnet). Go here to learn how to install Mediatek Vcom Drivers to your PC
- Infinix Hot 4 TWRP Recovery image. Download Here
- SuperUser v2.66.zip. Download Here
Step 1: First download twrp recovery zip file for Infinix Hot 4 from given link, and then extract the “Recovery.img MT6580_Android_Scatter.txt” file to another folder in your PC desktop screen
Step 2: Now, power off your Infinix Hot 4, its time to install TWRP recovery for Infinix Hot 4
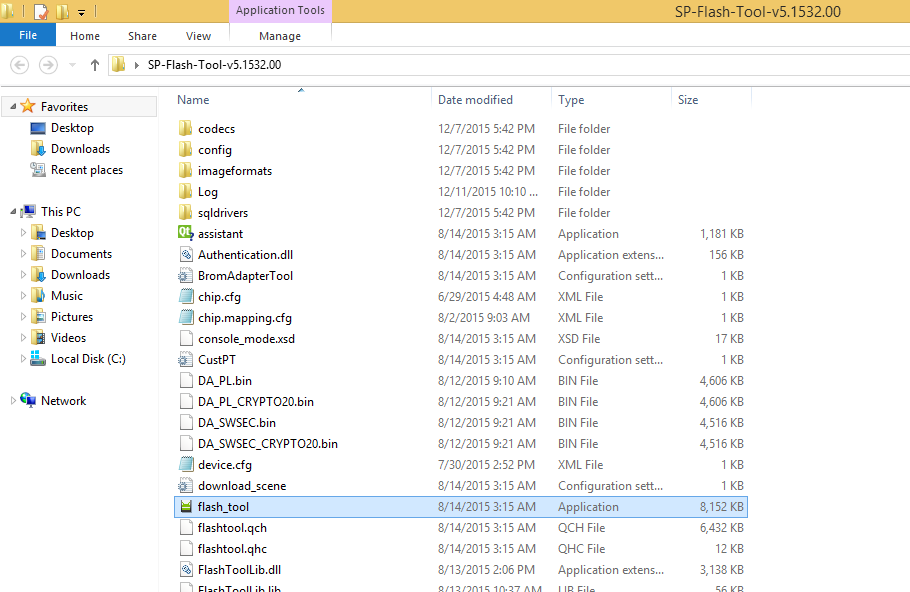
Step 3: Next, download the SP Flash tool, and extract its files to another folder your computer. You should get the following files as seen below, after extraction.

Step 5: Once the flash tool is launched, then click on the download/upgrade tab and click on scatter loading button.
Step 6: Now, locate the “MT6580_Android_Scatter.txt” file, which is on your desktop.
Step 8: Immediately, connect your switched-off Infinix Hot 4 to your computer via USB cable
Step 9: The Flashing process would be in progress, and a Green button would appear once the process is completed.
That’s it. TWRP Recovery is now succesfully installed on your Infinix Hot 4.
To boot to recovery mode, simply press and hold Volume up button + press Power button. Now let's move to the next phase on how to root Infinix Hot 4
HOW TO ROOT Infinix Hot 4 x557
Granted you have successfully installed TWRP Recovery after going through the detailed instruction on how to install Recovery image via Sp flashtools to your Infinix Hot 4, now do the following:
- Boot your Infinix Hot 4 phone into TWRP recovery mode (by Holding the Vol. Up + Power button at the same time for 5 seconds).
- In TWRP recovery mode, Choose "Install zip".
- Then navigate to the location you placed SuperUser v2.66.zip file and proceed to install
- After installing SuperUser.zip, reboot your phone
That's it, you have successfully rooted your Infinix Hot 4 Android smartphone. To verify if its properly rooted, goto Google playstore and download "Root Checker.apk" to verify.
Sunday, October 30, 2016
How To Root Any Android Device Without Internet Connection Using VRoot
Welcome to 24wikis today we are going to discusse about rooting android phone without internetion connetion, everyone, we all know that there are so many methods to root Android phones within a minutes.
So today, i will show you how to root your Android phone without an internet connection, the easiest way using an improved PC software (vROOT) that makes the rooting of any android phone and devices seem so easy and effortless. I have personally tried it on several android operating System (OS) including;
==============================
- 2.2 (Froyo)
- 2.3 (Gingerbread)
- 4.0 (Ice Cream Sandwich) and
- 4.2 (Jelly Bean)
- MTK Devices
==============================
- HTC
- Samsung Galaxy Note 10.1 (GT-N8000)
- Gionee Pioneer P1
- Huawei U8180
- Sony Ericsson Xperia Active ST17i
- Tecno Tab and
- Samsung Galaxy Note 3
HOW TO ROOT USING VOOT METHOD
==============================
WHAT IS NEEDED?
- A working Windows PC
- Working USB cable
- USB drivers of your phone or device installed on the pc. In case you don't have your phone drivers, you can get it from below.
- Your phone battery should be atleast 50% - 100%
PROCEDURES:
==============================
- Download and install the VRoot software (English Version)
- Enable USB debugging by going to ==> Settings ==>Developer options.
- Launch the vROOT software from your start menu or desktop
- Connect your phone or device to the computer using the USB cable that came with it. (Drivers must be properly installed for your phone to be detected)
- Allow vROOT to detect and display the model of your phone (accept any USB debugging prompt)
- Tap the green “Root” button to root your phone or device
- The device will be rebooted and confirmed rooted by the vroot software.
USB DRIVERS FOR DIFFERENT DEVICE
==============================
- For Samsung USB drivers here or install Kies instead
- For HTC USB drivers here
- For Gionee USB drivers here
- For Huawei USB drivers here
- For ZTE USB drivers here
- For Infinix USB drivers here or use the adbdriver.com to detect automatically
- For LG Android USB drivers here
- For Tecno Android USB drivers use same as Gionee above or here to download a universal one.
Please If This Was Helpful To You, Don't Forget To Hit The Share Button. Aslo If You Have Any Qestion, Ask Via The Comment Box Below. ThanKs...
Friday, July 17, 2015
How to backup/extract your android phone firmware
Recently, someone asked me how he could backup his android phone's Rom manually via cmd; it should be all over the internet I said to myself.
Today, I'm posting it here again for easy access.
There are too many reasons why you would want to backup your Android device. It could be for backup purpose, just incase something goes wrong, or to restore in another compatible device, for further modification/development, and on.
To go about this.
- Make sure ADB is properly installed
- Ensure to install your device drivers
- Ensure your device has root access
- You'll need a functional brain too ;)
Now, to the real deal!
Run CMD and point to the folder where you have your ADB files (Windows: Right-click on the folder while holding SHIFT button, select Open command window here)
Connect your device via a usb cable
Type the following commands:
adb devices (click enter)
adb shell (click enter)
su (click enter)
cat /proc/mtd
The above command will list your device's partition.
Example:
dev: size erasesize name
mtd0: 00040000 00020000 "misc"
mtd1: 00500000 00020000 "recovery"
mtd2: 00280000 00020000 "boot"
mtd3: 04380000 00020000 "system"
mtd4: 04380000 00020000 "cache"
mtd5: 04ac0000 00020000 "userdata"
Take note of the partitions you wish to backup. For instance, if it's system partition:
Type:
cat /dev/mtd/mtd3 > /sdcard/system.img
It will be backed up to your SDcard root as system.img.
The important partitions to backup include: boot, recovery, and system. This will give your device a clean Rom if restored; with your installed apps intact but without any data.
This is where the functional brain comes to play... ;)
Please leave your comments below if you experience any issues..
Labels: adb, android, backup, boot.img, how to, recovery, rom, stock firmware, system.img, xda
Thursday, April 2, 2015
How to Download Images From Instagram
Watch Video For Instructions
Download
Labels: how to, Instagram, Windows Tricks
Thursday, September 18, 2014
[ Solved ] How To Remove Shortcut Virus From Pendrive, Hard disk, Memory Cards
Many of you Will be Victims of Shortcut Virus that has Been infecting your Pen drives, Memory cards, Hard Disks etc and bothered about removing it. If you are Searching For Solution you are at write Place.
Requirements :-
1. Laptop or PC
2. Infected Removal Disks with Shortcut Virus ( Pen drives, Memory cards, Hard Disks etc )
3. Download USBfiX Free Software From Here
Caution : Save your Incomplete Works Before Perfoming Below Method
Method :-
1. Install UsbFix.exe Downloaded From Above link
2. Launch the UsbFix from Desktop Shortcut if it is not started automatically
3. After Program has launched as in above Image, Just Click on Clean Option and wait. You may not use your desktop while your USB Device us at Disinfection.
4. After Disinfection Procedure Click on Vaccinate to Prevent Future Infections From Shortcut Virus.
Watch Below Video Tutorial For Detailed Explanation
Labels: how to, Windows Tricks
Saturday, August 2, 2014
How To Use 2 Numbers of WhatsApp In One Device
Now You Can Use two whatsApp Numbers in one Device
Requirements:- Android Mobile 2.3+
- File Explorer { Es File Explorer Recommended }
- OGWhatsApp
- Official WhatsApp
- Little Brain
Procedure:
- First Backup your messages from existing WhatsApp Account (In case you want the messages)
- Uninstall your WhatsApp From your Device
- Open your File Explorer see for 'WhatsApp' Folder and Rename it to 'OGWhatsApp'
- DownLoad and install OGWhatsApp Form HERE
- Launch OGWhatsApp and Login with Your Existing WhatsApp Number
- Next Install Official WhatsApp From Play Store And Login With Your Second Number
- Hope you understood.
- Share This Trick With your Friends And Enjoy
Labels: android, how to, og whats App, whats app, WhatsApp Trick
Wednesday, April 23, 2014
What is CWM (ClockWorkMode) in Android
CWM (ClockWorkMod) Recovery in Android OS.
What is CWM Recovery ?smartphone recovery
Note:- Make a deep search before installing CWM on your android device. Make sure every thing work perfect.
| Rom Manager |
Labels: Android recovery, Clockworkmode Recovery, CWM Recovery, how to, recovery, Tutorial, what is recovery in android
Tuesday, April 22, 2014
Android System Recovery .
An Overview on Android System Recovery
Guide for Beginners.
smartphone recovery
What is Android System Recovery ?
How to Use Options in Android System Recovery ?
Reboot System Now.
Apply Update from external Storage .
Wipe data / Factory reset .
Wipe cache partition.
Labels: Android recovery, Android Tablet, how to, how to reset a android tablet, recovery, Tutorial, what is recovery in android
Wednesday, April 16, 2014
How to Disassemble the unknown tablet which does not have screws.
Tutorial
How to Disassemble / Open Wondermedia Tablets.
How to Disassemble the unknown tablet which does not have screws.
![]() |
| Wm8650 Tablet |
Mostly wondermedia tablets came with hidden screws. The one I am using for this tutorial same tablet with hidden screws. Many days I wonder how to open it , sometimes try to simply take off back cover of tablet but it was very hard. Then I searched a lot almost a whole day to find out how to disassemble this Wondermedia tablet. I found this tablet have four screw under the Front tape . A thick sticker is place on mostly wondermedia tablet ,look like touch glass.
1. You need tweezer (mobile opener).
![]() |
| tweezer to lift up touch screen hard tape |
![]() |
| Lift Up Touch Tape Wm8650 |
![]() |
| Hidden screws Inside tape |
![]() |
| Open Plastic Locks side by side wm8650 |
![]() |
| inside wm8650 Wondermedia Tablet |
![]() |
| inside Wondermedia tablets |
| Wondermedia Wm8650 Chip |
Salahuddin Ayubi Said , "Take a risk in life , if you fail , you will guide. If you succeed you will lead "
Labels: how to, Tutorial, WM8650, WonderMedia Tablets
Sunday, April 13, 2014
[ How To ] Hacking And Bypassing Android Password / Pattern / Face / PI
Credits: This Article Credit goes to XDA Developers http://forum.xda-developers.com
I am just posting this here for you
This Is For Educational Purposes Only
You Shall Not Use This On Other People Phones Without Permission Under Any Circumstances
I'm Not Responsible For Any Eventual Errors And Misbehaving Of Your Devices
Files And Tutorials Are Used And Partially Created According My Expirience And Also Collected From Internet & XDA Forums
All Regards Are Going To Their Authors
Requirements:
The Device Needs To Have Usb Debugging Enabled
In Case Usb Debugging Isn't Enabled And You Have Recovery,you Can Run The Same Instructions From Recovery
For Some Methods Root Is Not Required (Though It Will Be Better If Device Is Rooted)
If None Of This Methods Works For You - Unfortunally You Probably Must Full Wipe Your Device
METHOD I
Solution For Everyone With Recovery (Cwm, Twrp, Xrec,Etc...) Installed:
INSTRUCTIONS:
1. Download this zip Pattern Password Disable (Download from attachments) on to your sdcard (using your PC, as you cant get into your phone, right )
2. Insert the sdcard into your phone
3. Reboot into recovery mode
4. Flash the zip
5. Reboot
6. Done!
Note : If You See The Gesture Pattern Grid Or Password After Restarting, Don't Worry. Just Try Any Random Pattern Or Password And it Should Unlock.
METHOD 2
Solution For Everyone Without Recovery Installed - ADB :
What You Need:
=>A computer running a Linux distro or Windows+Cygwin
=>USB cable to connect your phone to the PC
=>Adb installed
How to install adb:
1. Open Terminal
2. Type:
sudo apt-get install android-tools-adb
3. Follow the instructions until everything is installed.
INSTRUCTIONS:
1. Connect you (turned on) Phone to the Computer via USB.
2. Open a terminal window.
3. Type:
adb devices
adb shell
cd data/system
su
rm *.key
Note : If You See The Gesture Pattern Grid Or Password After Restarting, Don't Worry. Just Try Any Random Pattern Or Password And it Should Unlock.
METHOD 3
Solution For Everyone Before Lock Accident :
SMS Bypass - Download Link - Install It On Your Device (Download from attachments)
This App Allows You To Remotely Bypass Your Phone's Screen Lock By Sending A SMS.
It Removes Your Gesture Pattern Or Password After Receiving A Preset Keyword Along With A Secret Code Via SMS.
SMS Bypass App Requires Root.
INSTRUCTIONS:
1.First, make sure you give permanent root access to the app.
2.Change the secret code to your preferred choice. The default password is : 1234
3.To reset your screen lock, send the following message from another phone:
secret_code reset
1234 reset
Note 2 : There is an option available to change the preset keyword. Default is : reset - Your phone will restart and your lock screen will be reset.
Note 3 : If You See The Gesture Pattern Grid Or Password After Restarting, Don't Worry. Just Try Any Random Pattern Or Password And it Should Unlock.
METHOD 4
Solution For Everyone Via Adb - SQL Command :
INSTRUCTIONS:
=>Type This Commands Separated In Your Terminal (CMD Prompt) :
adb shell
cd /data/data/com.android.providers.settings/databases
sqlite3 settings.db
update system set value=0 where name='lock_pattern_autolock';
update system set value=0 where name='lockscreen.lockedoutpermanently';
.quit
Note : If You See The Gesture Pattern Grid Or Password After Restarting, Don't Worry. Just Try Any Random Pattern Or Password And it Should Unlock.
METHOD 5
Solution For Everyone Via Adb - File Removal :
INSTRUCTIONS:
=>Type This Command In Your Terminal (CMD Prompt) :
adb shell rm /data/system/gesture.key
METHOD 6
Solution For Everyone With USB Debugging Enabled :
INSTRUCTIONS:
Primary Step for all method:
- Download & Extract to anywhere - Bypass Security Hack (Download from attachments)
- Open SQLite Database Browser 2.0.exe in SQLite Database Browser.
- Run pull settings.db.cmd inside By-pass security Hacks folder to pull out the setting file out of your phone.
- Drag settings.db and drop to SQLite Database Browser 2.0.exe program.
- Navigate to Browse data tab, At table there, click to list down the selection & selete secure
Instruction To Remove Pattern Lock:
- Now, find lock_pattern_autolock, Delete Record
- Close & save database
- Run push settings.db.cmd and reboot your phone
Instruction To Remove PIN Lock:
- Now, Find Or Create lockscreen.password_type, double-click & change it's value to 65536, Apply changes!
- Now, find lock_pattern_autolock, Delete Record, If doesn't exist, Ignore
- Close & save database
- Run push settings.db.cmd and reboot your phone
Instruction To Remove Password Lock:
- Now, find lockscreen.password_salt, Delete Record
- Now, find lockscreen.password_type, Delete Record
- Close & save database
- Run push settings.db.cmd and reboot your phone
Note : If You See The Gesture Pattern Grid Or Password After Restarting, Don't Worry. Just Try Any Random Pattern Or Password And it Should Unlock.
METHOD 7
Solution For Everyone With Recovery Installed :
INSTRUCTIONS:
1.Download and Copy Aroma File manager.zip (Download from attachments) to your memory card.
2. Open your recovery (press volume Down + Power button or it can be different according to the phones. Generally the phones who have press able button on the middle they have to press all three buttons. Google for you pattern there are lots)
3. There’ll b an option in recovery called “mount”. Go in that option and then mount all the cache and everything it is there.
4. Then select “update” and select “apply update from SD/external” and select aroma file manger.zip file that you downloaded using above QR code above.
5. After Flashing or updating, the aroma file manger will open. Use volume keys for up/down and power button 2 select like you use to get into recovery.
6. In aroma File manager , Go to menu , which is located in bottom strip and then select Settings.
7. Go to bottom n select “mount all partition in startup ” then exit from aroma file manger.
8. Now after exit , re-update that aroma file again and it will open again.
9. Go to data >> and then System.
Then find ‘gesture.key’ (for pattern lock) and ’password.key’ (for password lock) then long touch on gesture.key or password.key and sum option will be prompted , choose delete and delete that file and restart.
Note : If You See The Gesture Pattern Grid Or Password After Restarting, Don't Worry. Just Try Any Random Pattern Or Password And it Should Unlock.
ATTACHMENTS
Pattern-Password-disable.zip
SMSBypass.apk
By-pass security Hacks.7z
aromafilemanager.zip