Monday, September 18, 2017

Read And Write Tool For IMEI Solution Mediatek Spreadtrum Qualcomm

Read And Write Tool For IMEI Solution Mediatek Spreadtrum QualcommHi friends ! If you are looking complete package for all mobile IMEI issues, than you are right place right now, this post only for you , today i want share with you a small tool Read And Write Tool  For IMEI Solution (Mediatek Spreadtrum Qualcomm), Read&write tool is a small utility that allows you to flash IMEI on Mediatek

Labels: , , , , , , , , ,

Saturday, September 24, 2016

How To Fix/Change Invalid IMEI On Spreadtrum Devices Without Pc


Not everyone has the opportunity to use a pc to change there spreadtrum devices with IMEI issues, today am going to show you how to Fix/change spreadtrum device IMEI with this simple steps

1>>before we begin check your IMEI number by dialing *#06#

2>> After doing the above dial *#*#83781#*#* To enter Spreadtrum device  Engineering Mode

3>>Scroll down and click on Set Imei Button

4>>After Clicking on Set Imei button input the new imei number you want to use either for ''sim 1 or sim 2 '' if you feel like changing the two its your choice...you can generate imei number by downloading the app on google play store or you can open the back of your phone...most phones Imei  numbers are always writing there.

5>> After typing the new IMEI number click on Set Imei Button 

6>> Reboot Your device so that the settings can take place....after reboot dial *#06# to check new imei

Labels: ,

Saturday, September 17, 2016

Learn How To Flash / Upgrade Spreadtrum Devices

Hey guys today am going to show you how upgrade or flash spreadrum devices  using reaserch download tool, most people already know about this tool but i decided to do my own version that is prity much easy...i have made an easy step below so follow the guide carefully to avoid bricking your phone and you will be able to use this tool very well...Goodluck


How To Use RDT Tool Flash/Upgrade Spreadrum Devices

>>> Install Spreadtrum USB Driver on your Computer  Download Usb Driver Here

>>> Download Stock Rom (.pac) for your Android Device.

>>> Download and extract RESERCHDOWNLOAD   tool on your computer. After extracting, you will be able to see the following files:


>>>Open reseachdownload.exe. to launch the  software


when running the researchdownload don't forget to switch  off your device

click on the Load Packed Button and add the .pac file,the pack file is your stock rom which comes in .pac file as seen in the image below.


If you want to remove all look codes like pattern lock, phone lock ,gmail lock etc.
uncheck all , and flash only userdata fdl1


Once you have implemented the Stock Rom .pac file,Connect your Device and click on start and allow the process to run.


During the flashing process your device will restart automatically. Once flashing is completed, you will be able to see the Green Passed Message in researchdownload tool  which is shown in the image below


Labels: ,

How To Use GPG Dragon To Flash / Upgrade Spreadtrum Devices With PAC or BIN File


Hey guys today am going to show you how to use Gpg dragon to flash to flash/upgrade spreadtrum devices

>>Download and Install Spreadtrum USB Driver on your Computer.
Download an install spreadtrum drivers HERE
Download and extract gpg dragon from HERE

>Launch GPG Dragon
>Click on Spreadtrum Tab
>Tick WriteFlash
>Under Mobile Option, Select 6280_Android or 8810_Android
>Click the button with 3 dots [...] near C:\Temp_File.bin bar
>Select the pac or bin file you want to flash
>Click Start Button
>You will see Scanning USB Port
>Connect the spreadtrum device you want to flash to PC while holding volume down button
>GPG Dragon will Read the phone info and the pac or bin file info then you will see a message Waiting for your confirmation...
>Tick the partitions you want to flash and select OK (do not untick anything if you want to do full flash)
>You will see a purple progress bar with percentage completed.
>When flashing is complete, you will see a message All Done!
>You can now disconnect the device and reboot.

For those who want to remove pattern lock or Google account but too scared to do a full flash, just tick only UserData and flash


credit: romkingz

Labels: ,

Wednesday, April 27, 2016

How To Extract / Unpack IMGs From .PAC Spreadtrum Firmware Package

Previously, I published an article on how to flash stock firmware on any spreadtrum device, but some people find it difficult flashing the .PAC firmware package contained in the downloaded zip archive. This could be as result of too many reasons: wrong USB driver installation, outdated firmware flashing software, and a handful of other reasons.

In this article, you'll learn how to extract the important IMG files for flashing via fastboot, just in case flashing with a firmware installation software/program fails to deliver.

Requirements

How To Unpack .pac

Step One: Run Research Download Tool

Step Two: Once it is fully launched, click on the Load Packet icon.

Step Three: In the window that pops up, select the pac file you wish to unpack then click Open

Step Four: Wait for the pac file to load completely, the click the Settings icon

Step Five: Click to highlight any item on the list

Step Six: Now double-click on the highlighted item, right-click and copy the path

Step Seven: Paste the copied path to any text editor, Notepad probably

Step Eight: Open any folder and unhide all hidden items from the Options menu (the steps might vary slightly from the version of your Windows installation)

Step Nine: Navigate to the path in Step Seven above and you'll find all the files there

Done!

How To Flash via Fastboot
  • Launch fastboot via cmd (remember to download and install fastboot)
  • Copy the partition(s) to flash to your fastboot package directory
  • Reboot device in fastboot mode. Can be done via adb: connect to computer and type
adb reboot bootloader

  •  Once in fastboot mode, use the command below to flash the copied images
fastboot flash boot boot.img
 If you're flashing recovery image, replace boot and boot.img with recovery and recovery.img.
Done!

Image credits: Hovatek

If you have any questions, suggestions or complaints please ask in comments section.

Share and like this article if it has been helpful to you.

Labels: , ,

Tuesday, April 12, 2016

How To Backup Spreadtrum Android Phone Firmware


Backing up your phone's firmware is very important and necessary if you're the type that loves trying new stuffs on your device. Like rooting, flashing kernels, custom roms, etc.

Also, if you want to build a custom rom for your device, a backup of your original firmware is required if you do not have a downloaded firmware package.

If you want to backup a device from another chipset, click here.

Requirements

Now, navigate to C:\user\.android\adb_usb.ini  and edit via Notepad++ or any text editor. Add this PCI ID to the file, to inform adb that you're working with a Spreadtrum device.
0x1782
Save and exit.

How To Backup Spreadtrum

  • Once you have fulfilled the requirements above, launch Command Prompt and key in the following commands hitting Enter button after each command line.
Note: be sure to launch cmd from where your downloaded backuptools.tar archive is located.

Commands:
adb push backuptools.tar /data/local/tmp
adb shell su -c "tar -xvpf /data/local/tmp/backuptools.tar"
adb shell su -c "./mkbackup.sh"

Wait for sometime then check the backup folder in your sdcard and you will find the backup files of your phone's firmware.

If you get an error message like: sh: applet not found, uninstall the busybox you have installed and install this- Busybox.

To learn how to flash or install stock firmware on your Spreadtrum phone, click here.

If you have any questions or complaints, please post in comments section. Don't forget to share if you find this useful.

Labels: , ,

Saturday, April 2, 2016

HOW TO PORT ROM SPREADTRUM SC7731-SC7731* (LOLLIPOP)

HOW TO PORT ROM SPREADTRUM SC7731
This tutorial teach you how to port devices like Spreadtrum  version SC7731 Lollipop. We know a lot of porting method can find in google but this method is one of the best porting method in android.


porting spreadtrum sc7731 to sc7731


Note:
* I'm not responsible for any damages will be held! Do at your own risk!

*SC7731 LOLLIPOP*

REQUIREMENTS:
1. PC
2. winrar
3. factory download (unpack pac)
4. ext4 unpacker (unpack system.img)
5. META-INF

Procedure:
1. Download Rom or (PAC FILE)

2. Load PAC File in Research Download

3. Get the system.img

4. Extract System.img Follow this tutorial on how to extract here

5. Replacing Files (from base to port)
Base-Stock 
Port-Custom

Boot.img

bin> sensorservice

etc>Bluetooth
    dhcpcd
    wifi   
    permissions
fallback_fonts.xml

lib>egl  
    modules  
    libsurfaceflinger.so
    libsensorservice.so
    libmedia_jni.so
    libEGL.so
    libGLES_trace.so
    libGLESv1_CM.so
    libGLESv2.so
lib>hw>Camera.sc8830.so
       sensors.so
  
all usr > except keylayout   

CREDITS:
Rafael A. Broas
Aji Permana Sidik
Hadi Khoirudin

Labels: , , ,

Monday, February 8, 2016

How to make full dump in Spreadtrum via ADB command or Terminal Emulator

How to make full dump in Spreadtrum via ADB command or Terminal Emulator.
This method is work in Spreadtrum SC8830 Chipset using ADB COMMAND or Terminal Emulator.
This also work in SC7731 Chipset manually backup your .img files.
Make sure you have enough space on Sdcard.


Spreadtrum backup and fulldump


Requirements:
Terminal emulator (Download via Playstore)

Spreadtrum device


First open terminal emulator
type su
and type this command one by one and wait to finish:

1.)For Boot.img
Type this ⬇

dd if=/dev/block/mmcblk0p16 of=/storage/sdcard0/boot.img

2.)For Cache.img
Type this ⬇

dd if=/dev/block/mmcblk0p18 of=/storage/sdcard0/cache.img

3.)For Fbootlogo.img
Type this ⬇

dd if=/dev/block/mmcblk0p15 of=/storage/sdcard0/fbootlogo.img

4.)For Logo.img
Type this ⬇

dd if=/dev/block/mmcblk0p14 of=/storage/sdcard0/logo.img

5.)For Misc.img
Type this ⬇

dd if=/dev/block/mmcblk0p20 of=/storage/sdcard0/misc.img

6.)For Miscdata.img
Type this ⬇

dd if=/dev/block/mmcblk0p2 of=/storage/sdcard0/miscdata.img

7.)For Prodnv.img
Type this ⬇

dd if=/dev/block/mmcblk0p1 of=/storage/sdcard0/prodnv.img

8.)For Recovery.img
Type this ⬇

dd if=/dev/block/mmcblk0p19 of=/storage/sdcard0/recovery.img

9.)For System.img
Type this ⬇

dd if=/dev/block/mmcblk0p17 of=/storage/sdcard0/system.img

10.)For Userdata.img
Type this ⬇

dd if=/dev/block/mmcblk0p21 of=/storage/sdcard0/userdata.img


This portion is optional since we need this file to complete your backup.

11.)For Wcnfixnv1.img
Type this ⬇

dd if=/dev/block/mmcblk0p7 of=/storage/sdcard0/wcnfixnv1.img

12.)For Wcnfixnv2.img
Type this ⬇

dd if=/dev/block/mmcblk0p8 of=/storage/sdcard0/wcnfixnv2.img

13.)For Wcnmodem.img
Type this ⬇

dd if=/dev/block/mmcblk0p13 of=/storage/sdcard0/wcnmodem.img

14.)For Wcnruntimenv1.img
Type this ⬇

dd if=/dev/block/mmcblk0p9 of=/storage/sdcard0/wcnruntimenv1.img

15.)For Wcnruntimenv2.img
Type this ⬇

dd if=/dev/block/mmcblk0p10 of=/storage/sdcard0/wcnruntimenv2.img

16.)For Wdsp.img
Type this ⬇

dd if=/dev/block/mmcblk0p12 of=/storage/sdcard0/wdsp.img

17.)For Wfixnv1.img
Type this ⬇

dd if=/dev/block/mmcblk0p3 of=/storage/sdcard0/wfixnv1.img

18.)For Wfixnv2.img
Type this ⬇

dd if=/dev/block/mmcbpk0p4 of=/storage/sdcard0/wfixnv2.img

19.)For Wmodem.img
Type this ⬇

dd if=/dev/block/mmcblk0p11 of=/storage/sdcard0/wmodem.img

20.)For Wruntimenv1.img
Type this ⬇

dd if=/dev/block/mmcblk0p5 of=/storage/sdcard0/w
runtimenv1.img

21.)For Wruntimenv2.img
Type this ⬇

dd if=/dev/block/mmcblk0p6 of=/storage/sdcard0/wruntimenv2.img


Note: sdcard0 is your external sdcard
          sdcard 1 is your internal sdcard

Congrats you have backup now and can use this for future  purposes like Porting Rom and Recovery.


Credits:
http://androidcribs.com
Rowel Crisostomo
My23 group
other not mention

Labels: , , ,

Thursday, December 17, 2015

How to fix Deadboot / Hardbrick MyPhone My 27

How to fix Deadboot / Hardbrick MyPhone My 27

MYPHONE


DISCLAIMER: DO THIS AT YOUR OWN RISK. THIS WILL DAMAGE YOUR PHONE PERMANENTLY IF YOU DONT FOLLOW INSTRUCTIONS. I WILL NOT BE HELD RESPONSIBLE IF YOU DAMAGE YOUR PHONE.


REQUIREMNTS:
  - PC
  - Micro USB to USB Cable


INSTRUCTIONS:
  - Download all files needed
  - Install Spreadtrum Drivers (Link Below For Spreadtum Driver)
  - Extract my27-Unbrick-File.rar
  - On the extracted my27-Unbrick-File.rar, right click on the ResearchDownload.exe, select Run as Administrator
  - On Research Download, click the Double Gear Icon on the top. (the 2nd Icon)
  - Check only FDL1, FDL2, SYSTEM, USERDATA
  - Again Check only FDL1, FDL2, SYSTEM and USERDATA, uncheck everything else
  - Click Play (the triangle icon)
  - Turn off your my27
  - Press and Hold Vol. Up and Vol. Down.
  - Connect it to your PC via USB Cable while still pressing Vol. Up and Vol Down.
  - when it starts loading you can let go of the volume keys
  - Wait until Research Download finish loading
  - when Finish, you can now remove your phone
  - Remove Battery and put it back now you can turn on you my27.
  - 1st Boot is around 10mins


SPECIAL THANKS:
MARK ALOCEJA

CREDITS:
  - SoCr@Te
  - HamDie Kona Kaya
  - Michael Liceralde
  - Klark Luis Fajardo Peralta
  - XDA

Labels: , , , ,

Wednesday, December 16, 2015

[ROM] XPERIA ROM for CM FLARE S3 LITE (kitkat)

[ROM] XPERIA ROM for CM FLARE S3 LITE (kitkat)
Spreadtrum SC8830/7731Chipset
XPERIA ROM

REQUIREMENTS:
Rooted

ROM LINK:

*PROCEDURE*

Step 1.Remove battery and place back again to make sure your phone is off.
Step 2. RECOVERY MODE
Press And Hold Power Button First, After 1 sec 
Press Volume Down. When "Flare S3 Lite" Appear In The Screen , Release The Power Button.
Just Press And Hold Volume Down Until "No Command" or "没有命令" Apper In The Screen
Press Volume Button To See The Options. -Use Volume Button To Scroll Up/Down. And Power Button To Select

Step 3. Once you see "apply update from external storage" .. go there.. locate  CWM (Philz_Non_Touch_Recovery).. Just update Click. yes yes  until blue sky appear

Step 4. NOTE: MAY BUG KASI YUNG CWM.. akala mo lumalaktaw pag pinipress mo ung volume twice... ung totoo hindi talaga lumalaktaw un.. kaya kaylangan nyo dito is COMMONSENSE...yan ang pang anim na sense ng tao..

Step 5. then Go to wipe data/factory reset... Then clean to install new rom.. wait to finish wiping.

Step 6. Now install zip ... GO TO CHOOSE ZIP FROM ext- sd card... Locate XPERIA ROM... Then install mo Click yes and  yes again '.. wait  until success 

Step 7. sa CWM parin back .. back... back... reboot the device na. yes..yes. tapos auto matic pupunta sya sa stock recovery... ngaun reboot the device ulit... NOW SEE WHAT YOU GOT...

common bug

di kaya mag uninstall ngapp ang launcher ng xperia.. kaya kung may iuunstall kayo direct na kayo sa app manager..

ENJOY

PAG MAY PROBLEM.. FACTORY RESET O REFLASH LANG HA'
PAG WALA PARIN.. FLASH KA NA LANG STOCK ROM..

credits 
advan s4k star mini

special thanks
TAWAGIN MO AKONG JONG
HAMDIE KONA KAYA
JOHN HERO POLENCIO
JHUN

Labels: , , ,

Thursday, November 26, 2015

How to flash stock rom/ firmware on any spreadtrum android device

This post will guide you on how to flash stock rom/firmware on any Android spreadtrum device. In this post, iTel will be used to demonstrate the flashing process.

REQUIREMENTS

  • Pc
  • Spreadtrum Device
  • Spreadtrum driver (download from post)
  • A usb cable
  • Spreadtrum upgrade tool

HOW TO FLASH
  •  Download and Install Spreadtrum USB Driver on your Computer. If in case Spreadtrum Driver is already installed on your computer then SKIP this Step. 
  •  Download .pac firmware for your device (Itel, other
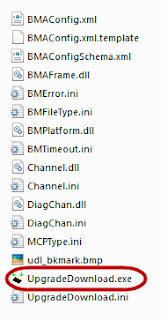
  •  Download and extract Spreadtrum Upgrade Tool on your computer. After extracting, you will be able to see the following files: 
Learn to backup your Spreadtrum device here

  •   Now, open UpgradeDownload.exe.

  • Once Spreadtrum Upgrade Tool is launched, connect your Android device to the computer (make sure your device is switch off).
  • If Smartphone is properly connected to the computer, click on the Load Packed Button and add the .pac file (stock rom which comes as .pac).
  • Having successfully added the .Pac file in Spreadtrum Upgrade Tool, click on the Start Downloading button to begin the flashing.
  • During the flashing process your device will restart automatically. Once flashing is completed, you will be able to see the Green Passed Message in Spreadtrum Upgrade Tool.
  • Now you have successfully flashed your Android Device using Spreadtrum Upgrade Tool. After device is booted up successfully, Go to Settings > About Phone > Check firmware.
  • Done!
If you experience any difficulty flashing or installing your device firmware using this method, please refer to this guide for manual firmware installation method. You can also learn how to extract contents of your .pac firmware here.

Questions? please ask in comments!

Labels: , ,